[2026] Fix Can’t Import Photos from iPhone to Mac
Photos not importing from iPhone to Mac? We have heard a lot about this problem recently. And if you’re struggling with the same issue, we can help you out here. Read more in detail!
Most of the time, transferring iPhone images to a Mac is straightforward. All you need to do is link your iPhone to the Mac computer, then access the Apple folder to copy photos on Mac. Unfortunately, there are situations like new photos can not import from iPhone to iPhoto, cannot import photos from iPhone to mac unrecognizable file format, etc.
Additionally, the Photos app on Mac will occasionally fail to identify your iPhone. Even if your iPhone can be identified, the Photos application might get stuck when importing photos. Thus, we’re here to offer you the solution to your “My Photos Not Importing from iPhone to Mac” problem. Let’s get started!
Why Are my Photos Not Importing?
Transferring too Many Photos Simultaneously
Firstly, if you are importing many photographs from your iPhone to your Mac simultaneously, say 1500 photos, the Photos app may get stuck in the middle of the import process.
Optimize iPhone Storage
When you turn on Optimize iPhone Storage option from iCloud Photos, full-resolution photos and videos are automatically replaced with smaller versions if your iPhone has low storage. Photos may be no imported because you need to download full-resolution photos first.
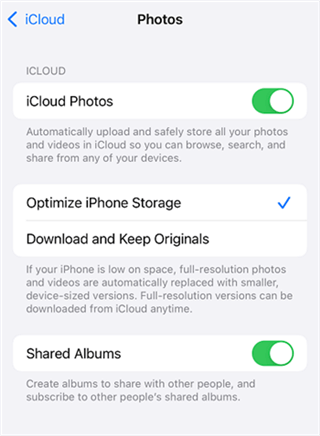
Optimize iPhone Storage
Unrecognizable Photo Format
One of the main reasons you can encounter while transferring pictures from your iPhone to a Mac is the unrecognizable format of the picture. Yes, that’s true. At times, you have to make sure you are transferring the right file format, which is also accepted by the receiving device. Otherwise, you can face issues such as file transfer failure.
Also Read: How to Fix Can’t Import HEIC Photos to Mac >
Connectivity Issues
The last probable explanation is that your Mac cannot identify the attached iPhone. A broken cable or a system malfunction might cause this connection problem.
How to Save iPhone Photos on Mac [Solved]
In this part of our article, we have gathered the best solutions to fix your “MacBook not Importing Photos from iPhone” problem. We are sure that the following tips will help you solve the matter entirely.
1. Disable iCloud Photo Library
As long as you’ve enabled iCloud Library, iPhoto can’t import photos from your iPhone to your Mac over USB since they’re held in iCloud and can’t be transferred. Proceed as follows to disable iCloud Photo Library:
Step 1: Go to “Settings” on your iPhone and choose “Profile.”
Step 2: Turn off iCloud Photos by going to iCloud > Photos and clicking the toggle switch next to it.
Further Reading: How to Fix Photos Missing from iCloud Photo Library >
2. Import Only a Few Pictures Simultaneously
Transferring too many photos simultaneously from an iPhone to a Mac might cause the photos program to become sluggish, so try importing a few photos at a time.
3. Reset the Location and Privacy of your Device
If you’re having trouble transferring images from your iPhone to your Mac, it’s possible that the connection issue generated by your location or privacy settings is to blame.
Step 1: Restore your iPhone’s location and privacy settings by going to Settings > General > Reset/ Transfer or Reset iPhone.
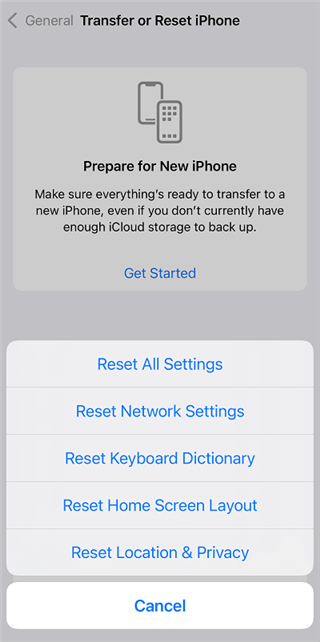
Reset the Location & Privacy
Step 2: Connect your iPhone once again to your Mac.
Step 3: Tap the Trust button whenever the Trust the Mac notice pops up on your iPhone.
4. Restart Your devices
When your device has a minor malfunction, the best action is to restart it. If the Photos application is stopped at importing photos on Mac, try restarting your iPhone and Mac.
5. Repair Home Folder Permissions
By correcting the Home Folder permissions, many users could rectify this issue. There are a few things to keep in mind when it comes to the location of your Mac’s desktop and other data:
Step 1: Recovery Mode may be activated by pressing Command + R on the Mac keyboard.
Step 2: Select Terminal from the utility menu. Then press the Return key and enter “repairHomePermission.”
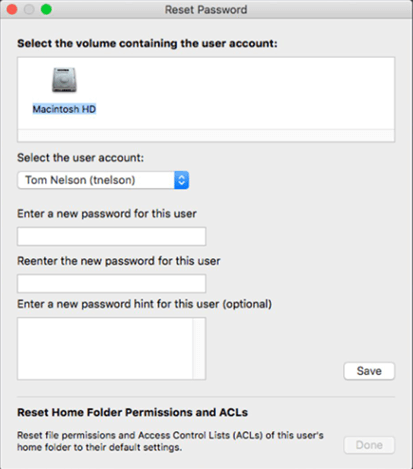
Repair Home Folder Permissions
Step 3: Enter the password for the admin account you want to use. Click the Next button. Wait for the procedure to finish, then press Exit.
Step 4: Restart in normal mode.
6. Repair the Phone Library
Many people have verified that repairing their library can also be the solution to this problem. Here’s how:
Step 1: Stop using Photos on Mac. Click the Command + Option buttons as soon as the app has been launched for a second time.
Step 2: To restore the Photos library, the Repair Library prompt will appear on the window in a matter of seconds.

Repair Library
Step 3: To begin the repair procedure, choose Repair from the drop-down menu.
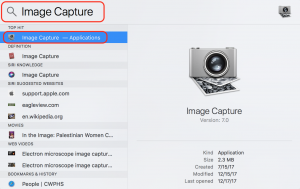
7. Use Image Capture to Save iPhone Photos on Mac
If you want to save images from your iPhone to your computer instead of just sending them over iCloud, use Image Capture. If you’re short on time and don’t want to spend time troubleshooting the issue, this is a temporary solution.
We’ve previously written a step-by-step tutorial on how to import iPhone photographs into Image Capture on Mac. To summarize, you’ll want to perform the following:
Step 1: Open Photos on your Mac and choose “Import from iPhone” from the Import menu.
Step 2: Don’t open Photos on your iPhone at this time.
Step 3: Once you’ve done that, unlock your phone and disable Auto-lock.
Step 4: Choose your iPhone in Image Capture.
Step 5: Next, go back to Photos and choose Import All.
Save iPhone Photos on Mac via Image Capture
You May Need: How to Fix Image Capture Not Working/Not Recognizing iPhone >
Import Photos from iPhone to Mac Directly
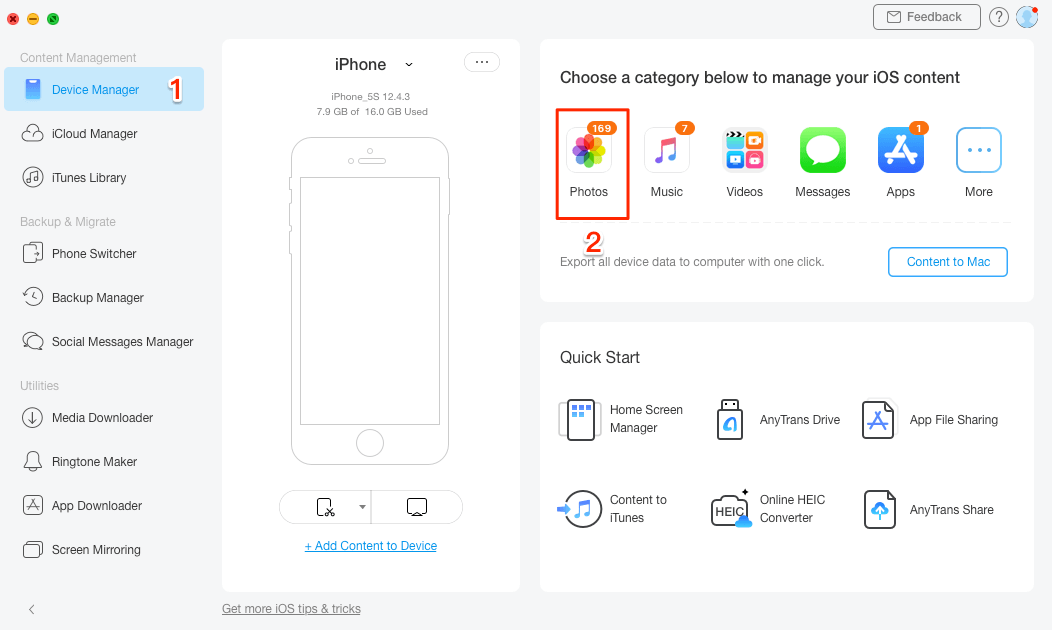
To transfer photos from iPhone to Mac without any hassle, you can use AnyTrans. It is a full-way data transfer tool, which allows you to transfer any data, including photos between iPhone and Mac/Windows. During the transfer, you can preview and move photos selectively or wholly. Besides, AnyTrans makes it easy to migrate an old iPhone to a new iPhone when you change to a new iPhone 17. What’s more, as an iOS data transfer and managing tool, it’s easy to manage your phone data, iTunes/iCloud data, or social messages like WhatsApp, Line, etc.
Now, check the steps below to import photos from iPhone to Mac:
Step 1. Once you get AnyTrans on your Mac, connect your iPhone to the computer. After detecting, click the Photos category.
Free Download * 100% Clean & Safe
Connect iPhone to Mac
Step 2. Here you can preview all the photos on your iPhone. Choose what you need and click To Mac button.

Select Multiple Photos from iPhone to Mac
Step 3. Once the transferring process is completed, click View Files and check the photos on your Mac.
How to Transfer Photos from iPhone to Mac Wirelessly
You have two options here: Airdrop and/or Mail. The use of wireless techniques, including Airdrop and Mail, to transfer images from an iPhone to a MacBook may also be a speedy solution to the connectivity or stalled issue.
Step 1: To enable Bluetooth on your iPhone, go to Settings > Bluetooth and choose Enable.
Step 2: Open the Photos app on your iPhone or iPad and choose the photos you wish to import to your Mac computer.
Step 3: Select Airdrop from the Share drop-down menu on the left-hand side of the screen.
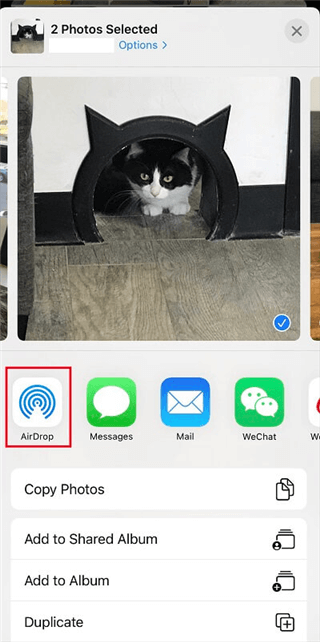
Airdrop Photos from iPhone to Mac
Step 4: Select the Mac computer to which you want to transfer the photographs. If your Mac device does not show, make sure your Bluetooth settings are correct.
Step 5: Wait for your photographs to be transferred from your iPhone to your Mac.
If Airdrop does not work, you may alternatively try sending photos over email, which follows the same processes as Airdrop but DOES NOT need Bluetooth capability.
The Bottom Line
For the most part, transferring images from your iPhone to an Apple computer should be a breeze. If you’re facing the “My Photos Not Importing from iPhone to Mac” issue, try the methods listed above. We are sure the solutions explained above will comfortably solve your problem. Good luck!

Joy Taylor is a seasoned technical writer with over a decade of experience in mobile technology. At iMobie, she specializes in producing in-depth content on iOS data recovery, iPhone unlocking solutions, and iOS troubleshooting.
Product-related questions? Contact Our Support Team to Get Quick Solution >
