How to Fix Image Capture Not Working/Not Recognizing iPhone
If the Image Capture app is not working and you are unable to import your iPhone photos over to your Mac, the following guide will teach you how to fix the issue and be able to transfer photos from iPhone to your Mac machine. Read on to learn how.
Mac Tips & Issue Fixes
Mac Related Tips
Plugging in phone via cable. Image Capture launches and can see the device, but no images or videos show up in the list. Device is accessible in iTunes, photos are showing up in the contents bar so the computer knows I have photos on the phone (there’s over 500 on there), just Image Capture can’t see them. Any help appreciated.
Image Capture is a photo utility app that comes preloaded on most Mac machines. The main purpose of the app is to help you import photos from various photo devices over to your machine. It has support for iOS devices as well so you can use it to import photos, say from your iPhone over to your Mac in a few clicks.
While it seems there are some users who are facing an issue with the app as the above user mentioned. The Image Capture app is not recognizing the iPhones of these users, iPhone photos not loading and as a result, the users are unable to get their iPhone photos on their Macs. If you are one of these users and are suffering from the issue, the following guide should help you out.
The following are some of the common solutions that you can apply to get rid of the issue on your machine. Many of these methods have proven to work for users who were troubled by the Image Capture app not being able to detect their iPhones.
Solution 1. Unplug and Re-plug Your iPhone
If the Image Capture app does not recognize your iPhone in the first attempt, you may want to try unplugging your iPhone from your computer and then plugging it back in after a few minutes. This will deactivate the port you use on your machine and then reactivate it and it will likely resolve the issue for you.
Solution 2. Update Mac System
Some older Mac system versions are not compatible with the new iOS system. So if you’ve updated your iPhone to the newest iOS version, you need to check your macOS system and update it to the latest version. Here are the steps for How to update the software on your Mac:
- Choose System Preferences from the Apple menu, then click Software Update to check for updates.
- If any updates are available, click the Update Now button to install them. Or click ”More info” to see details about each update and select specific updates to install.
- When Software Update says that your Mac is up to date, the installed version of macOS and all of its apps are also up to date. That includes Safari, iTunes, Books, Messages, Mail, Calendar, Photos, and FaceTime.
Solution 3. Re-trust Your iPhone in the iTunes App on Your Mac
You may wonder why you need to re-trust your iPhone in the iTunes app as all that you want to use is the Image Capture app. Well, iTunes provides universal authentication for your iPhone on your Mac and therefore getting your iPhone re-trusted in the iTunes app will let you use your device in the Image Capture app as well. And you can do as follows:
- Unplug your iPhone from your Mac if it is already plugged in. Plug the device back in after a minute or so.
- Launch the iTunes app on your computer and you will be asked to trust the computer on your iPhone. Tap on Trust on your iPhone and it will let you move ahead.
- Open the Image Capture app on your Mac and you should find that the app has now detected your iPhone.

How to Fix Image Capture Not Working – Re-trust Your iPhone
Solution 4. Delete the Image Capture Preferences Files
If there is any misconfiguration in the settings of the app, it could be preventing it from being able to recognize your iPhone. One way to resolve this is to reset the preferences of the app on your Mac and you can do it as the following.
- Open a Finder window and head to the /Library/Preferences/directory, then the directory is named “com.phaseone.captureone##” or “com.captureone.captureone##”. ## is the number that represents the Capture version.
- When the directory opens in Finder, find the following two files and move them to your desktop. Make sure you move and not copy them to your desktop.
- Restart your Mac and then launch the Image Capture app.
Solution 5. Enable My Photo Stream on Your iPhone
While not so relevant to the app, there is a solution that asks you to enable the photo stream feature on your iPhone to fix the Image Capture issue on your machine. There is no harm in applying the solution to your device although it is not totally relevant and the following is how you do it.
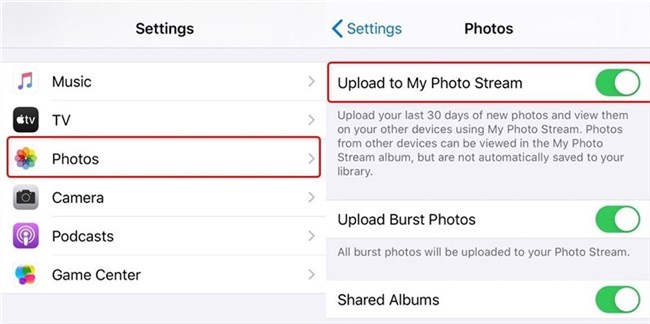
- Launch the Settings app on your iPhone and tap on Photos.
- On the screen that follows, you will find an option that says Upload to My Photo Stream. Enable the option by turning its toggle to the ON position.
- Connect your iPhone to your computer and launch the Image Capture app. The app should recognize your device.
Enable My Photo Stream on iPhone
Solution 6. Disable the Optimize Storage Option on Your iPhone
When you import photos from your iPhone to your Mac, you probably want to get all of your photos in their original resolution. However, your iPhone will only keep the low resolution photos if you have the optimize storage option enabled on your device. This is because your original resolution photos are saved on the iCloud and your iPhone only shows thumbnails of those photos.
Disabling the option will fetch all of your photos in their original resolution from your iCloud account over to your iPhone and the following is how you do it.
Step 1. Launch the Settings app on your iPhone and tap on your name followed by iCloud and then Photos.
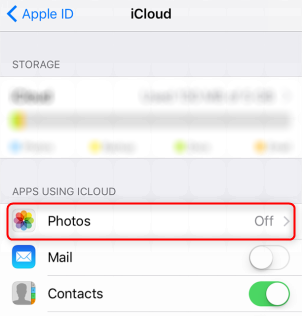
How to Fix Image Capture Not Working – Disable the Optimize Storage Option on iPhone
Step 2. Under the iCloud Photo Library option, you will see two options out of which you can only checkmark one at a time. Tap on the option that says Download and Keep Originals to disable the optimize storage option on your iPhone.
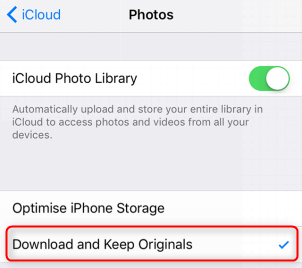
Disable the Optimize Storage Option on iPhone
Solution 7. Turn Off iPhone and Turn it Back On
If the above methods are still not working – iPhone photos not showing up on Mac. Here is another minor tip that you can use, which is turn off iPhone and turn it back on when it’s connecting with computer. You can follow the steps:
After you plug your iPhone into your Mac and open Image Capture, keep the phone plugged in and Image Capture open. Then, turn off the phone and turn it back on again. As soon as it turns back on and your enter your passcode, Image Capture should detect your iPhone and upload all photos on your iPhone.
Bonus Tip: Fix Photos not Showing Up on Mac without Image Capture
If none of the above methods worked for you, you may want to drop the idea of using Image Capture to import your iPhone photos to your Mac. That does not mean there exists no way to transfer photos from your iPhone to your Mac, though. Meet AnyTrans, an application that makes it possible and extremely easy to import iPhone photos to your Mac or even a Windows PC without the need of the Image Capture app.
- It enables you to transfer all kinds of iPhone photos. Like My Photos, Shared Albums, My Photo Stream, Live Photos and more, all can be transferred directly to your computer.
- All photos shall be saved in its original quality. Without quality loss, all photos will be kept in its original picture quality after being transferred to Mac/PC.
- All photos will be organized in its original categories. Without the need to sort out photos, all your iPhone photos shall be categorized into folders once it is transferred to your computer.
- Transfers Photos from iPhone to Mac in other formats. You can import live photos from iPhone as MP4/M4V, export Heic photos to JPG to a computer.
It supports transfers of dozens of other file types like music, messages, contacts, apps, however, we will only be focusing on the photo transfer feature of this tool so you can get your job done. Download it to your Mac or Windows computer now and here’s how to transfer photos from iPhone to Mac with AnyTrans:
Free Download * 100% Clean & Safe
Step 1. Launch AnyTrans on your Mac > Plug-in your iPhone to your Mac using a compatible cable > Click on Device Manager at the left-side menu > Then, Click Photos or you can select the option that says Content to Mac.
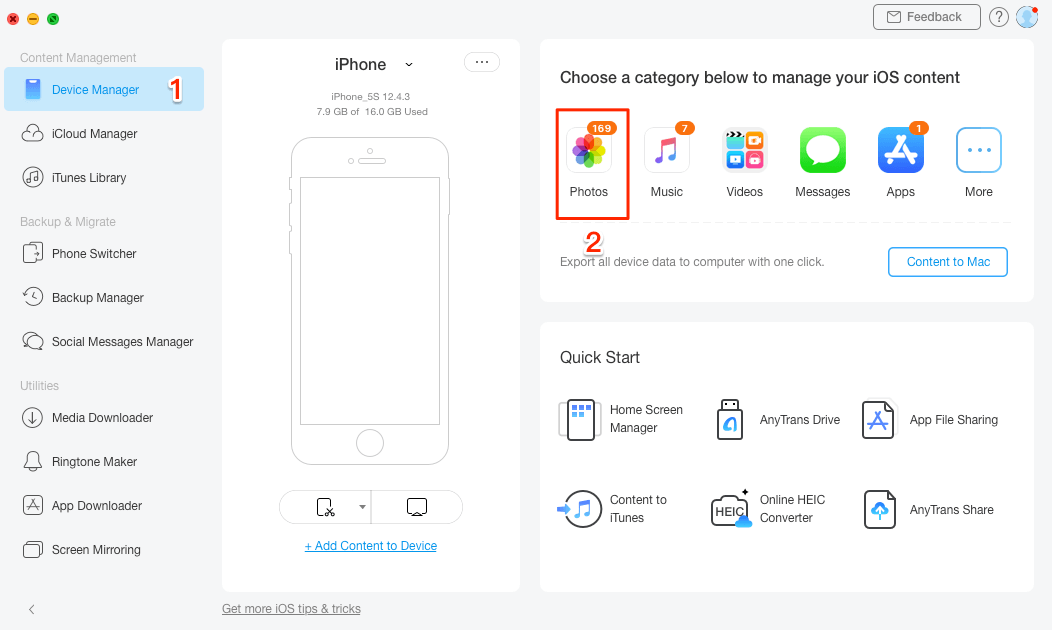
Go to Device Manager to Transfer Selected or Multiple Photos from iPhone
Step 2. On the following screen, click on My Photos (or choose other categories like Places, People, and son on) > Select the photos you want to transfer > Tap on the Send to Mac icon to move forward with the process.

Choose Photos and Click Send to Mac
Step 3. The app will start importing photos from your iPhone over to your Mac. It ensures your photo folder structure is intact so you can easily find the photos you want to view.
Further Reading: How to Fix iPhoto Not Recognizing iPhone
The Bottom Line
If the Image Capture app fails to recognize your iPhone, you have a number of ways to fix the issue and get the app to do your task. If all fails, you have AnyTrans which can be used as an alternative to the Image Capture app on your computer. Give it a try and get easier iOS data management.
More Related Articles

Senior writer of the iMobie team as well as an Apple fan, love to help more users solve various types of iOS & Android-related issues.
Product-related questions? Contact Our Support Team to Get Quick Solution >
