How to Transfer Music from Mac to iPhone with/without iTunes
How can I transfer music from Mac to my new iPhone? This quick guide is prepared for those who don’t know how to download music from MacBook, iMac or Mac mini to iPhone.
Mac Tips & Issue Fixes
Mac Related Tips
The iPhone is a portable music player for you to enjoy the most popular songs, from a cup of coffee in a shop to a long trip to Egypt, it would be a pleasant experience to listen to your favorite songs with your iPhone.
If you want to add music from your Mac to your iPhone and don’t know how to do it, here in this post, we will introduce 4 available methods for you. You can choose the one that you find most convenient. Just follow the rest part to get the answer.
Also Read: How to Transfer Music from iPhone to Mac >
Part 1. Transfer Music from Mac to iPhone with iTunes Sync
iTunes is the first recommended option to go when you want to transfer music from Mac to iPhone, but you need to know that iTunes will erase all your existing media data on iPhone while syncing music from Mac to iPhone. Please make sure you have made backups for your media data.
Step 1. Open iTunes and update to the latest version on your Mac computer.
Step 2. Connect your iPhone to the Mac via a USB cable, and click the Device icon.
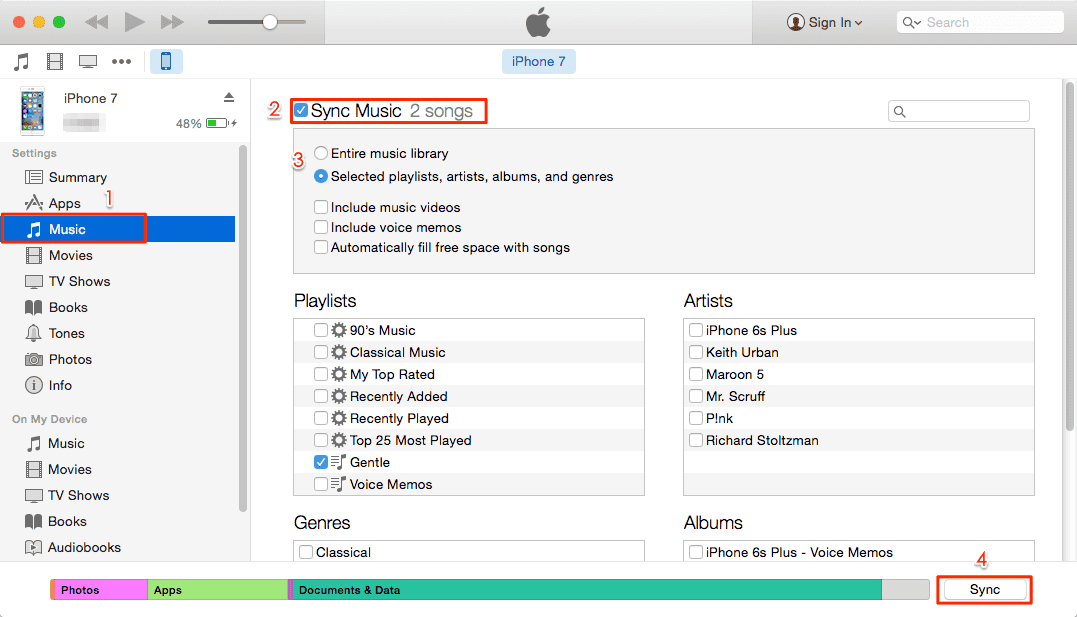
Step 3. Choose Music under the Summary category and click Sync Music.
Step 4. Check either the Entire music library or Selected playlists, artists, albums, and genres. And choose the detailed items you want to sync to iPhone.
(If the music you want to add to your iPhone is not in your iTunes library, then just go to File > Add File to Library first before Step 2.)
Step 5. Click Sync to start copying music from Mac to iPhone with iTunes.
How to Transfer Music from Mac to iPhone with iTunes
With macOS Catalina, your iTunes media library is now available in the Apple Music app, Apple TV app, Apple Books app, and Apple Podcasts app.
Part 2. Transfer Music from Mac to iPhone with Finder
As we have mentioned above, with macOS Catalina, there’s no iTunes Library anymore, as a result, you can use Finder to manage and sync content on your iPhone, iPad, and iPod touch. So check the guide below to see how to use Finder to transfer Mac music to iPhone.
Step 1. Connect your iPhone to your Mac, and then open Finder.
Step 2. In the Finder window, select your device and select the “Music” tab.
Step 3. Select “Sync music onto [device name]” to turn on syncing of your music. You can choose to sync the entire library or selected artists, albums, genres, and playlists.
Step 4. After the setup is done, click Apply to start.
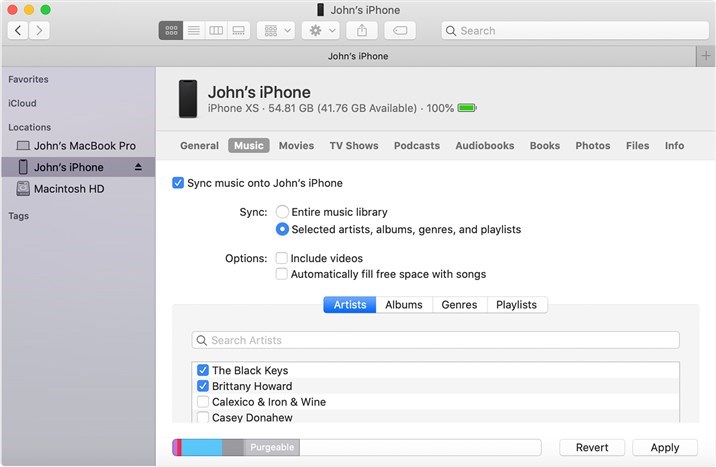
Sync Mac Music to iPhone with Finder
Part 3. Transfer Mac Music to iPhone with Cloud Drive
Apart from Apple’s tool, cloud drive is also a great choice to transfer content between a computer and an iPhone. Most of the cloud drives work in a similar way, here we take Google Play Music as an example.
Step 1. Download Google Play Music on both of your Mac and iPhone.
Step 2. Launch Google Play Music on your Mac, log in with your account.
Step 3. Upload the music stored on your Mac to the cloud drive. You can choose to upload the music from the iTunes, Music folder, or other folders with the music you want to transfer.
Step 4. Log in to the same account on the iPhone as the account on the Mac.
Step 5. Find the music you’ve uploaded, download them to your iPhone.
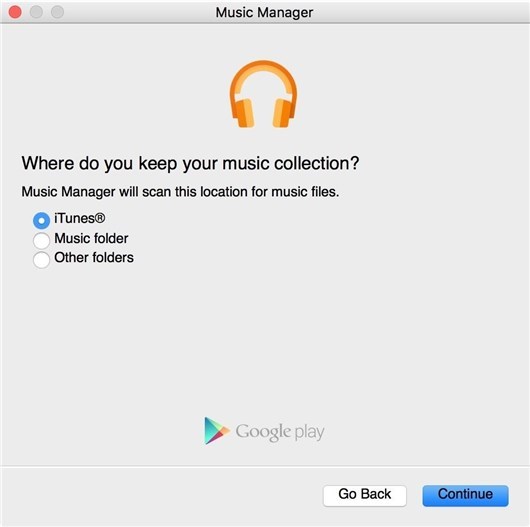
Upload Mac Music to Google Play Music
Part 4. Transfer Music from Mac to iPhone with Third-Party Tool
The Tool You Will Need
- An iPhone and an iPhone USB cable;
- A Mac computer;
- An iPhone content manager, AnyTrans.
AnyTrans is said to be the best alternative to Apple iTunes on data transferring & managing. It allows you to import or export music from/to Windows and Mac computer freely. Unlike iTunes syncing, when putting songs from Mac to your iPhone with AnyTrans, no data will be replaced. You can put your loved songs anywhere you like. Additionally, it supports transferring media files among iDevice, computer, and iTunes. Besides music, photos, such as moving photos from iPhone to Mac computer, videos, apps, contacts, messages, notes, voice memos, ringtones are all supported files by AnyTrans.
First of all, free download and install AnyTrans on your computer, and there are two versions of AnyTrans for you: Windows and Mac. Follow the steps below to get music from Mac to iPhone.
Step 1. Run AnyTrans on your computer, and connect your iPhone to Mac via a USB cable. After your iPhone is recognized, select “Music” to get all music info.

How to Transfer Music from Mac to iPhone 6 with AnyTrans – Step 1
Step 2. Click the “+” button on the top-right of this window > Browse the songs on your Mac > Choose the Song or Music Videos you need >Transfer the exact one you want.
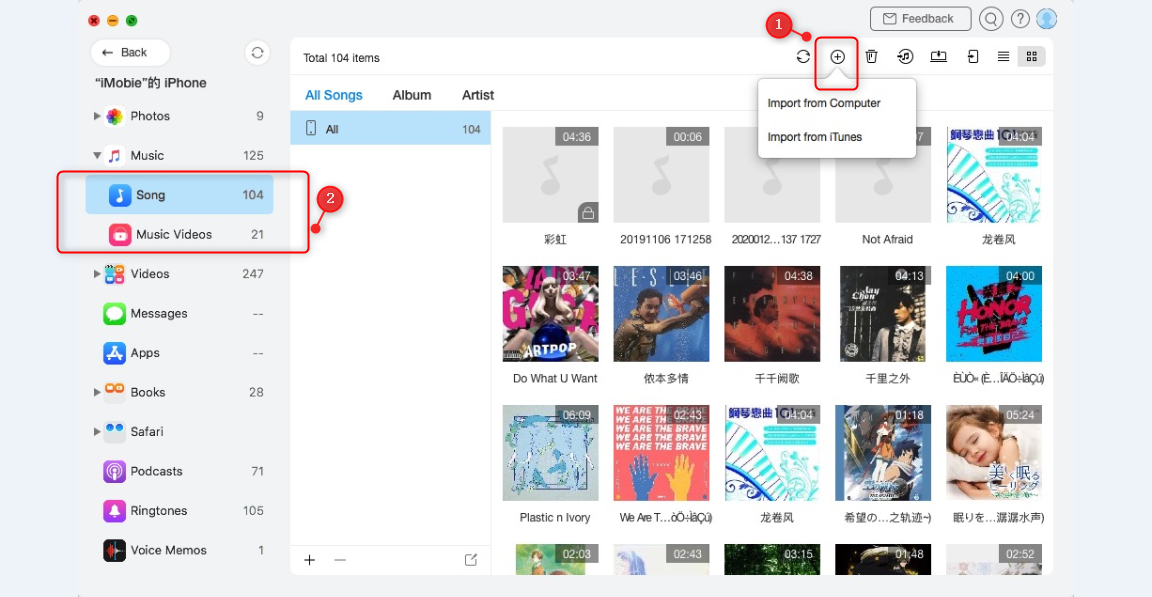
How to Transfer Music from Mac to iPhone 6 with AnyTrans – Step 2
You May Like: How to Put Music on iPhone >
The Bottom Line
AnyTrans breaks the limitations of iTunes and allows you to transfer music from Mac to iPhone and vice versa. Any problems with this guide or AnyTrans are warmly welcomed, at the same time, don’t hesitate to share this guide with your friends. Download the free trial to give a shot on AnyTrans now >
More Related Articles

Member of iMobie team as well as an Apple fan, love to help more users solve various types of iOS & Android related issues.
Product-related questions? Contact Our Support Team to Get Quick Solution >
