How to Clear Cache on Android Phone to Get More Space
If you are running out of memory space on your Android, the following guide will show you how you can clear cache on your Android device to get more space. It also shows some other methods of freeing-up memory space on your device.
Android Manage & Backup Tips
Android File Management
Android Backup Tips
Each time you launch an app on your Android device, your data will be transferred from the professor to your Android device, along with the cache files. Over time, there are more and more cache files that need to be removed to free up memory space and enhance the performance of your Android device.
The following guide shows the methods to clear the cache on Android devices, which is as easy as accessing Android internal storage. You will also learn how to free up memory space using other methods in the guide. To prevent losing any important data on your Android phone, you can back up your Android phone on a regular basis. Keep in mind not to delete anything that you think you might need in the future.
Method 1. Clear App Cache on Android Devices
In this section, you are going to learn how you can clear the cache on your Android phone. As said before, each app stores the so-called cache files on your device and removing those files helps free up memory space.
Here’s how you can go about clearing app cache files on your Android device:
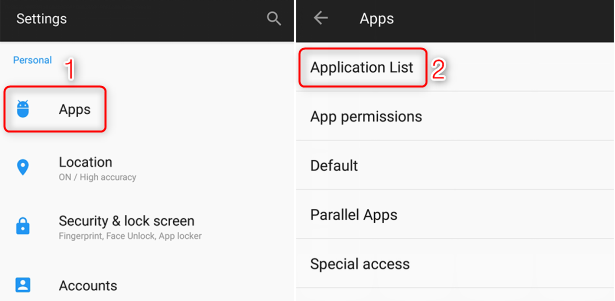
Step 1. Launch the app drawer on your Android device > Tap on the “Settings” app.
Step 2. Scroll down and tap on the option that says “Apps”. On the following screen, tap on the option that says Application List to view your app list.
Clear App Cache on Android Devices
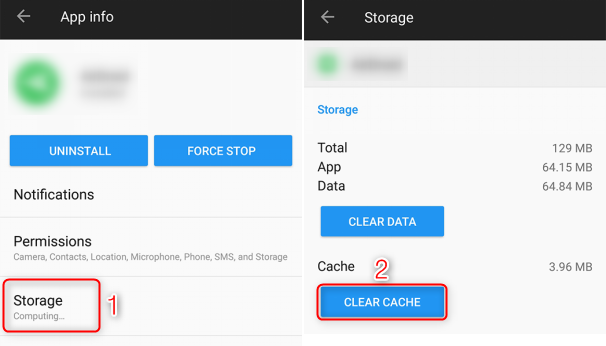
Step 3. You will see all the apps you have installed on your device. Tap on the app you want to clear cache files for > Tap on “Storage”.
Step 4. Tap on “Clear Cache” on the following screen and the cache files of the selected app will be removed from your device.
Clear App Cache on Android Devices
That’s all. You have successfully cleared the cache files for your chosen app on your device.
Method 2. Clear Downloaded Files on Android Devices
Many times it happens that you download files on your device but you forget to use them or you just never use them at all. These unused downloaded files could occupy a large amount of memory space on your device. Clearing these files will free-up the valuable memory space on your device and the following is how you do it.
Step 1. Launch the default file manager app from the app drawer on your device.
Step 2. Tap on the Downloads folder to open the folder. You should be able to see all the files you have downloaded to your device.

Clear Downloaded Files on Android Devices
Step 3. Tap on the “filter” at the top-right corner and select “Sort by size”. Then, find the unused large files and get rid of those files.
You have successfully got rid of the unused files that were occupying a large amount of memory space on your device. You now have more space available to add new and useful files to your device.
Method 3. Remove the Backed Up Photos
If you use Google Photos, it is likely the app has uploaded most, if not all, photos from your device over to the Cloud storage. If that is the case, you may want to delete the photos that are already available in Google Photos from your Android device.
The following instructions demonstrate how you can do it:
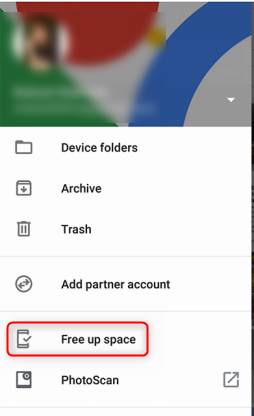
Step 1. Open the app drawer on your device and tap on Photos to launch the Google Photos app.
Step 2. When the Photos app launches, tap on “horizontal lines” at the top and select the option that says “Free up space”.
Remove the Backed Up Photos
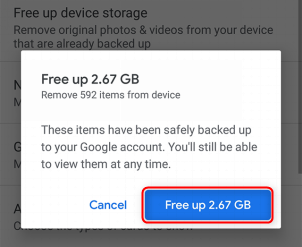
Step 3. On the following screen, a notification will appear telling you the amount of memory space you can free-up by deleting duplicate photos. Tap on the Free up button to delete the duplicate photos.
Remove the Backed Up Photos
Even though the photos have been deleted from your device, those are still available in your Google Photos account and can be accessed anytime you want right from your device.
Method 4. Uninstall Unwanted Apps from Android
If you have installed any apps that you do not frequently use on your device, you can uninstall those apps to clean up your device. Uninstalling an app is an extremely easy task and the following shows how to do it.
Step 1. Open the Settings app on your device > Tap on Apps > Tap on Application List on the following screen.
Step 2. Tap on the app you want to uninstall, and select Uninstall.
Step 3. Chosen the app you’d like to delete from your Android device.
Even if you deleted apps on your Android phone unexpectedly, you are allowed to recover deleted apps back to your Android phone with PhoneRescue for Android.
Method 5. Use the Free Memory Space Option on Android
The newer versions of the Android OS have the memory free-up option that automatically detects less used apps and files for you to delete from your device. The following section shows how you use the feature on your device.
Step 1. Launch the Settings app and tap on Storage & memory. Tap on the Free Up Space button on the following screen.
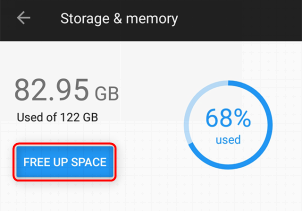
Use the Free Memory Space Option
Step 2. You will see a list of infrequently used files on your device. Tap on the Free Up option in the bottom-right corner of your screen to remove those files from your device.
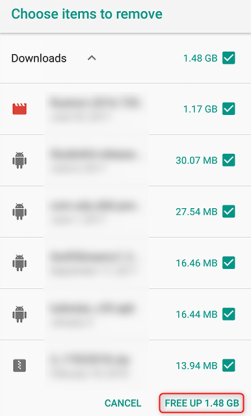
Remove Infrequently Used Files
The infrequently used files will be removed from your device and you will have more memory space available on your phone.
The Bottom Line
Clearing cache is one of the many ways to get more space on your Android device and the above guide teaches you how to do it. It shows a few other ways as well to let you clean up your phone of any junk files.

Member of iMobie team as well as an Apple fan, love to help more users solve various types of iOS & Android related issues.
Product-related questions? Contact Our Support Team to Get Quick Solution >
