How to Recover Unsaved Screen Recording
When you want to look at a screen recording but find that it hasn’t been saved at all or has been deleted, it can be a challenge to recover it. But in this article, we have provided detailed instructions for Mac and iPhone users on how to recover screen recordings.
If you are a gamer, YouTuber, content creator, or podcaster, you must know the value of screen recordings. Most people do a screen recording of the games or important content, and not one of them would want to lose those recordings. However, sometimes you accidentally delete or forget to save your screen recordings on Mac.
Since recording the screen using QuickTime again can be hectic, people wonder how to recover deleted screen recording on Mac. And if you want to recover the deleted or unsaved screen recording, worry not! You’ll discover some excellent methods to recover your unsaved or deleted QuickTime screen recordings in this article. Let’s get going!
Recover Unsaved QuickTime Screen Recording on Mac
QuickTime for macOS is an outstanding free tool for generating recordings and video clips. People use this built-in tool to record their screens on Mac. But if due to some reason, the recordings do not get saved, you can recover them. To recover the unsaved QuickTime screen recordings on Mac, follow these two methods:
Method 1. Recover QuickTime Screen Recordings via AutoSave Location
AutoSave is one of the essential features of macOS, which saves your recordings before you ever touch the Save button in tools like Preview and QuickTime Player. However, if you know where QuickTime Player files are stored automatically, you may be able to recover the screen recording if QuickTime crashes.
To know how to recover unsaved screen recording of QuickTime via AutoSave location, follow these instructions:
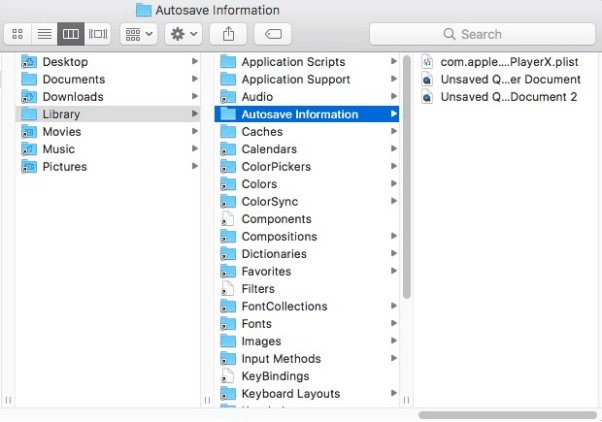
Step 1: Hit the top-left Apple icon, click GO and choose Go to Folder.
Step 2: Copy and paste /Users/ [user name] /Library/Containers/com.apple.QuickTimePlayerX/Data/Library/Autosave Information into the address bar of the window that will appear, and hit Enter.
Step 3: Look for the Autosave destination for Quick Time audio and video recordings.
Look for the Autosave File
Step 4: Right-click the chosen recording file, then choose Open with. After that, select QuickTime Player.
Step 5: Now, modify the name of the recording and then hit the Save option to save it from the screen capture recovery.
Method 2. Recover QuickTime Screen Recordings via Temporary Folder
Another approach to recovering unsaved QuickTime recordings is to use Temporary folders. This method doesn’t work for all but based on the previous success in recovering unsaved files, it is advised that you should give it a try.
To recover the unsaved QuickTime recordings using the Temporary folder, follow the step-wise guide below:
Step 1: Launch the Finder application on your Mac.
Step 2: Type Terminal in the search field, and then click on its icon to launch Terminal.
Step 3: Then, type open $TMPDIR into the command line and hit Enter to start the command line.
Step 4: It will navigate to the Temporary Folder. After that, go to TemporaryItems and verify if the file is saved to the Temporary folder or not.

Go to Temporaryitems
Step 5: If the file is there, open it using QuickTime Player and save it to a specified folder.
How to Restore Accidentally Deleted QuickTime Recording on Mac
Fortunately, if your Mac is configured to back up all of your data every day automatically, you may be able to avoid the disaster. If you have accidentally deleted QuickTime screen recordings, you can recover the recordings from the Time Machine backup that was made that day to recover them.
Time Machine is a built-in backup tool that is included as part of the macOS operating system. Time Machine backs up your data hourly, daily, or weekly based on your chosen schedule. The oldest backups are removed from the system when your backup drive is full.
To recover the accidentally deleted QuickTime recording on your Mac using Time Machine, follow this step-wise instruction:
Step 1: Connect the external hard disc that you use to back up your Mac via Time Machine. Note: If the recording is not backed up, you can’t restore it using the Time Machine backup tool.
Step 2: Go to System Preferences, and select the Time Machine icon from the menu.
Step 3: Mark the checkbox next to Show Time Machine in the menu bar.
Step 4: After selecting the Time Machine icon from the Menu bar, click the Enter Time Machine button.
Step 5: Search for the QuickTime recording using the arrows and timeline provided by Time Machine. Once you’ve located it, select it and press the Restore option to restore the recording to your computer. Note: The QuickTime recordings that have been restored will be placed in the original destination folder
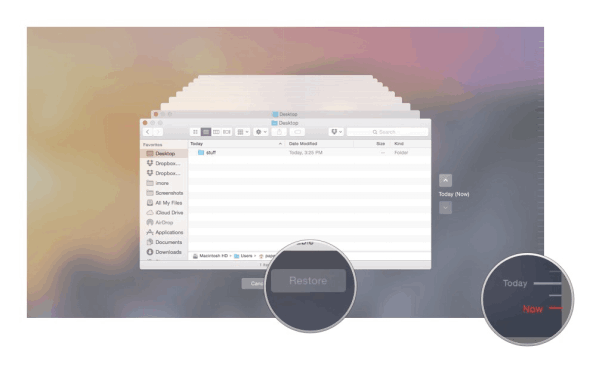
Click Restore Button
Recover Unsaved Screen Recording on iPhone
Recording the iPhone screen and saving the movie in Camera Roll is popular among iPhone owners. Control Center is where you’ll often find the screen recording option on an iPhone.
However, there are occasions when screen recordings are accidentally removed from the device. When that happens, people want to get their screen recordings back. And the good news is iPhone users can recover their unsaved or accidentally deleted screen recordings using the following methods.
Method 1: Recover Unsaved Screen Recording on iPhone via Recently Deleted Album
After iOS 8, Apple included the Recently Deleted album in the Photos app. Recovering screen recordings that have been accidentally deleted or unsaved is easy with this tool. However, only if the deleted screen recordings are not older than 30 days. To restore lost screen-recorded videos from your iPhone, you should utilize this method.
To know how to recover unsaved screen recordings via Recently Deleted Album, follow these instructions:
Step 1: Tap the Photos app on your iPhone to access it.
Step 2: Scroll down and choose Recently Deleted Album. Note: You will only get deleted pictures and videos less than 30 days old.

Go to the Recently Deleted Album
Step 4: Now, choose the screen-recorded videos that you want to recover from the list.
Step 5: Finally, touch Recover, and all of the chosen screen recordings will be restored to their original location in the Album.
Method 2: Recover Unsaved Screen Recording without Backup
But what to do if you want to recover a screen recording that is more than 30 days old, or even permanently deleted? To do so, you have to act fast and get an iPhone data recovery tool – PhoneRescue for iOS. Through the deep scan on PhoneRescue for iOS, you can easily find and recover unsaved screen recordings on iPhone without any backup.
There are reasons why people say it is the best tool to retrieve unsaved screen recordings from an iPhone without backups. To start with, you can freely browse these unsaved screen recordings and selectively or wholly recover screen recordings to the computer in a readable format. In addition, you only need to click on buttons to complete the entire recovery process, which is quite easy for everyone. Most importantly, unlike recovering from iTunes or iCloud, PhoneRescue will not overwrite or erase your data on your device at all!
Besides, PhoneRescue for iOS can also help you recover up to 32 types of other data from your iPhone like photos, call history, missing messages & attachments, notes, contacts & phone numbers, and so on. Just be free to try. Here are the steps:
How to Retrieve Deleted Screen Recordings on iPhone without Backup:
Step 1. Run PhoneRescue for iOS on a computer.
Now, free Download PhoneRescue for iOS and launch it > Connect your iPhone to the computer. Select Recover from iOS Devices and then click the Right Arrow button to continue.
Free Download* 100% Clean & Safe
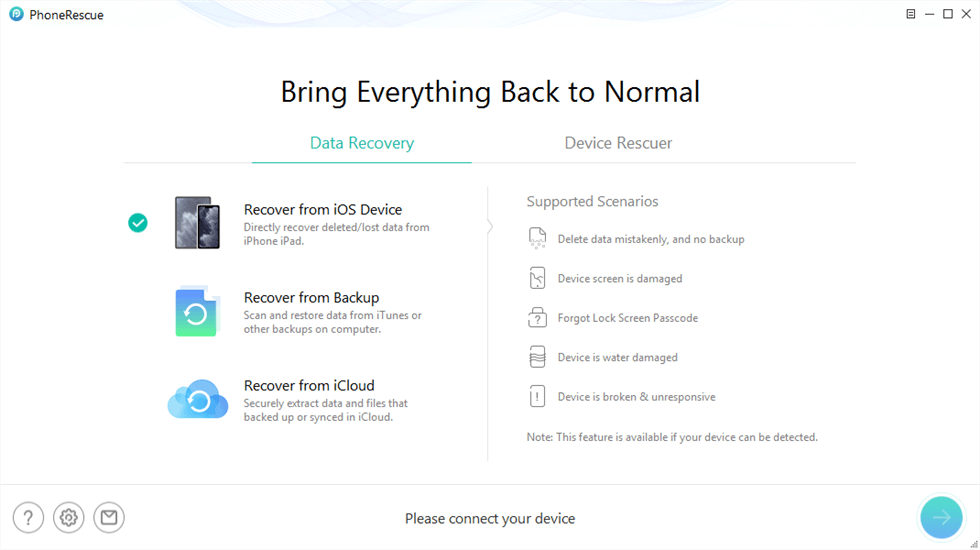
Recover from iOS Device without Backup
Step 2. Scan the data on the iPhone.
You can see all the data were selected. So you need to uncheck the Select All box, then check the box of Photo Videos and Videos. Don’t forget to click OK.
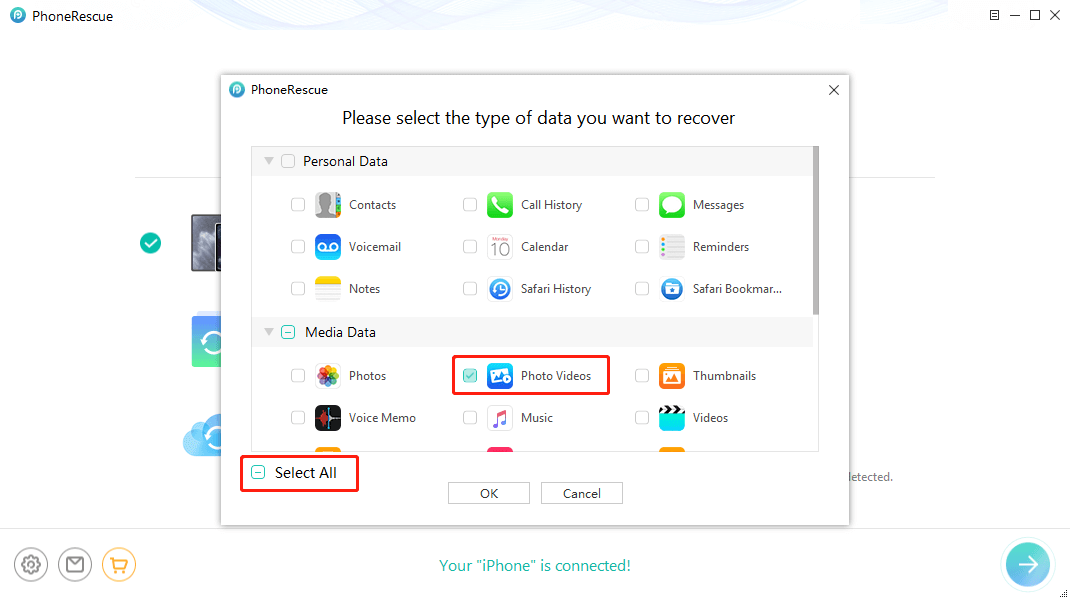
Select Videos and Photos Videos to Scan
Step 3. Preview and recover the videos.
PhoneRescue for iOS would display all videos, including the lost one. Select the video you want to recover from iPhone, click the To Computer button to recover.

Select the Videos to Restore on iPhone
Method 3. Recover Unsaved Screen Recordings on iPhone via iTunes Backup
iTunes is a convenient tool for transferring iPhone data to your PC. Therefore, you can quickly recover the unsaved screen recordings if you had utilized iTunes to back up screen-recorded films before they were accidentally deleted.
To know how to recover accidentally deleted screen recordings via iTunes backup, follow these instructions:
Step 1: Launch the most recent version of iTunes on your pc, and then connect your iPhone to it via a USB cord.
Note: Allow them if you get a notification to unlock your phone, Trust This Computer, or anything similar.
Step 2: When iTunes detects your iPhone, click on the iPhone icon.
Step 3: Select the General tab and choose Restore Backup.
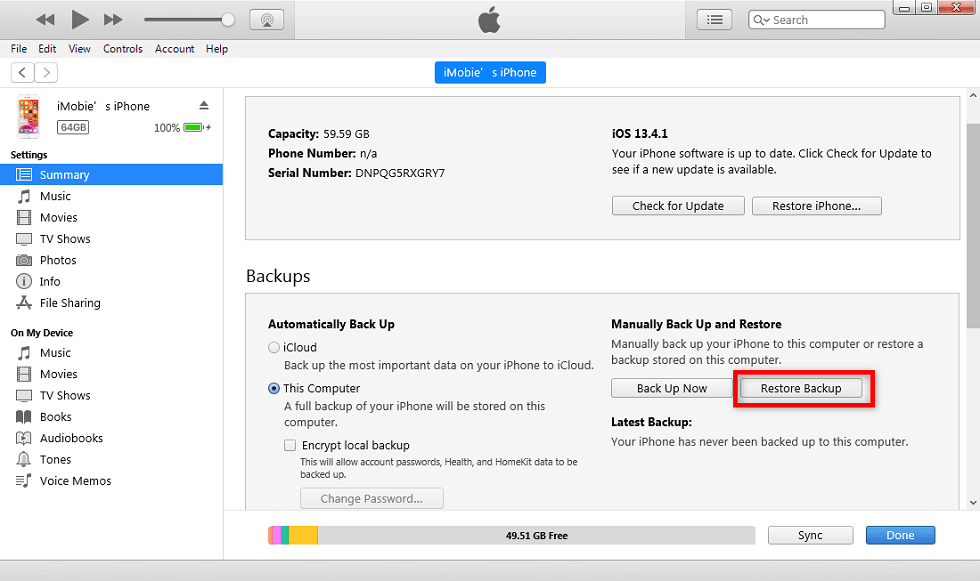
Click Restore Backup from iTunes
Bonus Tip: Free Computer Screen Recorder
The above sections introduce how to recover unsaved screen recordings on iPhone. If you are also interested in making a screen recording on your computer, you can try a free screen recorder for iMobie users – Gemoo Recorder Lite. In all, it is a 100% free screen recorder that works for both Windows and Mac computers. What makes Gemoo Recorder Lite stand out being a screen recorder recommendation is its various recording modes and HD recording quality.
Screen Recording Modes:
There are four recording modes in Gemoo Recorder Lite: screen + camera, camera only, screen only, and audio only. Whether you want to record the image or the computer audio only, you can find a solution with Gemoo Recorder Lite.
Screen Recording Quality:
Some users are recording their computer screens to make tutorial videos. In this case, the clarity of the screen recording video is an important factor affecting the quality of the tutorial video. Gemoo Recorder Lite provides users with a wide range of video resolutions from 720p to 4k, which satisfies all your needs.
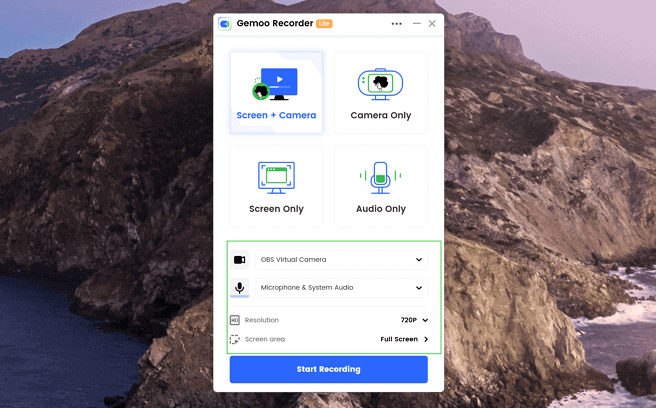
Gemoo Recorder Lite
If you’re interested in the 100% free screen recorder – Gemoo Recorder Lite. Don’t hesitate and download it to have a try now!
The Bottom Line
Some screen recordings are essential for people who use Apple devices, especially content creators, so they prefer not to lose them. But even if they do, Apple allows them to recover those files. And we hope that you know how to recover deleted screen recordings on Mac and iPhone after reading this article. For iPhone users in particular, it is highly recommended that you try PhoneRescue for iOS, as it offers you a trial version to scan for screen recordings or any other data you want in advance.
Free Download * 100% Clean & Safe

Senior writer of the iMobie team as well as an Apple fan, love to help more users solve various types of iOS & Android-related issues.
Product-related questions? Contact Our Support Team to Get Quick Solution >
