Where Do Saved Audio Messages Go on iPhone [2026]
In this article, not only will you know where do saved audio messages go on iPhone iOS 14, you will also know how to recover a vanished audio message. We also have the answer to your question about what to do when audio messages not saving.
Audio messages are a fast and straightforward method to communicate with your acquaintances. You may send an audio message if you can’t type, want to convey a more personalized message, or need to make a rapid info dump. It’s easy to locate audio messages on smartphones since it stays in the chat. However, audio iMessages don’t work the same, and they disappear two minutes after you listen to them.
Since some audio messages are essential and iPhone users would prefer to keep them safe for the future, this disappearance can be pretty hectic. If you are wondering where do saved audio messages go on iPhone iOS 14, don’t worry. In this article, you’ll find where to look and how to save audio messages on iPhone. Let’s get going!
Where to Find Saved Audio Messages on iPhone
After the introduction of iMessage in 2011, all Apple devices now have this functionality. iMessages appear in blue on Apple devices. Moreover, they’re transmitted via the Internet rather than through your cell or network provider. Only owners of Apple products, such as Macs, iPhones, and iPads, have access to it.
End-to-end encrypted audio messages can also be sent via iMessages. The good news is that you can be sure that your data is safe. Apple considers audio messages to be precious information. So, if you were wondering where voice messages are saved on your iPhone, the bad news is that your audio messages expire by default (and are removed) after you listen to them once.
In most cases, after you’ve listened to an audio message, it will linger on your device for roughly two minutes before being deleted. This tells you that iPhone doesn’t save audio messages unless you alter the default iMessage settings.
What to Do When Audio Messages Not Saving
There might be many possible reasons that your audio messages are not saved on your iPhone, such as:
- Default iMessage setting (expire after two minutes)
- You haven’t enabled the Keep option to save the audio message
- After the iOS update (it rarely happens, though)
- After your iPhone is broken
- You have any software issues, etc.
However, Apple does allow you to save the audio messages manually or by changing some settings. To save the audio messages on iPhone, follow these methods:
Method 1. Save the Audio Message via Keep Feature
iMessages on iPhone comes with a Keep feature that allows you to retain the audio message in your chat. It works for iPhone users even if they haven’t altered the default settings (audio messages expire after two minutes). To save the audio message via Keep, follow these steps:
Step 1. Open the iMessage app.
Step 2. Select the thread or chat containing the audio message.
Step 3. To listen to the audio message, tap it.
Step 4. After listening to it, hit the Keep button located under the audio message clip. Note: When you do that, the individual audio message will be saved inside that thread to listen to whenever you choose.
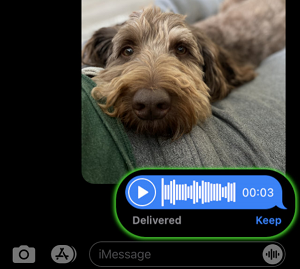
Click on Keep Button
Method 2. Save Audio Messages via Settings
It is possible to modify the default audio message settings on your iPhone. With this method, you can be confident that the audio messages stored on your device will not be destroyed or that they will not expire. To keep the audio messages on iPhone by altering the settings, follow the procedure outlined below:
Step 1. On your iPhone, open the Settings app.
Step 2. Scroll to the Messages option, and select it.
Step 3. Now, look for the Audio Messages section. You can find it at the bottom of the interface.
Step 4. Select Expire from the drop-down menu. After that, set the expiration time to Never.
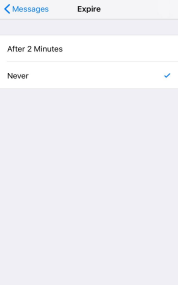
Select Never Button
Method 3. Save Audio Message on Mac
You can store audio messages to your Mac computer in addition to disabling iPhone audio message expiry settings. To store received voice messages on your Mac, follow these instructions:
Step 1. First, change the settings in your iCloud account so that your iMessages discussions are visible across both your iPhone and Mac computer.
Step 2. Now, open your Mac, run the Messages application from inside, and go to the chat where the voice message is located.
Step 3. Right-click the specific audio message and choose Services from the drop-down menu. After that, select Show in Finder from the choices that appear.
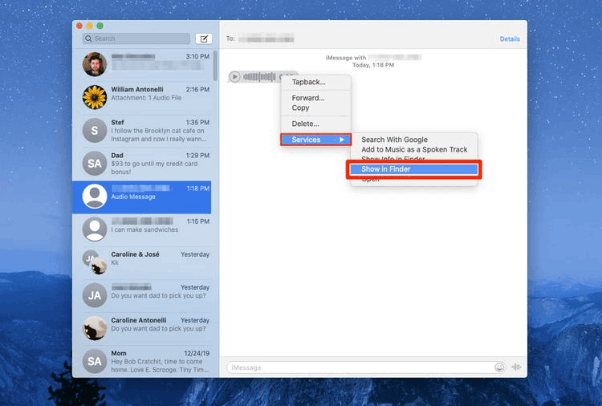
Pick Show in Finder
Step 4. Within your Mac, the Transfers folder window will appear. Drag the audio message file you discovered there and place it into a folder on your Mac machine.
How to Recover Lost Audio Messages on iPhone
If you ever unintentionally delete or lose an essential audio message and can’t figure out how to get it back, this section is for you. When you encounter this difficulty, it may be pretty unpleasant and aggravating. But luckily, you can recover the lost audio messages on your iPhone by following these two methods:
Method 1. Find Audio Message Back via Data Recovery Tool
Not only audio messages but also other data such as contacts, photos, etc., if you have lost them, you must be very anxious to find the easiest and most efficient way to recover them.
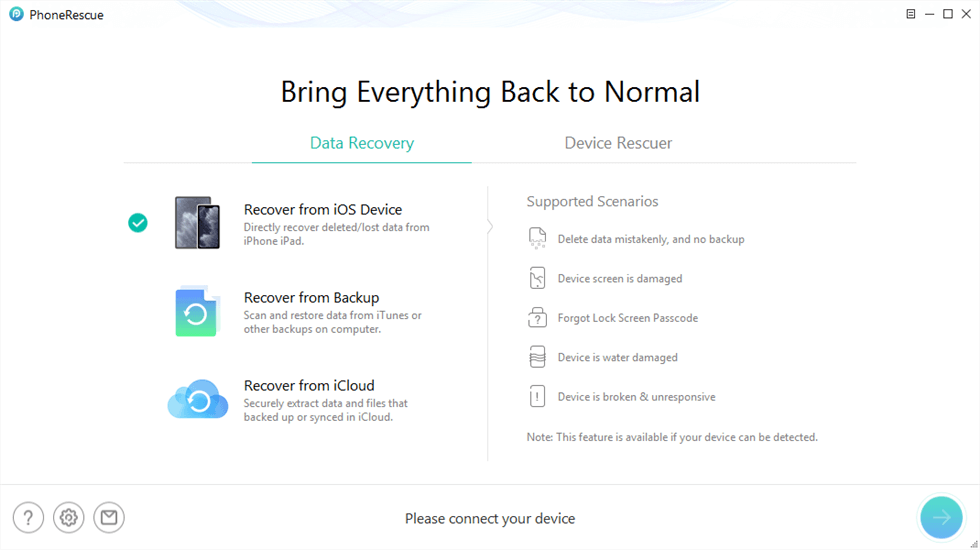
To retrieve deleted audio messages from iPhone, you have to act fast and ask for help from some iPhone data recovery tool like PhoneRescue for iOS. PhoneRescue can thoroughly scan the iPhone for free and find the deleted audio messages then recover them. More importantly, unlike restoring from iTunes or iCloud, no data will be erased on your iPhone while restoring audio messages.
Now, let’s check how to use PhoneRescue for iOS to recover lost audio messages from iPhone, even without any backups:
1. Download PhoneRescue for iOS on your computer and launch it, then Plug in your iPhone.
Free Download* 100% Clean & Safe
2. Select “Recover from iOS Device”, then click the “Right Arrow” button.
Choose Recover from iOS Device
3. Uncheck the “Select All” button and check “Messages” only, then click “OK”.
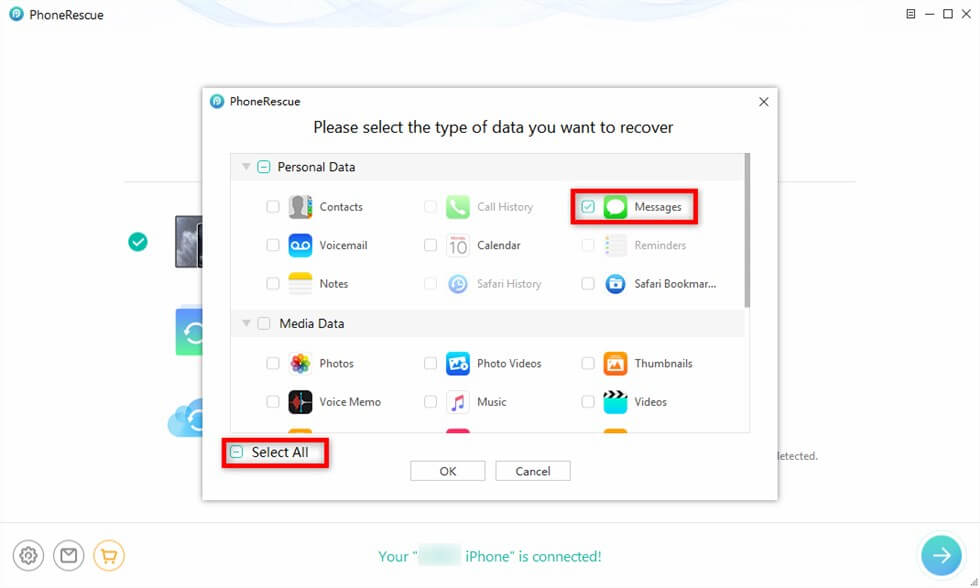
Choose Messages to Scan
4. Select the deleted audio messages and then click the “To Computer” or “To Device” button to recover.
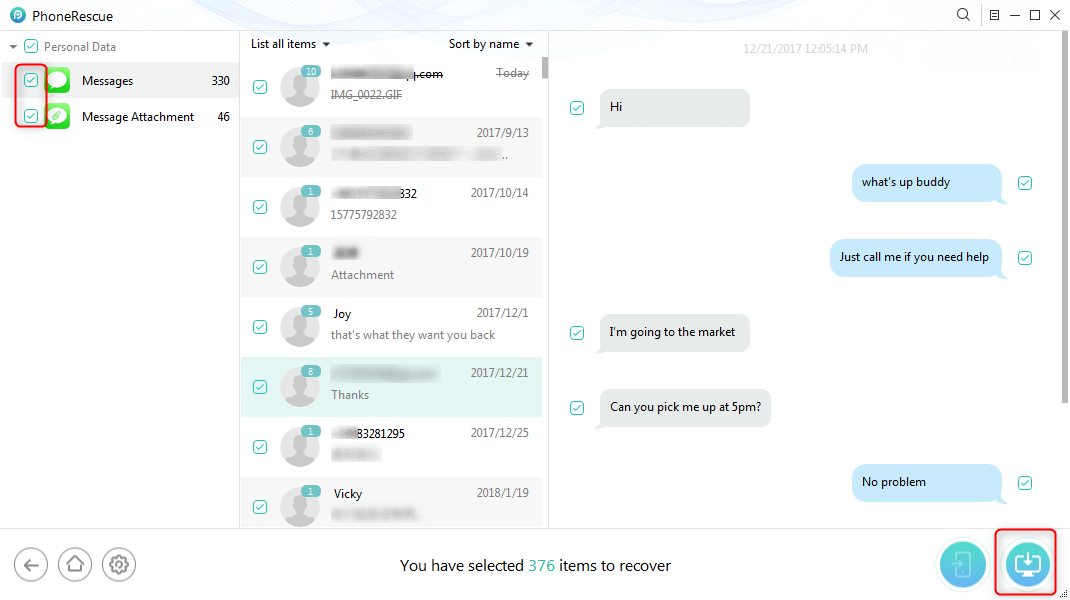
Preview and Choose to Recover Texts
Method 2. Recover Lost Audio Messages on iPhone via iCloud Backup
Since iOS 11.4, this method has been more popular for users who have experienced data loss. Apple’s iCloud Messages service allows users to synchronize their text and audio messages with their media assets, including videos, photographs, and other attachments. Lost audio messages may be retrieved from your iPhone if you’ve activated the iCloud “Message” option before the loss.
To get back the audio messages you lost on your iPhone, follow these steps:
Step 1. Go to Settings and sign in with your Apple ID to iCloud. After that, turn off the Messages option.
Step 2. When an alert appears, tap Keep on My iPhone. Now, turn on the Messages option once again.
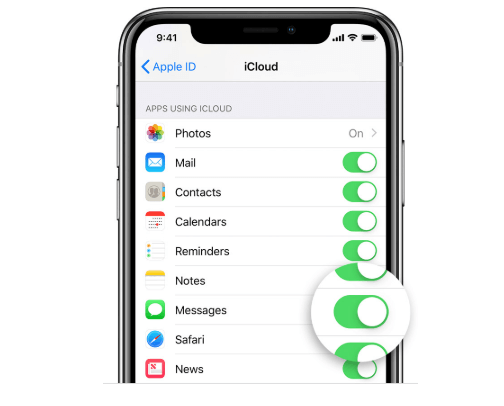
Recover iPhone Messages with iCloud Messages
Step 3. Then, from the pop-up menu, choose Merge. Wait a few moments for the lost audio message to be returned to your iPhone’s messaging app.
Method 3. Recover Lost Audio Messages via iTunes Backup
If you utilize iTunes frequently and regularly create backups for your device, it is a pretty simple method for you. To recover the lost audio message, follow these steps:
Step 1. Click the iPhone symbol in the upper left corner of the iTunes interface after connecting your iPhone to your PC via USB cable.
Step 2. Select Summary from the left sidebar, then hit the Restore Backup option. Note: On iTunes, you can see the date and volume of the backup files and select the one that is the most relevant to your audio recordings.
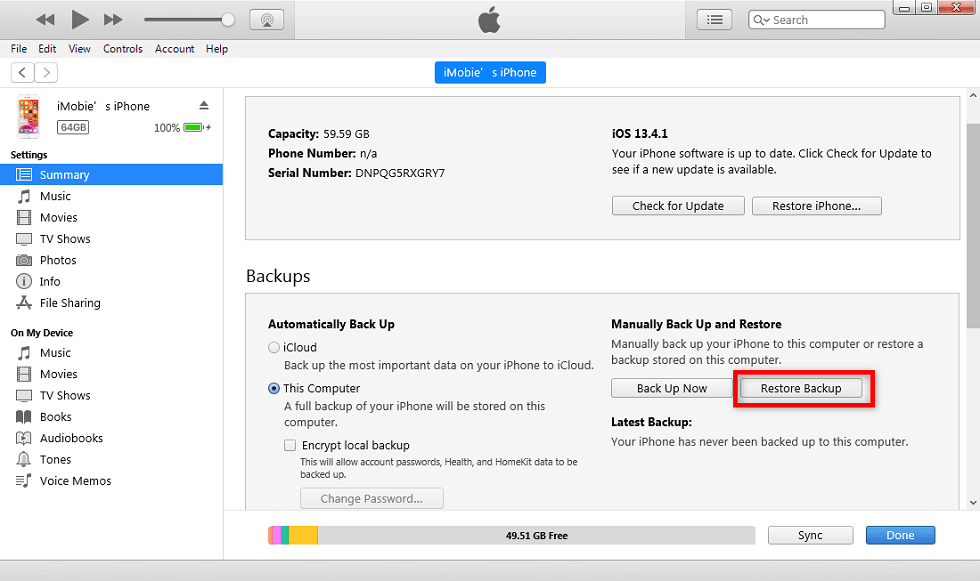
Click Restore Backup from iTunes
Step 3. After selecting the backup, click the Restore option to recover all the lost or deleted items, including audio communications. Note: Once the restoration is complete, all of your audio messages will be restored to your Messages app.
The Bottom Line
Since audio messages on iPhone disappear after two minutes, it’s pretty common for people to wonder where saved audio messages go on iPhone iOS 14. However, you can recover the lost audio communication by utilizing the methods discussed in this article. Of these methods, PhoneRescue for iOS is the best option, as you can use the trial version first to try to see if you can scan the data you want. In addition, PhoneRescue for iOS can also help you remove screen locks, repair damaged iOS devices, and much more!
Free Download * 100% Clean & Safe

Senior writer of the iMobie team as well as an Apple fan, love to help more users solve various types of iOS & Android-related issues.
Product-related questions? Contact Our Support Team to Get Quick Solution >
