How to Fix iMessage Needs to Be Enabled to Send This Message
Get the warning “Cannot Send Message. iMessage needs to be enabled to send this message.”? Check this guide to fix this message not sending issue quickly.
iPhone Message Tips & Issues
iPhone Message Tips
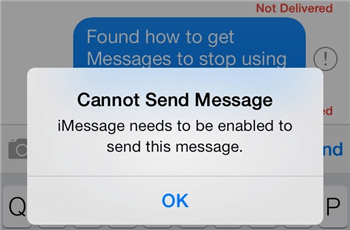
What does “iMessage needs to be enabled to send this message” mean? I can’t get my messages to send and when I try that pops up. What is it and how can I fix it?
– A user from Apple Discussion
With iMessage, you can collaborate with others in a conversation, decorate messages with stickers, share a song, and more – without leaving Messages.
However, sometimes when you send an iMessage to others, you probably will get this notice: Cannot Send Message. iMessage needs to be enabled to send this message. And even occasionally, when you send text messages, you will also get into this trouble.
iMessage Needs to Be Enabled to Send This Message
Method 1. Enable Your iMessage
The first reason we could think about is that you have not enabled iMessage (How to Enable iMessage on iDevice and Mac) on your iPhone. Just like the words say, you need to enable it.
Open the Settings app on iPhone > Tap on Messages > Switch iMessage to on and wait for it to activate. If you have enabled it before the problem happens, you can try disabling it firstly, and then enabling it again.
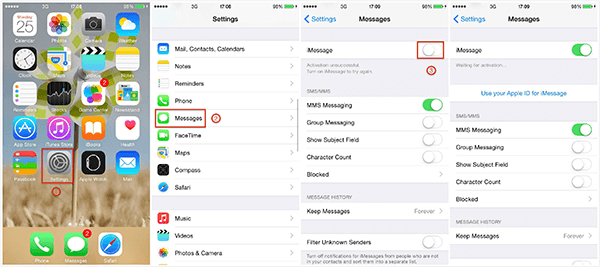
Fix iMessage Needs to Be Enabled to Send This Message – Enable iMessage
Method 2. Check If Apple iMessage Server Is Down
Another reason why iMessage Needs to Be Enabled to Send This Message issue comes is about the iMessage sever. If the server is not working, you can send messages. To check if it works or not, please go to Apple System Status.
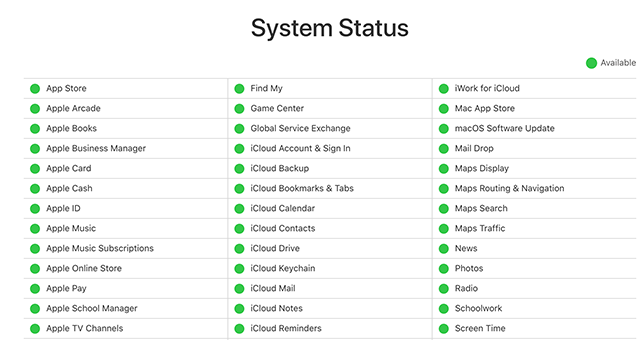
Go to Apple and Check Apple’s System Services
Method 3. Reset Network Settings
Sometimes, the reason why messages cannot send is related to network connection problems. You can reset network settings to fix it. Go to Settings > Tap on General > Reset > Reset Network Settings.
Method 4. Reset iMessage Settings
If all the above three methods do not work, the fourth way you can try is resetting the iMessage.
Step 1. Open Settings and tap on Messages > Choose Send & Receive option.
Step 2. Uncheck the email address and phone number in the section of YOU CAN BE REACHED BY IMESSAGE AT.
Step 3. Tap your Apple ID and choose Sign Out.
Step 4. Restart the iPhone, activate iMessage from the Settings, and sign in to your Apple ID again.
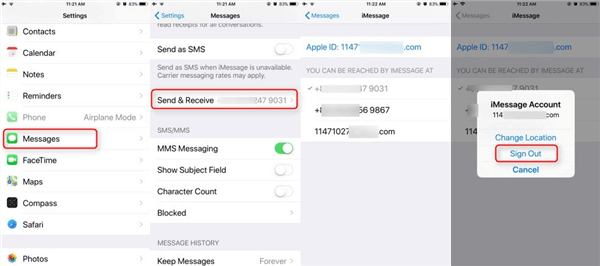
Reset iMessage Settings
Method 5. Erase All Content and Settings
The last way to fix iMessage that needs to be enabled to send this message is resetting all settings on your iPhone, and then setting it up as new.
Go to Settings > General > Reset > Erase All Content and Settings. Then set it up from your iCloud backup, if you have one.
Or you can also directly restore your iPhone with iTunes. Launch iTunes and connect your iPhone with computer > Click your iPhone icon and then click Restore iPhone. Make sure you’ve turned off Find My iPhone > Choose a proper iTunes backup file and click Restore.
But no matter iCloud restoring, or iTunes restoring, neither of them support backup previewing, which means you will not know what contents the backups contain. And you need to restore them all to your iPhone, including the items you don’t need.
So to preview and selectively restore iCloud and iTunes backups, we sincerely recommend PhoneRescue for iOS to help your get the job done.
PhoneRescue for iOS is good at getting back various iOS data from iPhone directly, iCloud backups, and iTunes backups. While, what PhoneRescue is different and better than iTunes and iCloud restoring are,
- PhoneRescue supports previewing iTunes and iCloud backup files. It means you can check whether the backup contains what you want before restoring.
- You can also selectively choose what types of data to restore. There is no need to restore the whole backup file to iPhone.
- Supports all kinds of data, contacts, messages, photos, notes, calendars, songs, and more.
Totally getting rid of iTunes & iCloud various restoring drawbacks. So why not give it a trial now?
Step 1. Run PhoneRescue on your PC > Choose Recover from iTunes Backups or Recover from iCloud (here we taking iTunes as an example) > Click right arrow to continue.
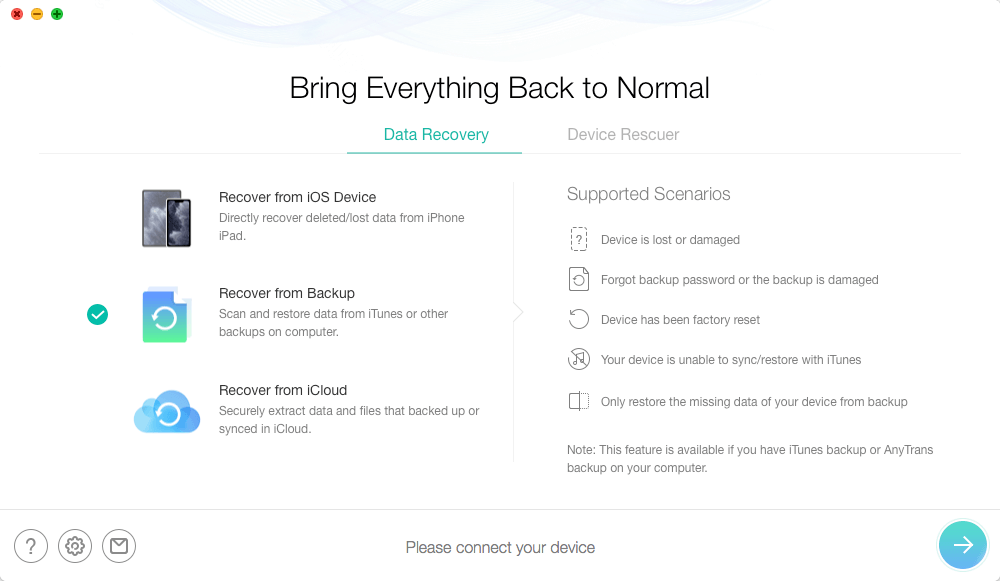
Choose Recover from Backup
Step 2. Choose the iTunes backup, which contains the lost data > Click right arrow > It will pop up a screen for choosing what kind of exact data types you would like to scan. Take Photos as an example > Click on OK button to continue.
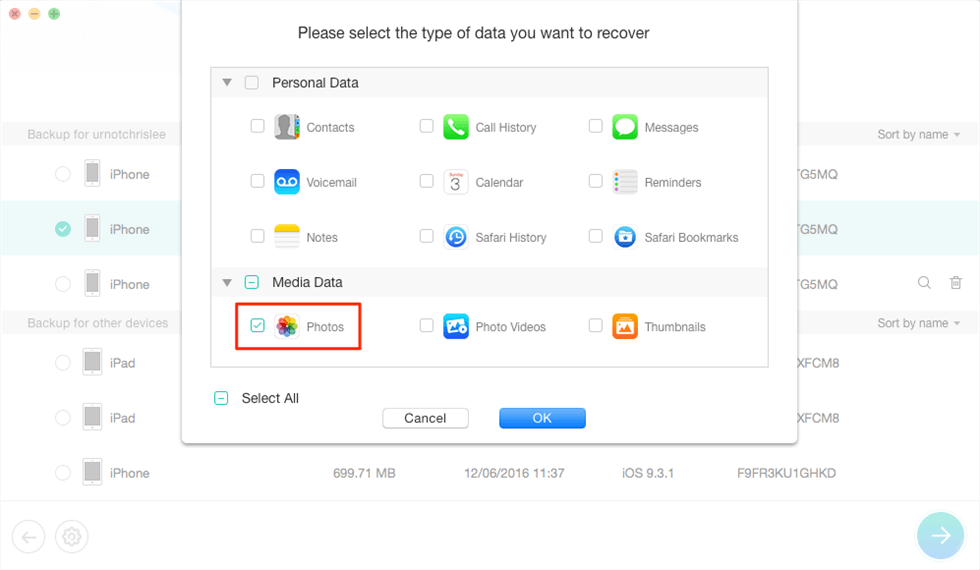
Extract iPhone Photos from iTunes Backup
Step 3. It will start scanning all photos in iTunes backup. After finishing, select the photos you would like to recover > Click on To Device button to download them to your device directly, or To Computer button to save them to computer.
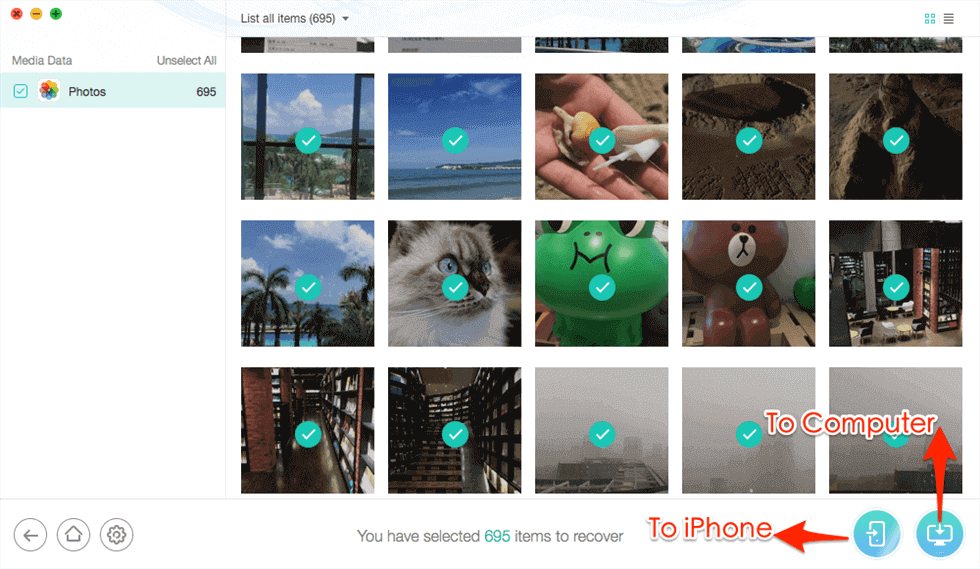
Preview the Photos and Choose to Recover
The Bottom Line
With these five methods, you can totally fix iMessage need to be enabled to send this message issue. When you try restoring way, sincerely recommend you give it a trial with PhoneRescue. Also if you have found other practical methods, please share them in the comments below.

Senior writer of the iMobie team as well as an Apple fan, love to help more users solve various types of iOS & Android-related issues.
Product-related questions? Contact Our Support Team to Get Quick Solution >
