How to Transfer Data from iPhone to Computer
If you need to access your iPhone’s files on your computer, you will need to first transfer your files over to your computer. There are a number of ways to do the task and you will find several of those in the below guide.
iPhone Transfer Tips
Transfer from iPhone
- Best iPhone Transfer Software
- Photos iPhone to HP Laptop
- Photos iPhone to Dell Laptop
- Photos iPhone to Surface
- Music from Phone to Computer
- Sync iPhone to Computer
- Sync iPhone Videos to Flash Drive
- Move iPhone Notes to iCloud
- Transfer iPhone Music to iPad
- Transfer iPhone Files from to PC
- Sync iPhone Files to Flash Drive
- Move Camera Photos to Computer
There are certain situations when you need to transfer files from iPhone to a computer, for example, your device alerts “Storage full” so delete unwanted files from the device to make some space. In such scenarios, the best thing you can do is to simply move your important files from device to a computer.
Most importantly, it is always good to have a backup of all the data of your iPhone into your computer. Well, you’ve come to the right place to learn how to transfer files from iPhone to computer for whatever reasons you want to do it. Here, we’ll show you several ways to move files from iPhone to Windows PC and Mac.
How to Transfer Files from iPhone to PC/Mac
Following are three methods to transfer files from iPhone to PC or Mac and you can pick the one as per your needs.
Method 1. Transfer Files from iPhone to Computer with iTunes
Many users still prefer using iTunes to transfer data from iPhone to a computer. With iTunes, you can’t transfer all kinds of files and only the data of the apps that enable file sharing will be transferred to your computer. Here’s what you need to do:
- Run the latest version of iTunes on your computer.
- Connect your iPhone to the computer using a digital cable.
- Once iTunes detected your device.
- Click the device icon and navigate to the “File Sharing” panel.
- You will see apps that enable files to be shared.
- Select the app from the list.
- Drag and drop files from the “Documents” list to your computer.
- Choose desired files from the ‘Documents” list and hit the “Save” button.
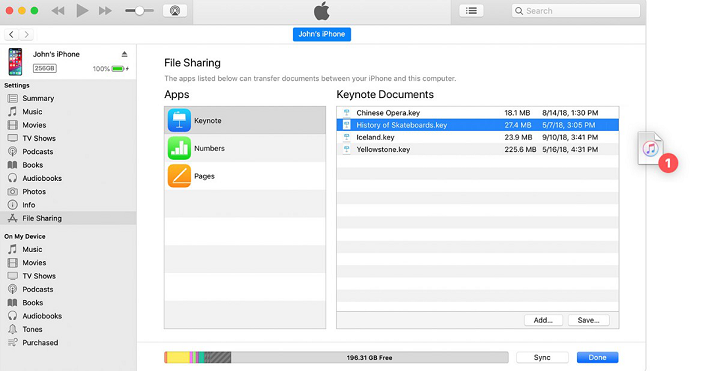
Files to Computer with iTunes
Once the process gets completed, there will be a copy of all the data of your device into your computer. If you find this method inconvenient, you can go for other ways.
Method 2. Transfer Files from iPhone to Computer with iCloud
iCloud is one of the great apps provided by Apple. This app has better performance, unlike iTunes. You can use iCloud Media Library to move music from iPhone to computer or iCloud Photo Library for photos.
However, if you’re interested in getting all of your data, then you need to create a backup. But, the good thing is that iCloud offers “Back Up Now” or “Automatic Backup” – to back up your iPhone regularly using Wi-Fi connection. Here’s what you need to do:
- On your iPhone, open “Settings”。
- Tap on [Your Name] > “iCloud”.
- Choose “iCloud Backup” > “Back Up Now”.
- Now, you need to access iCloud on your computer.
On Windows PC:
How do I transfer files from iPhone to Windows computer? Please follow the steps below.
- Download and install the iCloud for Windows app.
- Run it and enter your Apple ID and passcode.
- Choose the options and connect you would like to move from the interface.
- Hit on the “Apply” button.
- You can access your files in iCloud Drive & iCloud Photos under the File Explorer tab on your Windows computer.
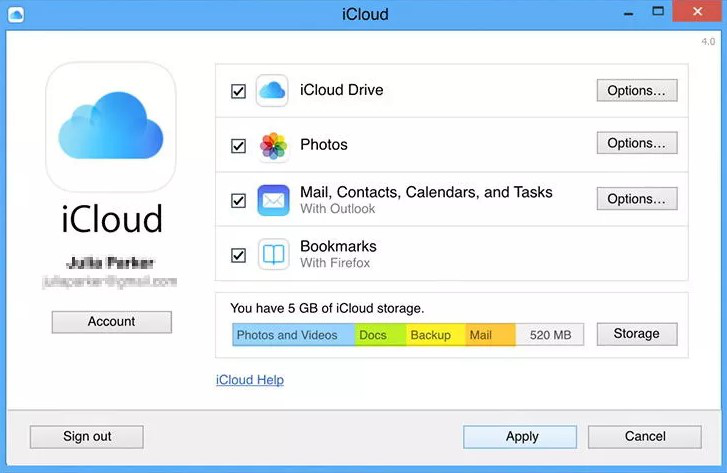
Windows – iCloud Screen
On Mac:
- Open “Apple Menu” > “System Preferences”.
- Select iCloud and tap the checkbox next to iCloud Drive.
- You can now access your device files on your Mac computer in iCloud.com or on desktop and Documents folder in Finder under iCloud.
Method 3. How to Transfer Files from iPhone to PC/Mac with AnyTrans
How to Transfer all Data from iPhone to PC/Mac? If you want a one-click way to transfer files from iPhone to the computer, you must try AnyTrans. The best thing about using this software is that it allows you to transfer files between iPhone and computer without any limitations. You can transfer any type of file such as photos from iOS device to computer in one simple click. This all-in-one iOS data management software can also help you to transfer data from iPhone to iPhone. It works on both Windows and Mac.
Free Download * 100% Clean & Safe
Get AnyTrans on your computer and follow the below steps to learn how to transfer data from iPhone to laptop or PC/Mac computer.
Step 1: Run AnyTrans and connect your device to the computer using a digital cable. Next, select the “Connect to PC” option from the main interface.
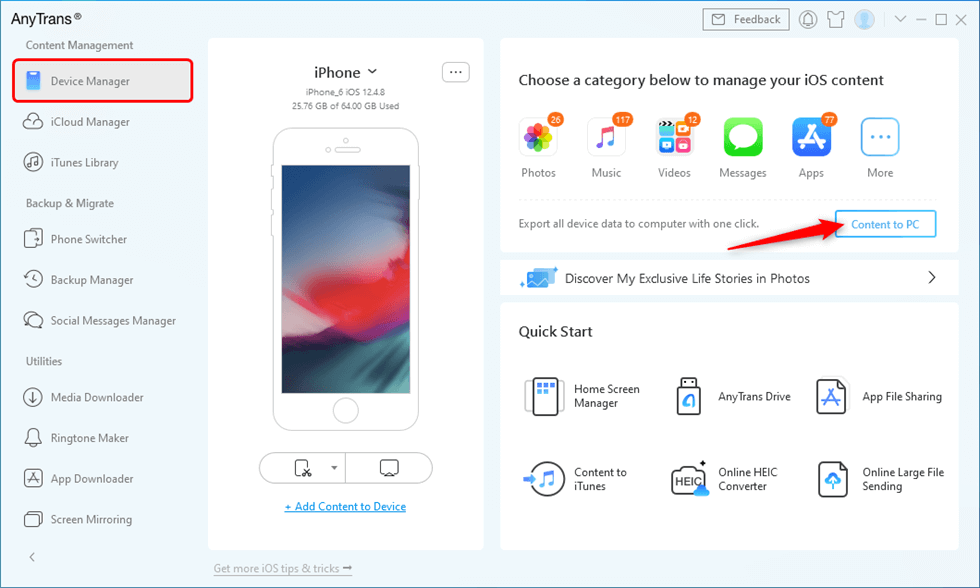
Go to Device Manager and Click Content to PC Button
Step 2: Next, you need to select the type of files you would like to transfer > Change the Export Path if you want > Click the Next button to start the transferring process.
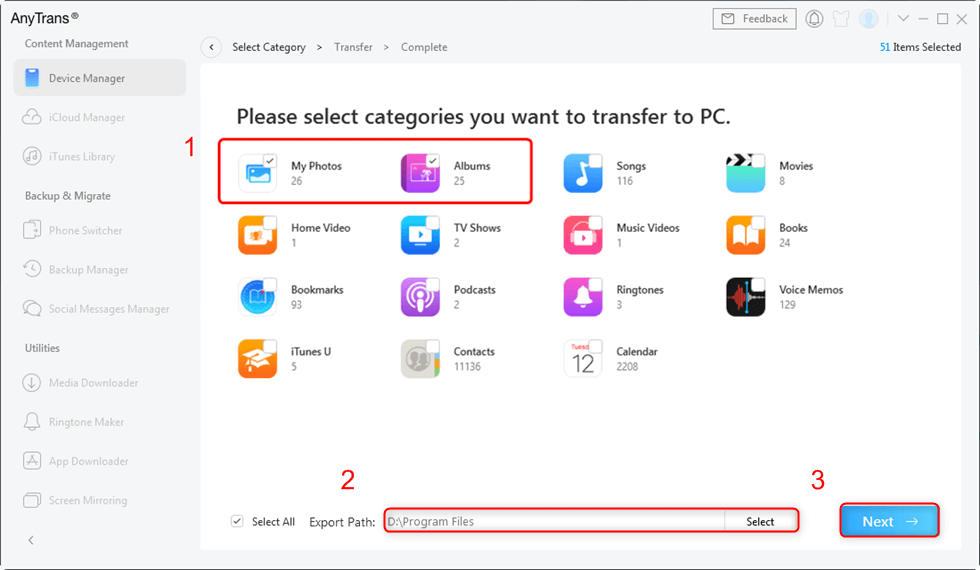
You Can Choose Export Path and Photos Category
Step 3: In a while, the software will transfer selected data from your device to your computer.
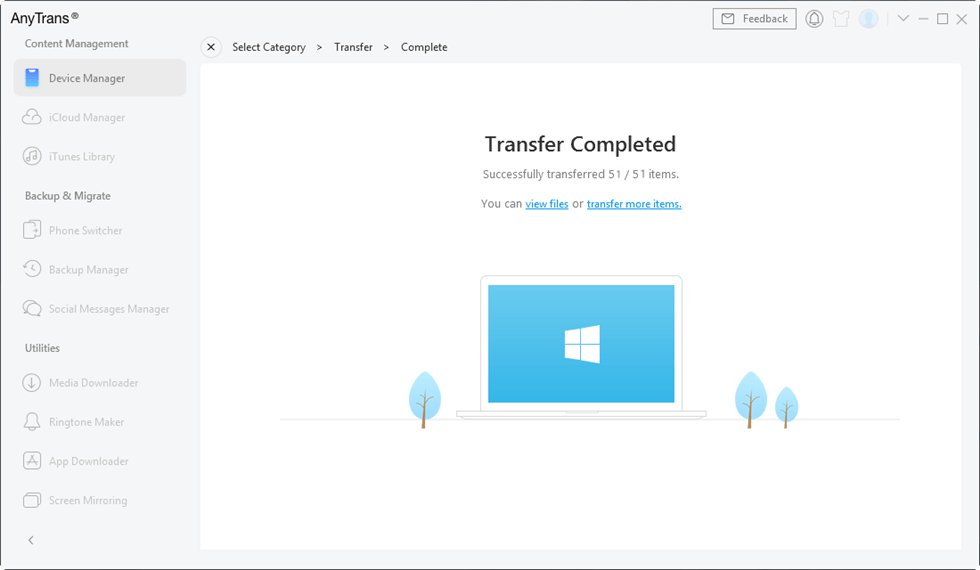
Photos Transfer Completed
Transferring Files from iPhone to PC without iTunes
If you’re interested in transferring files from iPhone to PC without iTunes, the following methods are recommended for you.
Option 1: Move Files from iPhone to PC via USB Connection
The method to move files from iPhone to PC through USB connection is mentioned below.
- Connect your iPhone to PC using a USB cable.
- Click “My Computer”.
- You will see your iPhone icon displayed under “Portable Devices”.
- Open it by double-tapping on it.
- After that, move to “Internal Storage” to access your files.
- Finally, move the desired files to your destination on your computer.
Option 2: Copy Files from iPhone to PC via AutoPlay
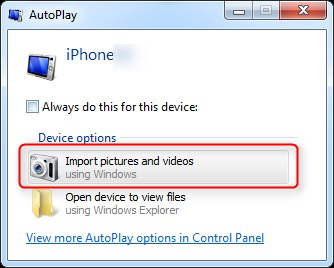
With Windows AutoPlay, you will gain more control of where your data is copied from your iPhone to a computer. So, follow the below instructions to learn how to move files from iPhone to PC through Windows AutoPlay.
- To start with, connect your iPhone to the PC with the help of a digital cable.
- The AutoPlay will show up immediately.
- Choose the “Import Pictures and Videos” option.
- You can tap on “More Options” to choose the folder where you would like to copy the files.
- You can create a folder for photos and then, click “Ok” > “Next”.
- Once you set up the functions, you can start importing the video by tapping the Import button.
Transfer Files to PC – AutoPlay
How to Transfer Files from iPhone to Mac without iTunes
There are also several ways to move files from iPhone to Mac without iTunes. If you’re are Mac user, the following are recommended methods for you.
Option 1: Transfer Files from iPhone to Mac via AirDrop
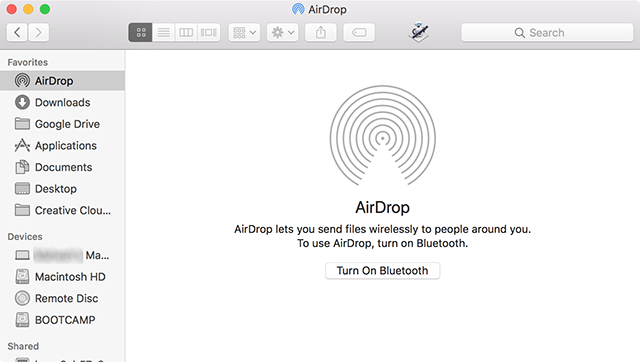
The easiest method to move files from iPhone to Mac without iTunes is using AirDrop. It works similarly to Bluetooth among Android phones and Windows PC. With the help of AirDrop, you can wirelessly transfer your files between iPhone and Mac. There is no need for a network connection as long as both devices are placed close enough.
Here’s how to transfer files from iPhone to Mac via AirDrop:
Enable AirDrop on your Mac – Go to “Finder” > “Go” > “AirDrop”. Also, turn on Wi-Fi and Bluetooth.
Now, activate AirDrop on your iPhone – Open “Control Center” > “AirDrop”. Also, enable Wi-Fi and Bluetooth. You can select to be found either by Everyone or Contacts Only.
- Next, open the file you would like to transfer on your iPhone.
- Then, click on the “Share” option.
- Your Mac icon will show up as a share option.
- Click on it to begin the process.
- Tap on the “Accept’ on the Mac when the pop-up window appears.
- Wait for the process to get completed.
Enable AirDrop on the Mac
Option 2: Transfer Media Files from iPhone to Mac via iPhone App
You can also transfer files from iPhone to Mac through the iPhoto app. This method is helpful to move pictures or videos from iPhone to Mac without iTunes. Here’s what you need to do.
- To start with, connect your device to Mac using a USB cable and run the iPhoto app.
- Now, you will be able to see the media files of your iPhone.
- Select the target files you would like to move and choose the “Import Selected” option.

How to Import Photos from iPhone to Mac with iPhoto
Option 3: Transfer Media Files from iPhone to Mac via Email
Transferring media files from iPhone to Mac through Email is one of the traditional ways. This is all about sending the files you want to transfer to your own email address. This method is recommended if the data you would like to move from iPhone to Mac is not huge, like 20 to 25 pictures you need to transfer. The following are the steps to get the job done rightly.
- Select the file you would like to transfer.
- Click on the “Share” button.
- Select “Mail” from the share options to move your selected picture to your own Email account.
- Finally, access your account on your Mac.
- Open the email you’ve recently sent to yourself to download the attachments to your computer.
The Bottom Line
That’s how to transfer files from iPhone to the computer. As you can see that there are several great methods to help get your job done. But, AnyTrans is one of the easiest ways you can have to move desired files from your iPhone to Windows PC or Mac.
Free Download * 100% Clean & Safe
More Related Articles

Senior writer of the iMobie team as well as an Apple fan, love to help more users solve various types of iOS & Android-related issues.
Product-related questions? Contact Our Support Team to Get Quick Solution >
