How to Transfer Photos from Sony Camera to iPhone
It used to be very difficult to share photos from a Sony camera to iPhone back in the day. However, in the advancement in software development, there are now a number of apps and methods available to transfer photos from Sony to iPhone. This guide has some of those ways for you to get your Sony photos on your iPhone. Read on to learn what those methods are.
iPhone Transfer Tips
Transfer from iPhone
- Best iPhone Transfer Software
- Photos iPhone to HP Laptop
- Photos iPhone to Dell Laptop
- Photos iPhone to Surface
- Music from Phone to Computer
- Sync iPhone to Computer
- Sync iPhone Videos to Flash Drive
- Move iPhone Notes to iCloud
- Transfer iPhone Music to iPad
- Transfer iPhone Files from to PC
- Sync iPhone Files to Flash Drive
- Move Camera Photos to Computer
Sony has manufactured some really great quality cameras and these are quite popular in the market. If you have one of these, it is likely you use it as your primary camera and take all of your pictures on it. If you need to switch your Android to iPhone, and want to transfer pictures from your Sony to your iPhone. It is totally possible to do it and this post will show you how to do it.
Earlier, you only had a limited number of options when it came to sharing photos from a Sony camera to an iPhone. However, with the availability of new apps, you have more and better options to share photos from your camera over to your iOS device. The following are some of the methods on how to transfer photos from a Sony camera to an iPhone.
Further Reading: How to Unlock Sony Xperia when Forgot Password >
Method 1. Transfer Photos from Sony to iPhone Using USB Cable
Using a USB cable to transfer data has been one of the traditional methods of sharing files and it works pretty well, too. If you have ever shared files from any of your devices to your computer, you have likely used a USB connection to do the task. The method is simple, easy to use, and does not require many resources.
If you choose to use the USB method to transfer photos from your Sony to your iPhone, then all that you are basically going to need is a compatible USB cable. Most cameras come with an original cable that you can use to establish a connection between your camera and your computer.
You can then transfer your photos to your computer and then from your computer to your iPhone.
Step 1. Connect your camera to your computer using a compatible USB cable.
Step 2. Your camera will appear as a storage device on your computer. Open it using file explorer and copy the photos you want to your computer’s local storage.
Step 3. You can eject the camera from your computer once the photos are copied.
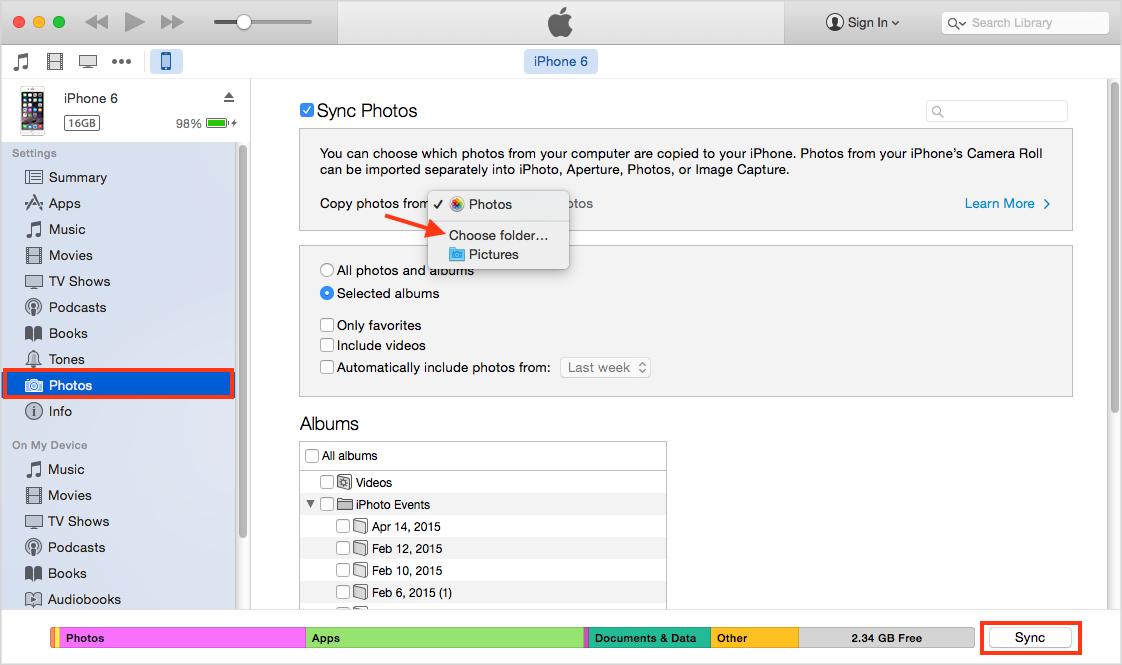
Step 4. Ensure you have the latest version of iTunes installed on your computer.
Step 5. Connect your iPhone to your computer and launch the iTunes app.
Step 6. Select your iPhone in the app, click on the Photos tab in the left sidebar, and then choose the folder where your photos are saved on the right-hand side pane.
Send Sony Photos to iPhone Using An App
Step 7. Click on Apply and it will sync your Sony photos with your iPhone.
It may not be the easiest way to do the task but it gets the job done for you.
Method 2. Transfer Photos from Sony to iPhone with Move to iOS
Move to iOS is an application developed by Apple to help non-iOS device users easily and seamlessly switch to an iOS device. The main purpose of the app is to help you transfer and migrate data from your other devices to your new iPhone or iPad.
You can actually use the app on your Android device and have your photos copied over to your iPhone. You are then going to need to first transfer the photos from your camera to your Android phone and the app for your camera should help you do it. Then you can move your photos from your Android phone over to your iPhone using the Move to iOS app. The following shows how to do it.
Step 1. Download and install Move to iOS on your device.
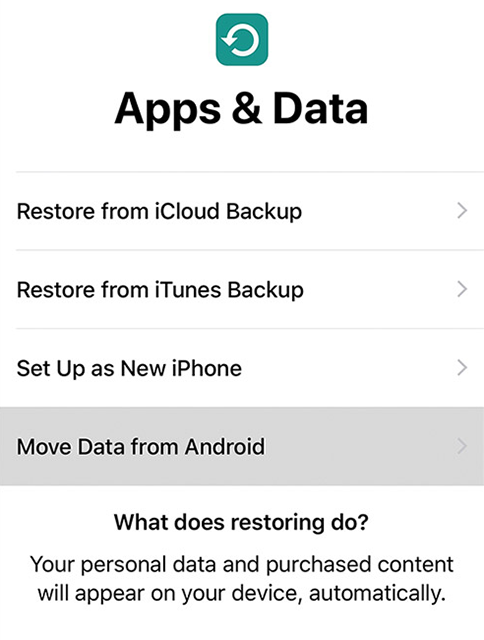
Step 2. While setting up your new iPhone, tap on Move Data from Android on the Apps & Data screen. It will let you copy photos from your phone to your iPhone.
Move Files from An Android Phone to An iPhone
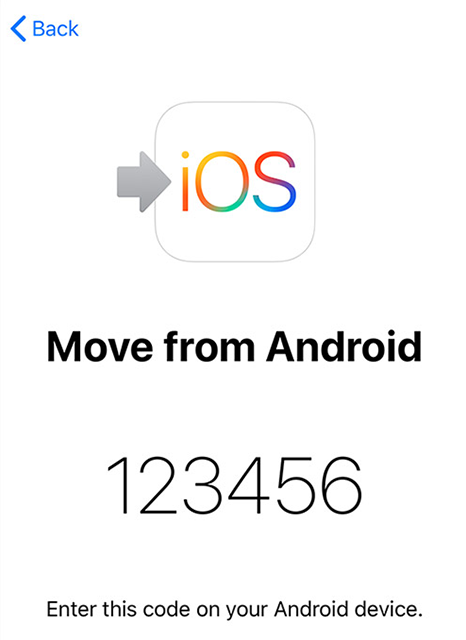
Step 3. You will see a code on your iPhone. Note it down as you will need to enter it on your Android device.
Note Down the Verification Code
Step 4. Enter the code when prompted on your Android device and wait for it to authenticate it.
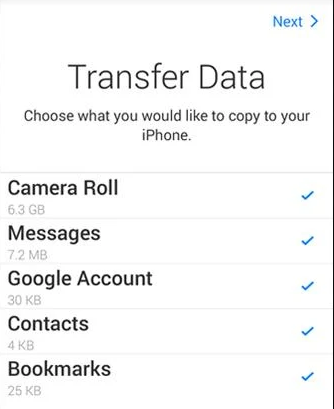
Step 5. Your Android device will then ask what data you would like to transfer. Make sure to select Camera Roll so that it includes all of your photos. Then, proceed with the on-screen instructions.
Make Sure to Select the Photos Option
Your Sony photos should now be available on your iPhone.
Method 3. Transfer Photos from Sony to iPhone Using Bluetooth
Wireless file sharing actually started with Bluetooth and it was a common way for people to share their files with their friends and family. If you have been using a smartphone for some time, you have likely used it to share your photos and other content with the people around you.
As you have access to both your iPhone and your camera, you can utilize Bluetooth to send photos from your camera to your iPhone. This requires no mess of cables and everything works wirelessly. All that you need to make sure is both of your devices are close to each other as Bluetooth does not work when two devices are far away.
The following are the steps you need to follow to share Sony photos via Bluetooth.
Step 1. Open the main settings menu for your camera and enable the Bluetooth option.
Step 2. Select the photos you want to transfer to your iPhone, tap the share option, and select Bluetooth.
Step 3. Head to Settings on your iPhone and ensure Bluetooth is turned on.
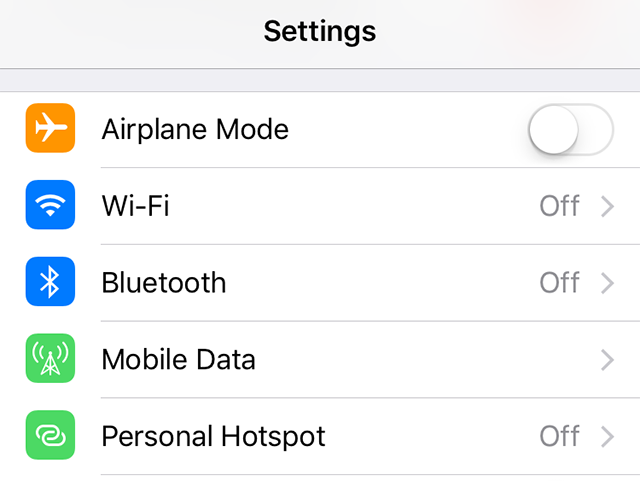
Enable Bluetooth on the iPhone
Step 4. Choose your iPhone in the Bluetooth devices list on your camera. If you do not see your device, refresh the list.
Step 5. Your camera will start transferring photos to your iPhone.
It can take anywhere from a few seconds to a few minutes to get your photos transferred. The time it takes is dependent on the number of photos being transferred.
You should then see the photos available in your Photos app.
Method 4. Transfer Photos from Sony to iPhone with AnyTrans
If you got your Sony photos on your Android device already, then there is a really fantastic app that lets you easily and quickly transfer photos from an Android phone over to an iPhone. All it requires you to do is connect both your devices, select an option, and you are good to go.
The app is called AnyTrans and it is a full package for all of your data transfer needs. You can use it to create a backup of your device, transfer your files, and even download media files off the Internet.
The following are the steps on how to transfer photos from Sony to iPhone using the aforementioned app.
Step 1. Download AnyTrans and install it on your computer.
Step 2. Connect both your Android phone and your iPhone to your computer using a USB cable. Launch the app and click on the option that says Phone Switcher in the left sidebar. Select your Android phone as the source phone and your iPhone as the target phone and hit Next.
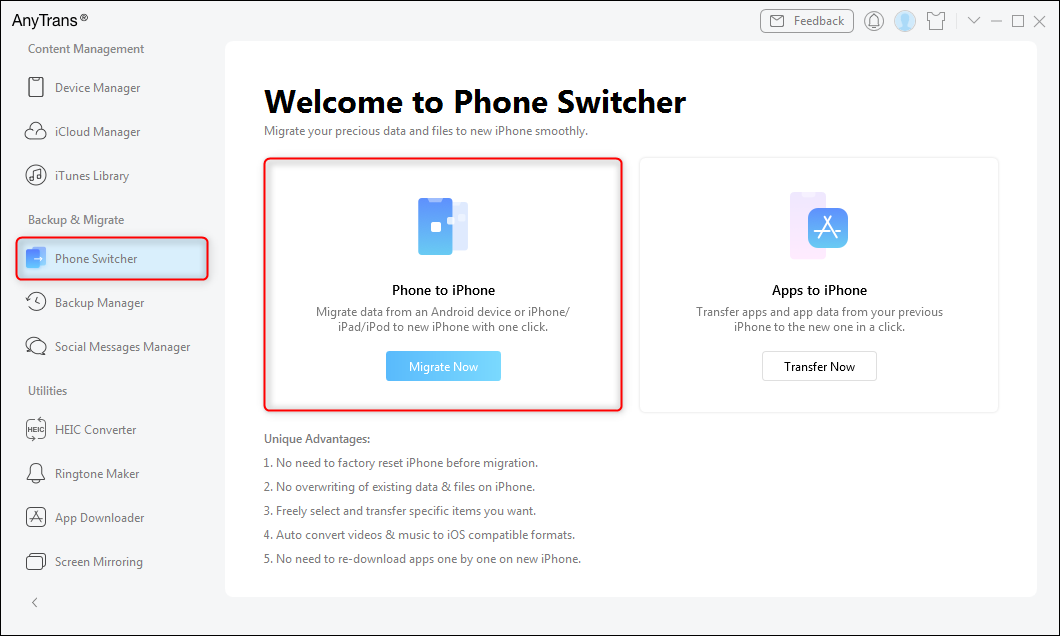
Choose Phone to iPhone on Phone Switcher
Step 3. It will ask what content type you want to transfer to your iPhone. Select Photo Library and click on Next.

Choose Photos and Click Next to Transfer
You will then find the transferred photos in the Photos app on your iPhone.
Conclusion
Sony and iPhone are two different items and transferring data between these two used to be a headache. Fortunately, with the apps and methods mentioned above, you can make the task a bit easier and transfer photos from your Sony camera over to an iPhone without much hassle.

Senior writer of the iMobie team as well as an Apple fan, love to help more users solve various types of iOS & Android-related issues.
Product-related questions? Contact Our Support Team to Get Quick Solution >
