How to Download Pictures from iPhone to Microsoft Surface Pro
If you have taken many pictures on your iPhone and want to transfer them from iPhone to Microsoft Surface Pro as a backup, this guide will show you how to make it with three easy methods.
iPhone Transfer Tips
Transfer from iPhone
- Best iPhone Transfer Software
- Photos iPhone to HP Laptop
- Photos iPhone to Dell Laptop
- Photos iPhone to Surface
- Music from Phone to Computer
- Sync iPhone to Computer
- Sync iPhone Videos to Flash Drive
- Move iPhone Notes to iCloud
- Transfer iPhone Music to iPad
- Transfer iPhone Files from to PC
- Sync iPhone Files to Flash Drive
- Move Camera Photos to Computer
Nowadays, no matter where you are, you can use your iPhone to take high-quality pictures like HEIC format from iOS 11 and record amazing moments even without a professional camera like Canon or Nikon. You must have many valued pictures on your iPhone and want to share with families on a computer.
Or, it’s also important to transfer pictures from iPhone to your Microsoft Surface Pro as backups in case of accidental data loss. Sometimes, you also need to download photos and videos to a computer, so you can get photos off your iPhone and delete some pictures to free up space.
Here in this guide, we will show you how to quickly transfer photos from iPhone to computer Surface Pro. So you can download iPhone photos and videos without any hassle.
You May Like: How to Transfer Photos and Videos from iPhone to Mac >
Easily Download Pictures from iPhone to Surface Pro with AnyTrans
AnyTrans is one of the best iOS content transfer softwares that allows you to transfer pictures from iPhone to Surface Pro. With AnyTrans installed on your Windows PC or Mac computer, you can preview all of your iPhone photos and videos, including My Photos, Albums, and divided into Peoples, Places, Photo Videos, etc.
Then, you can choose to transfer any of them to your computer. Besides, it enables you to delete photos as your needs, sync data between iOS devices. It also supports adding photos from a laptop to your iPhone. What’s more, AnyTrans supports you to manage all the files on your iPhone like videos, music, contacts, messages, notes, etc. The tool is compatible with all iOS models of iPhone, iPod, iPad, Windows 11, 10, 8, 7, and macOS.
Steps to Transfer Photos from iPhone to Surface Pro:
Step 1. Free download and install AnyTrans on Surface, and connect your iPhone to Surface via a USB cable. Click the Device Manager and choose Photos from the homepage.
Free Download * 100% Clean & Safe
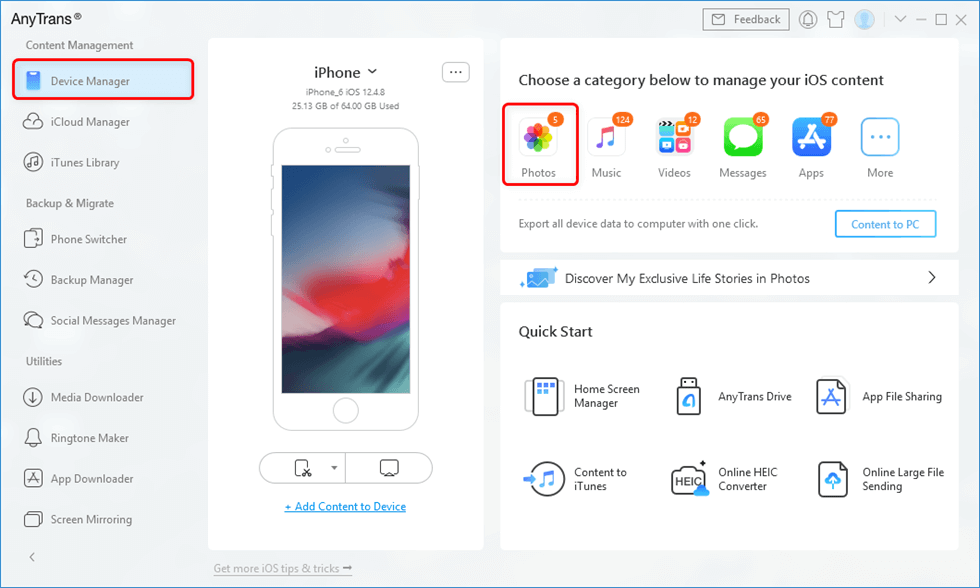
Click Photos in Device Manager
Step 2. Click on Photos, and then select the album with photos you want to transfer to Surface, like My Photos (including Places, People, and more), Albums, Photo Stream, etc.
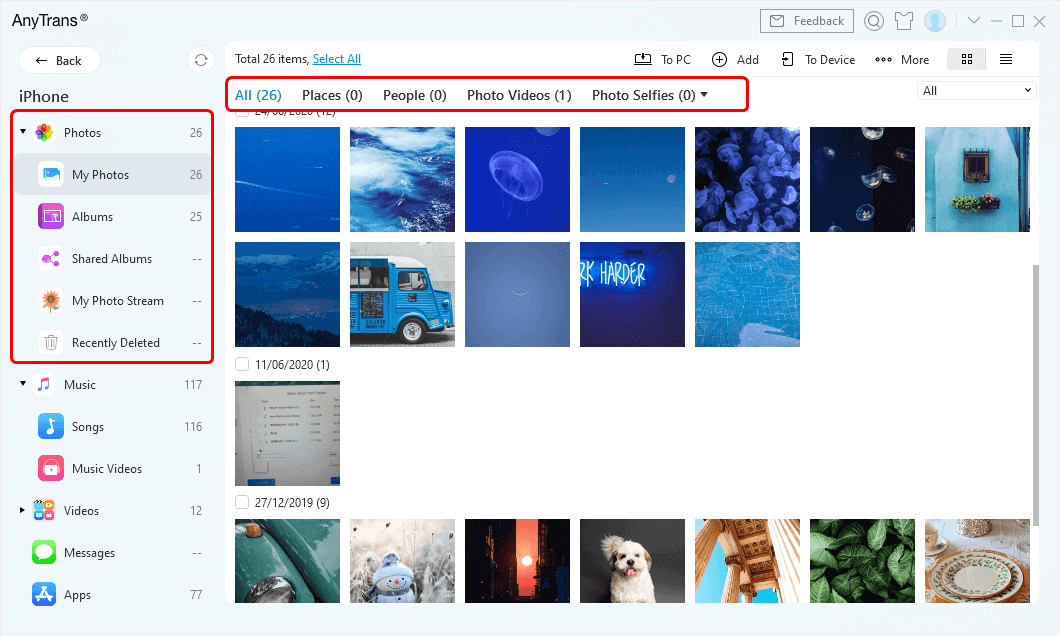
View Albums with AnyTrans
Step 3. Preview and select the photos you want to transfer > Click Send to PC button to get selected iPhone photos to your Surface Pro.

Select Photos and Send to PC
Download iPhone Photos to Surface Pro via iCloud
If iCloud is enabled on your iOS device, you can download your photos to Surface via iCloud website. Go to icloud.com > Enter your Apple ID and password > Click iCloud Photos and select photos you want to download > Tap the button “Download Selected Photos”. Then you can easily view your iPhone photos on computer.

Download iPhone Photos to Surface via iCloud
Also, you can set up iCloud for Windows on your Surface: Download and install iCloud for Windows for your Surface > Restart Microsoft and open iCloud for Windows from Start > Then enter Apple ID and password > Then select the Photos to sync to your Surface and select apply.
Sync Photos from iPhone with Surface Pro Microsoft OneDrive
Using OneDrive to sync photos from iPhone to Surface. On your Surface, you need to sign in to your Microsoft account first: Select Start > Settings > Accounts > Email & app accounts > Add an account > Sign in with your Microsoft account and follow the prompts.
On your iPhone: Download OneDrive app from App Store > Open the OneDrive app and sign in with the same Microsoft account, then follow the instructions > Select Start Camera Upload to enable automatic photo uploading to OneDrive. Also, you can also tap Me, Settings, and the Camera Upload option to turn on automatic photo uploading.
Transfer Photos from iPhone to Windows PC with USB
If you got a USB cable, then you can also just connect iPhone to surface pro and transfer files. Here’s what to do:
- Connect your iPhone to a PC with a USB cable.
- Unlock your iPhone screen and click Accept.
- Once the Photos app is launched on your Windows, select Import > From a USB device.
- Select some photos you want to import and create a folder to store them on your computer.

Transfer iPhone Photos with Windows Photos
And, once you connect your iPhone to Windows via USB cable, you can also open iPhone’s internal storage > DCIM > Copy and paste the photos to your computer.
Fix Can’t Import Photos from iPhone to Windows
If you are facing the issue that Windows computer doesn’t allow you to import photos, or the computer can not recognize your iPhone, you can try some simple solutions as below:
- Check if the USB cable works.
- Try another computer.
- Update Windows system.
- Turn off iCloud Photos Library.
Further Reading: How to Fix iPhone Not Showing Up in Windows Explorer >
Can I AirDrop from iPhone to Surface Pro?
No. Airdrop is an Apple service that is applied on iOS and macOS operating systems, which can transfer files among iOS and macOS systems. That is to say, AirDrop only works on Mac, iPhone, and iPad. You can not airdrop iPhone to Surface Pro.
Bonus Tip: How to Download Pictures from iPhone to Surface Wirelessly
Apart from transferring pictures from iPhone to Surface Pro with AnyTrans, there’s another app could help you to transfer photos wirelessly. With AnyTrans app, you could download photos from iPhone to your Surface pro without a USB cable.
Step 1. Download AnyTrans app on your iPhone.
Step 2. On your Surface: Go to AnyTrans website and you will see a QR Code.
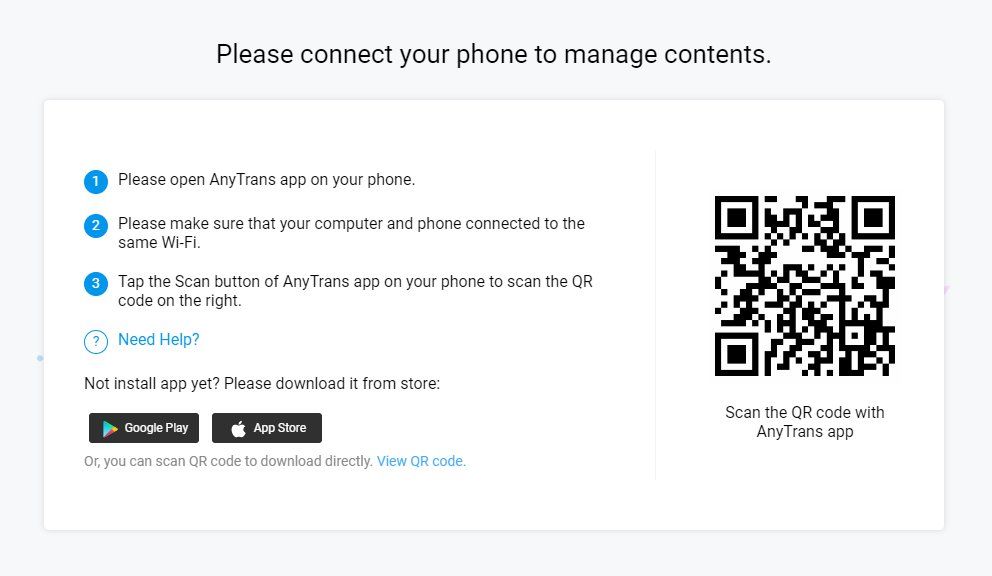
Download Pictures from iPhone to Surface Wirelessly – Step 2
Step 3. On your iPhone: Open AnyTrans app, and tap on the Scan button to scan the QR code on your Surface.

Download Pictures from iPhone to Surface Wirelessly – Step 3
Step 4. Then all your iPhone photos will show up on your Surface Pro computer. Select the photos you want to transfer and click on the “Download” button to download pictures from iPhone to Surface Pro.

Download Pictures from iPhone to Surface Wirelessly – Step 4
The Bottom Line
Besides transferring pictures from iPhone to Surface and Surface Pro, we can also use AnyTrans to transfer files from iPhone to Mac, to iTunes, and another device without erasing the previous data. Download AnyTrans now to have a try. If you still have any questions, please contact our support team by Email. If you like this guide, please share it with your friends.
More Related Articles

Senior writer of the iMobie team as well as an Apple fan, love to help more users solve various types of iOS & Android-related issues.
Product-related questions? Contact Our Support Team to Get Quick Solution >
