How to Make Custom Alert Tones for iPhone 6/6s/7/8/X/11
Want to make and set custome alert tones for iPhone Text, Calender, Reminders, etc? Here in this article, you’ll get to know how to make ringtones for iPhone and the way to set those ringtones as custom alert tones.
iPhone Ringtone Tips
Set Ringtone on iPhone
Ringtone Downloading Tips
I have successfully added a tone to my iPhone 6s but it is getting added as a ‘ringtone’, not as an ‘alert tone’. I wanted an alert tone. While syncing or creating the .m4r file, there is no option to select the type as ringtone or alert tone. So how do I add it as an alert tone, not as a ring tone?
– Users from Apple Community

Make Custom Alert Tones for iPhone
Like the users above, there are many users enquiring about how to make and set custom alert tones on iPhone. Even if you have made some custom ringtones on your iPhone, sometimes you can’t set them as your Calendar or Reminder alerts. Here in this post, I will introduce you how to make ringtones for iPhone and the way to set those ringtones as custom alert tones on iPhone. Now, keep reading and find a way to make alert tones as you need.
Part 1. How to Make Ringtones for iPhone
Method 1. Make Ringtones on iTunes
The first choice you can make ringtones for iPhone is iTunes. You can set a variety of global songs as ringtones from iTunes Music Library. Here are the steps to create iPhone ringtones in iTunes:
Step 1. Open iTunes > Tap Songs button under Library, then choose a song that you like and right-click on it > Click the Song Info option.
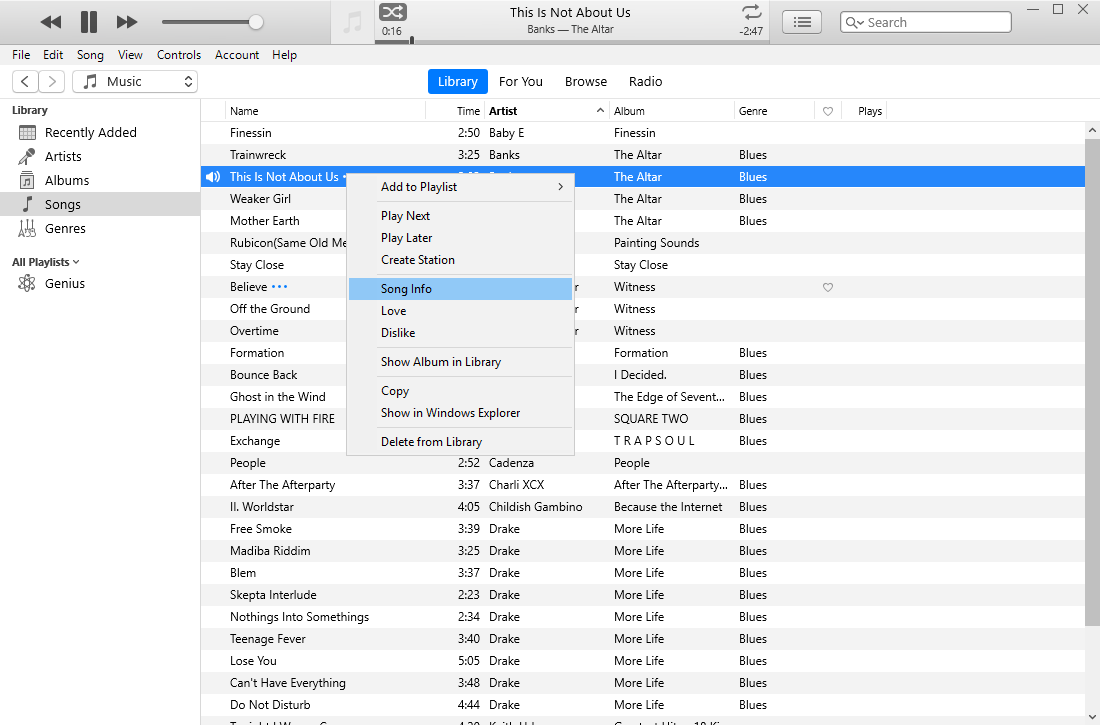
Choose a Song and Click Song Info
Step 2. In the Song Info box, click the Options tab > Enter the time you want the ringtone to start and stop, only a 30-second period can be applied into ringtone. Next, click OK to finish this song clip.
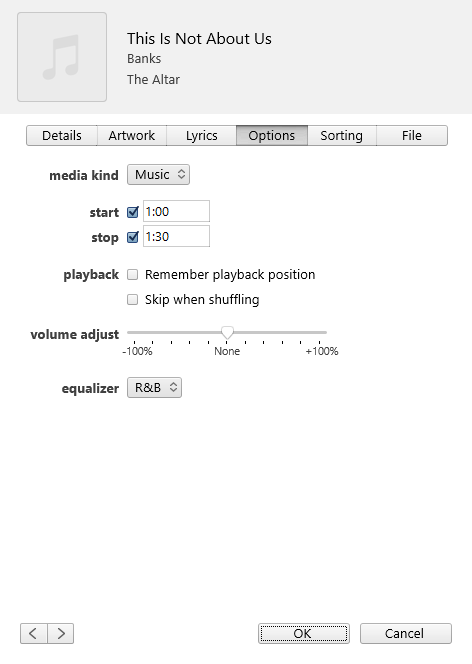
Enter the Start Time and Stop Time for 30 Seconds
Step 3. After you cut a 30-second song clip, click File on the menu column > Tap Convert > Tap Create AAC Version. iTunes will immediately convert the 30-second audio you just trim.
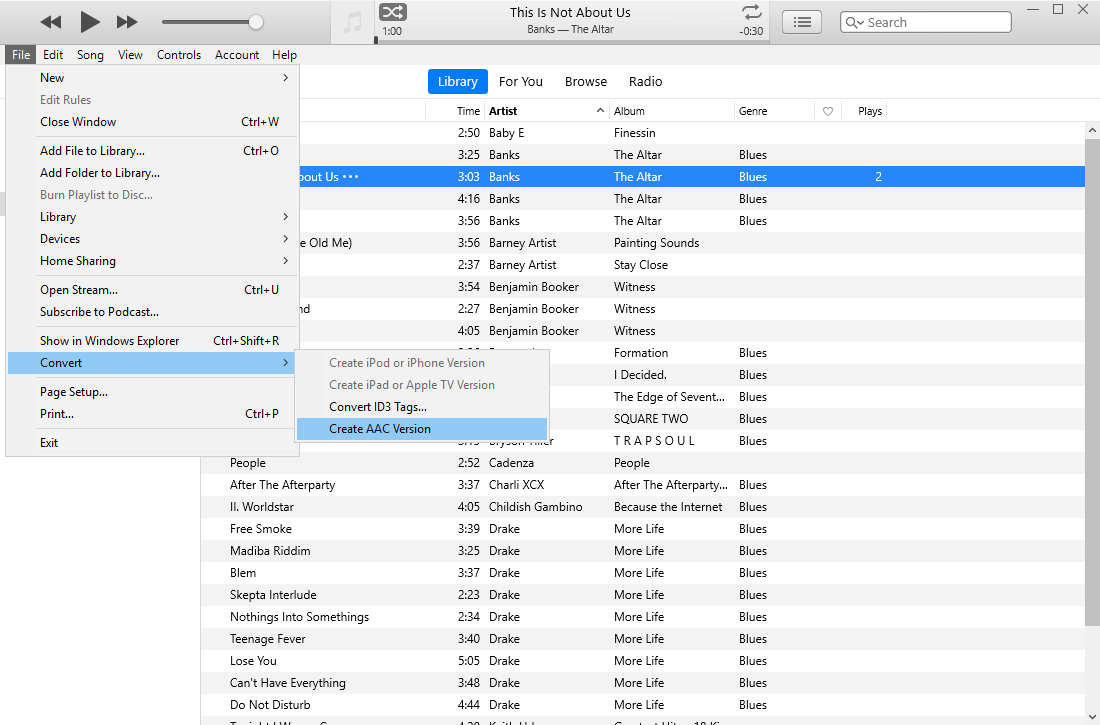
Create AAC Version for the Ringtone
Step 4. When you finished AAC version, the 30-second ringtone is in iTunes Library. Next, select create aac, and right-click on it, choose Show in Windows Explorer/Show in Finder on Mac.
Step 5. Now, you need to change the song’s file extension from .m4a to .m4r (That’s because Apple uses a .m4r extension for ringtones instead of .m4a.).
Step 6. Connect your iPhone with the computer with a USB Cable > Tap the phone icon> Click the Tones category, in the section On My Device > Copy (Ctrl+C) the ringtone file in your computer and paste (Ctrl+V) it to the Tones folder. The new ringtone should sync with your iPhone immediately.
Method 2. Create Ringtones for iPhone with AnyTrans
As an impressive iPhone ringtone manager, AnyTrans offers a safe and simple approach to make some custom tones for iPhone. Let’s check some main features of it:
- Supports making custom ringtones and alert tones for iPhone within steps, and you can directly export alert tones to your iPhone.
- Supports setting the duration of your custom tones and the start/end time fo your tones.
- Allows you to choose files from computer, device, or iTunes Library and set it as your custom alert tones on iPhone.
- Besides, it can also help you manage other iOS data like photos, contacts, messages, videos, music, bookmarks, ringtones, call log and more.
Before the start, you need to free download AnyTrans to your Windows/Mac computer and follow the steps below to make custom alert tones for iPhone.
Free Download * 100% Clean & Safe
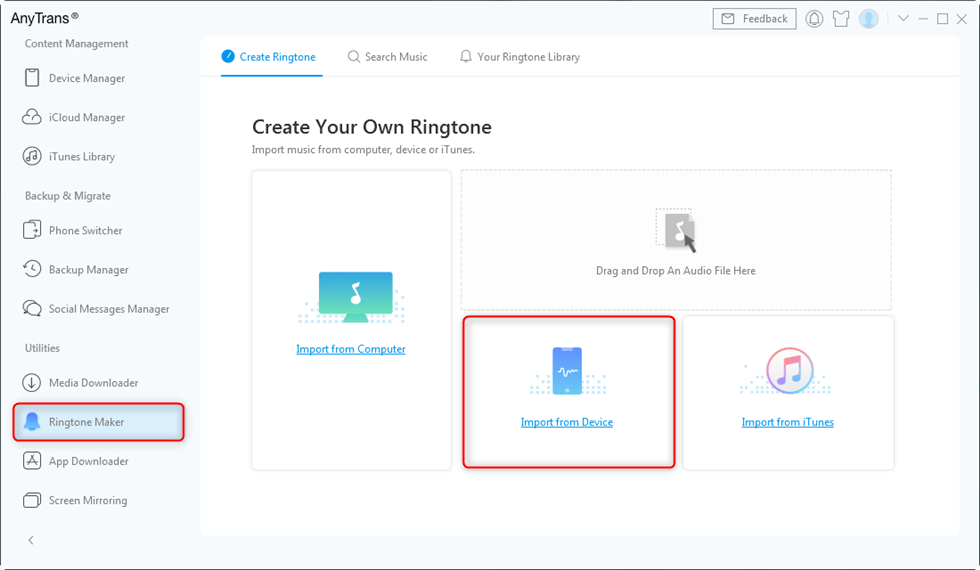
Step 1: Launch AnyTrans > Connect your iPhone to computer with USB cable. Click on Ringtone Maker.

Run AnyTrans and Connect your Device
Step 2: Choose an audio file from computer, device or iTunes library or just drag and drop audio files here.
Tab Import from Device
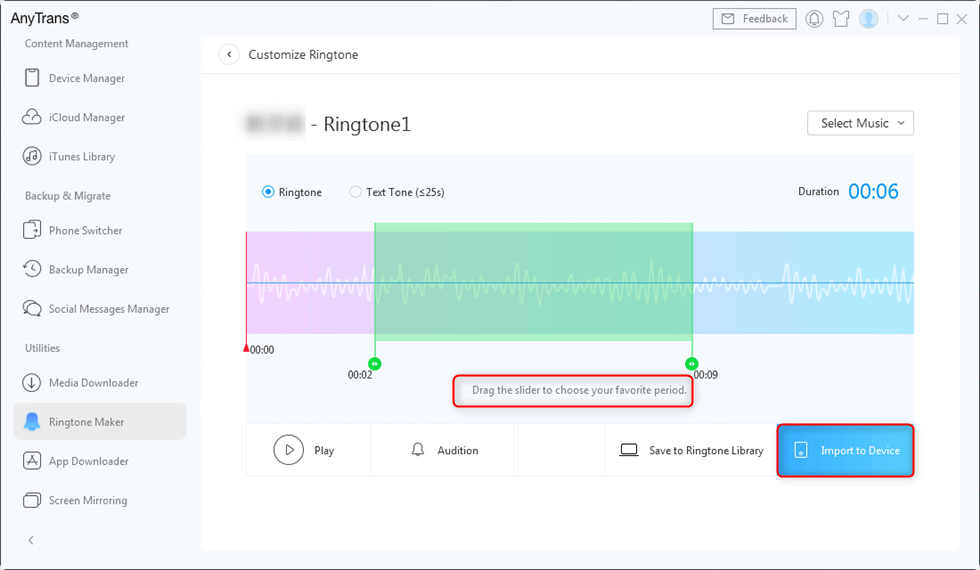
Step 3: Choose Ringtone (Also, you can choose Text Tone to make custom text tone directly here, please refer to Part 2 > Tip 2 for the detailed steps) > Then drag the slider to choose your favorite period > Click on Import to Device > Before that, you can Play it and make sure that you like.

Choose Text Tone and Preview then Import to Device
Step 4: The ringtone will be imported to your iPhone successfully, then you can apply it to your device. Please refer to Part 2 to learn how to set the ringtone as an alert tone.
Select and Set Ringtones to Transfer
Part 2. How to Set Ringtones as Custom Alert Tones on iPhone
Tip 1. Set Ringtones as Custom Alert Tones on iPhone
After you made and imported the ringtone to iPhone using the above methods, you can set them as alert tones as you like.
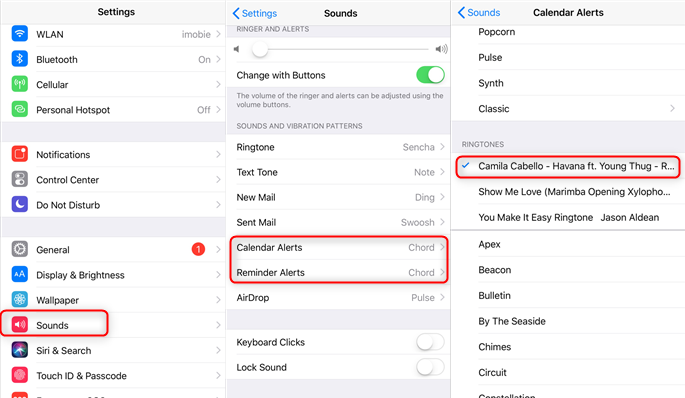
On your iPhone: Go to Settings > Sounds/Sounds & Haptics > Here you can choose , New Mail, Sent Mail, Calendar Alerts, Reminder Alerts, or Airdrop to set > Select the custom alert tones you imported.
Make Custom Alert Tones for iPhone
Tip 2. Set Your Text Tone with AnyTrans
In Part 1 > Method 2 > Step 3, you can choose Text Tone to make custom text tone directly. Then, the ringtone duration should be cut into 25s automatically, and you can drag to choose less than 25s. Next, click on Import to Device. With this way, you can make custom text tones directly. After imported to device, you can Select Music again to make another one with ease.
Choose Text Tone and Preview then Import to Device
The Bottom Line
That’s all for making custom alert tones for iPhone with the help of iTunes and AnyTrans. With AnyTrans, you can choose to make ringtone or text tone. What’s more, it can also help you transfer data from iPhone to iPhone, from iPhone to computer and from computer to iPhone as well. Just get it to your computer and start a free trial >

Member of iMobie team as well as an Apple fan, love to help more users solve various types of iOS & Android related issues.
Product-related questions? Contact Our Support Team to Get Quick Solution >
