How to Save GarageBand as MP3 with Ease
Want to save Podcast or music you created as mp3 to share it further? For this, you need to learn how to save GarageBand as mp3. This article will provide you steps in detail to convert GarageBand to mp3.
iPhone Ringtone Tips
Set Ringtone on iPhone
Ringtone Downloading Tips
Methods of music creation have changed drastically these days with the advent of technology, like GarageBand. It helps the users to create multiple tracks with the help of inbuilt MIDI keyboards, loops, voice recordings, and other instrumental effects. After recording and mixing, you can easily listen to it on this platform. However, if you want to play the music file with other common audio applications, then it is necessary to export GarageBand to mp3 or other formats.
The reason behind this is that by default GarageBand saves the music file as m4r which is not supported by other music applications. If you don’t know how to save GarageBand as mp3, don’t worry, here in this article, we will show you shared steps and methods to convert GarageBand to mp3. Now follow these steps to export GarageBand to mp3.
How to Save GarageBand as MP3
Step 1: Save the File
When you have completed your project, click on the File menu, and select Save. This ensures that all your files of recordings are saved and you are able to edit them further.
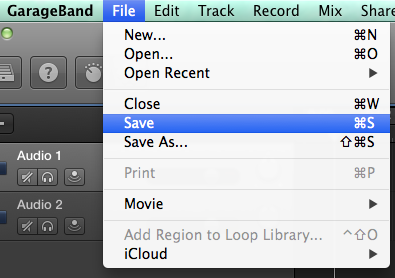
How to Save GarageBand as MP3 – Save the File
Step 2: Export Song to Disk
Click on Share and then select Export Song to Disk. You can then change the name, location, and select the file format (AAC, MP3, or AIFF). Choose the quality setting for the exported file from the Quality pop-up menu. Choose to export GarageBand as mp3.
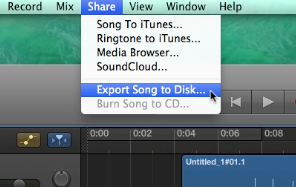
How to Convert GarageBand as MP3 – Share the File
Step 3: Converting to MP3
Select the Export button Once you are done with the settings and the quality measures of the recording.
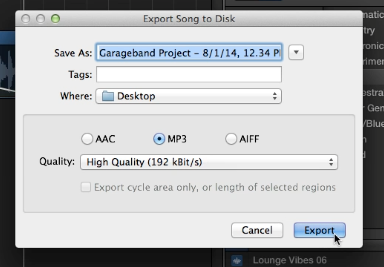
Export GarageBand to MP3 – Convert to MP3
Step 4: Store and Share the Converted File
After the completion of the converting progress, now you can easily save and share your mp3 file.
Bonus Tip: How to Create Ringtones for iPhone
Ringtones on iPhone are classic and great, however, the default ringtones are just not enough to express our character, that is why many people are tried many ways to create their own ringtones.
iTunes could be used as a ringtone converter. However, since iTunes 12.7, ringtones are not supported, that is to say now, creating ringtones is an impossible mission with iTunes. Luckily, we have some excellent iTunes alternatives, the most outstanding one is AnyTrans.
AnyTrans, developed by iMobie Inc., aims at providing all iOS users with the best way to transfer data. While transferring audio files, no matter downloaded songs online, or mp3 files converted from GarageBand, AnyTrans offers you the option to convert audio files to ringtones. Now, it has already become thousands of people’s first choice to create ringtones for iOS devices because:
- You can convert any audio files in any format on the computer as ringtones.
- You will no longer be stuck in complicated converting processes. With AnyTrans, within a few clicks, you can successfully transfer audio files from computer to iPhone iPad iPod as ringtones.
- You can choose the start time and ringtone length before transferring. That is to say, you can choose your favorite part of the song as a ringtone.
- You have our guarantee that AnyTrans is totally safe and secure. It is developed by Apple certificated developer and while using it, no information leakage or data loss would occur.
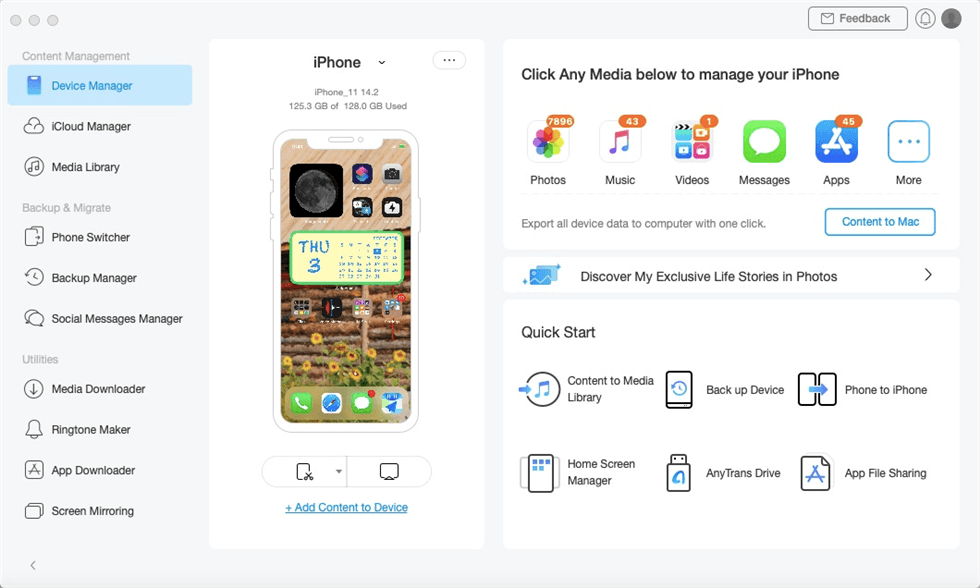
Manage iPhone/iPad/iPod Data with AnyTrans
As you can see, AnyTrans is indeed a nice and convenient tool for custom ringtones. Why not get it for free immediately and use it to help you transfer the audio file as a ringtone on iPhone?
Free Download * 100% Clean & Safe
The Bottom Line
With the above 4 steps, you can easily save GarageBand as mp3. If you want to convert the saved audio files as iPhone ringtones, don’t forget to give AnyTrans a try! By the way, if you have any questions about this post or AnyTrans, don’t hesitate to leave comments below.
More Related Articles

Member of iMobie team as well as an Apple fan, love to help more users solve various types of iOS & Android related issues.
Product-related questions? Contact Our Support Team to Get Quick Solution >
