How to Fix Red Eyes in Photos on iPhone
If your newly captured photos have red eyes in them, this post teaches you how to fix red eyes on an iPhone. There are actually both built-in and third-party apps to fix red eyes and we cover both of those for you here in this guide.
iPhone Photo Editing Tips
Edit Photos on iPhone
Edit Live Photos on iPhone
If you have ever captured photos in low-light using your iPhone’s flashlight, you have noticed that the eyes of the object in your photos look red. It often happens in scenarios like this and a bit of a slight adjustment can help fix the issue.
However, if you have already taken your photos and you want to remove red eyes from those on your iPhone, there are several ways to do the task on your device. You can either use the built-in Photos app to edit your photo and remove red eyes or you can download a free app off the App Store and use it to fix the eyes.
Regardless of what method you go for, you will have fixed red eyes in your photos at the end of each procedure. Let us check out the available methods to do the task.
Part 1: How to Remove Red Eyes in Photos on iPhone
If your iPhone runs iOS 7 or a newer version of the operating system, you do not need to download or install any app on your device to fix the red eyes. The built-in Photos app already has a feature to fix red eyes in any of your photos on your device. For as long as your photo is available in the app, you can edit it to remove the red eyes and apply the original eye color to the eyes.
If you are running an older version of iOS, you will need to first update your iPhone to the latest version available. It can be done by going to Settings > General > Software Update and tapping on Download and Install.
Once you are on a newer version of iOS, all you need to do is launch the Photos app and select your photo to do the red-eye correction on your iPhone. The following is a comprehensive section on how to do it.
There is one thing you need to keep in mind. If you open a photo in the Photos app but you do not see the red-eye fix icon, it means your iPhone does not recognize your photo to have a red-eye issue. It does not mean your iPhone lacks the feature to fix red eyes.
Step 1. Open the Photos app from the springboard on your iPhone. Select the photo you want to remove red eyes from and it will open.
Step 2. While your photo is in the full-screen mode, tap on the Edit option at the top-right corner to bring up the editing tools.

Access the editing feature in Photos
Step 3. On the following screen, you will find a new editing tool at the top-left corner of your screen. It looks like a strike-through eye icon. Tap on the icon to begin fixing red eyes in your photo.
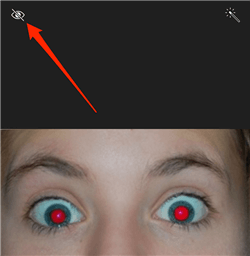
Choose the red eye removal tool
Step 4. Your iPhone will ask you to tap on each red eye in your photo to fix them. Tap on the first red eye in the photo and it will immediately fix the issue for you.
Step 5. Tap on the second red eye in the photo and it will be fixed immediately as well. Once you are happy with the final result, tap on Done at the bottom-right corner to save your photo.
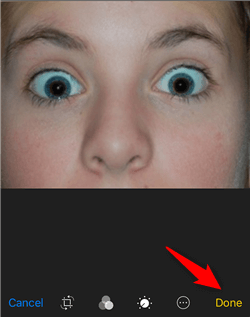
Save the fixed photo to your iPhone
Your photo without the red eyes issue will be saved in the Photos app on your iPhone.
Part 2: How to Get Rid of Red Eye on iPhone
The Photos app gets the red eye issue fixed for most photos on your iPhone. However, if you have run into a rare case where it does not fix the issue, you might want to look for a third-party app alternative.
If you take a look at the official iOS App Store, you will come across dozens of red eye remover apps claiming to help you fix the red eyes in your photos. While some of those apps come from legitimate sources and let you do the task without any issues, others often cause issues and do not fulfill their promise.
If you have not already chosen an app to fix red eyes on your iPhone, you can go ahead with the app we suggest below. It will work for sure and you will be able to fix the issue in no time on your iOS-based device.
Step 1. Open the iOS App Store on your iPhone, search for the app named Pixlr, and install the app on your device.
Step 2. You will see the app icon on your springboard when it is installed. Tap on the icon and the app will launch.
Step 3. When the app opens, you will see several options on the main interface. You need to find and tap on the option that says photos. It will let you fix the issues in your iPhone photos.
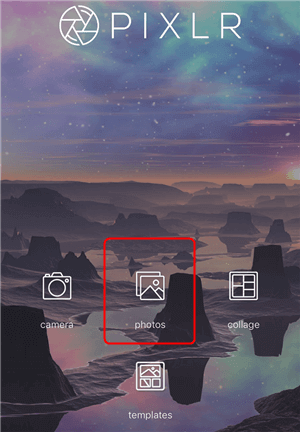
Select the photos option
Step 4. On the following screen, select the photo with red eye and it will be imported to the app.
Step 5. There are several editing options at the bottom bar of the app. You need to tap on the icon that looks like a suitcase and it will open a new editing menu for you.
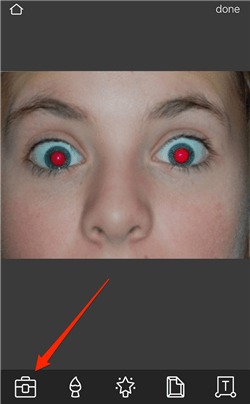
Open the editing menu
Step 6. You will now see a number of options to edit your image. You want to tap on the one that says red eye which is usually located at the end of the list.
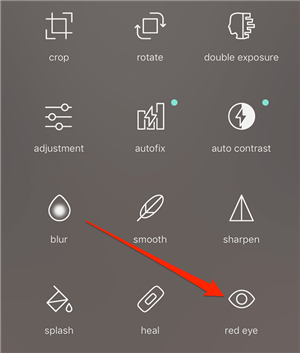
Choose the red eye tool
Step 7. It will ask you to tap on the center of each eye to fix the eyes. You will need to do it for both the eyes and the app will fix the issue for you.
That is how you get rid of the red eye issue on an iPhone using a third-party app.
Bonus Tip: How to Transfer Photos from iPhone to Computer
With so many amazing photo editing apps available for the iPhone, it is highly unlikely that these apps cannot fix the red eye issues in your photos. However, if that is actually the case and you are not able to fix red eyes using any of the apps on your phone, you may want to move over to an actual computer to do the task.
Your computer has access to more advanced-level photo editing tools which should help you fix any issue you have with your photos including the red eye one. Before you do that, though, you are going to need to transfer the photos from your iPhone to your computer.
A standard method to do that is to use the iTunes app. The main drawback of that option is that it syncs your entire photo library. If you are only going to be editing a single photo, this is too much of work to do and does not justify the efforts you put in.
A more efficient and better method is to use the AnyTrans app. It is an app just like iTunes but it is more flexible when it comes to transferring files between an iOS device and a computer. You can use the app to easily transfer photos from your iPhone over to your computer without syncing the entire library. It comes with many more useful features that you also might want to use.
AnyTrans – iPhone Photo Transfer
- Preview and copy photos from iPhone to computer in a few minutes.
- Convert HEIC photos to compatible computer formats.
- No harm to picture and will be kept in original quality.
- Work well with all iPhone models as well as iOS systems.
Free Download100% Clean & Safe
Free Download100% Clean & Safe
Free Download * 100% Clean & Safe
The following are the steps on how to use the app should you decide to give it a try.
Step 1. Grab the latest version of AnyTrans on your computer and install it.
Step 2. Plug-in your iPhone to your computer using a compatible cable. Launch the newly installed app on your computer.
Step 3. Select Photos from the right-hand side panel in the app to select and copy your photos to your computer.
Step 4. Click on your phototype in the left sidebar and your photo previews will appear in the right-hand side pane.
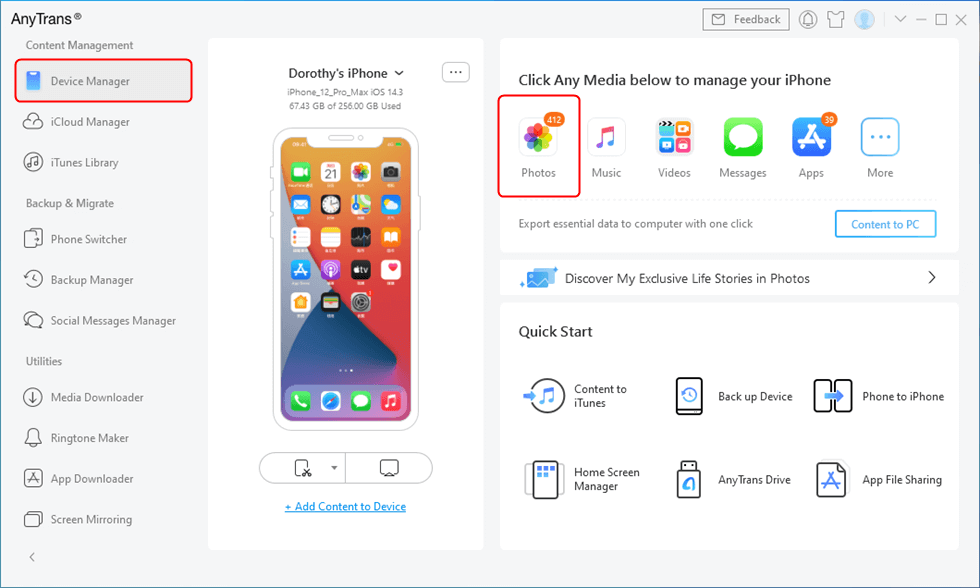
Go to Device Manager and Choose Photos
Step 5. Choose the photos you want to transfer to your computer and click on To Computer at the top.
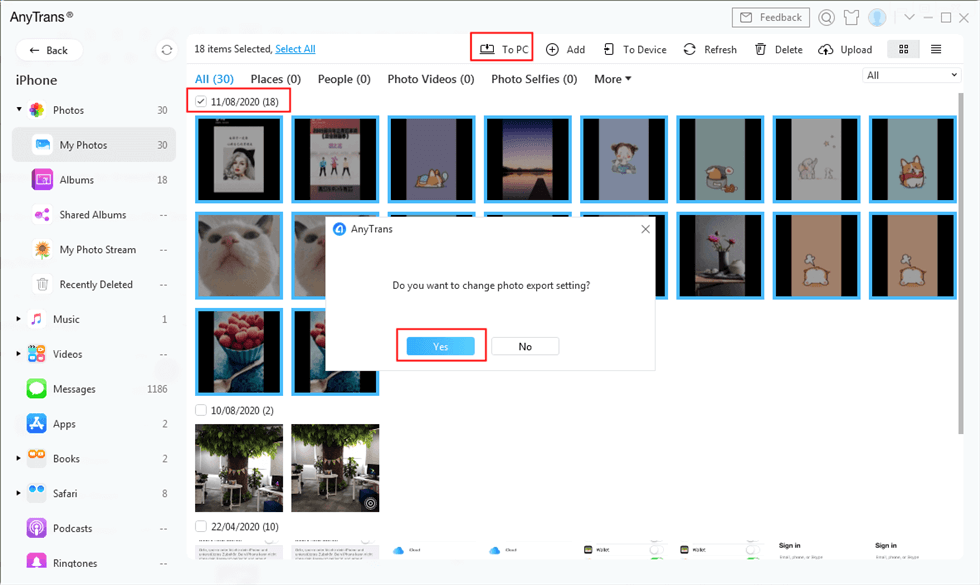
Backup Photos to Computer
Step 6. Your photos will be copied over to your computer.
Your selected photos should now be available on your computer.
The Bottom Line
If you are looking for methods on how to edit red eye on an iPhone, there are multiple ways to do it as described in our guide above. You are free to use any method that you think is convenient for you to fix the issue. We hope the guide has helped you out.
More Related Articles

Member of iMobie team as well as an Apple fan, love to help more users solve various types of iOS & Android related issues.
Product-related questions? Contact Our Support Team to Get Quick Solution >
