How to Rotate Photos on iPhone, iPad
Want to flip a photo on iPhone but do not know how? Here we will show you the detailed steps on how to rotate photos on iPhone.
iPhone Photo Editing Tips
Edit Photos on iPhone
Edit Live Photos on iPhone
AnyTrans
Transfer, backup and manage iOS content in a smart way
- Transfer photos, music, videos and more to computer, and vice versa
- Backup iPhone flexibly: Full Backup, Incremental Backup, and Air Backup
- Free download videos and music from 1000+ sites include YouTube
Available for both Win & Mac
One of the many good things about an iPhone is its camera quality. It is because of this feature that many users prefer to take photos on their iPhones rather than on their digital cameras. The iPhones are now as good, if not better, for taking photos as the DSLR cameras. If you use an iPhone, your gallery is likely full of your loving life moments.
Sometimes, what happens is that the photo shows up in the wrong orientation, e.g., you wanted them in landscape but they are in portrait, you can rotate your photos to fix the issue. Then when you are happy with the final result, you can save the photo in your Photos app. And here we will focus on how to flip an image on iPhone.
Part 1: How to Flip a Photo on iPhone
Once again, you do not need a third-party to do the tasks. The built-in Photos app is just good enough to handle tasks like rotating your photos. You can use it to easily change the orientation of your photos and it only takes a few taps to do it. The following should teach you how you go about doing that using the Photos app on your iPhone.
- Find the Photos app on your springboard and launch the app.
- Then, select the photo that you would like to rotate and tap on it. This will make the photo open in full-screen mode.
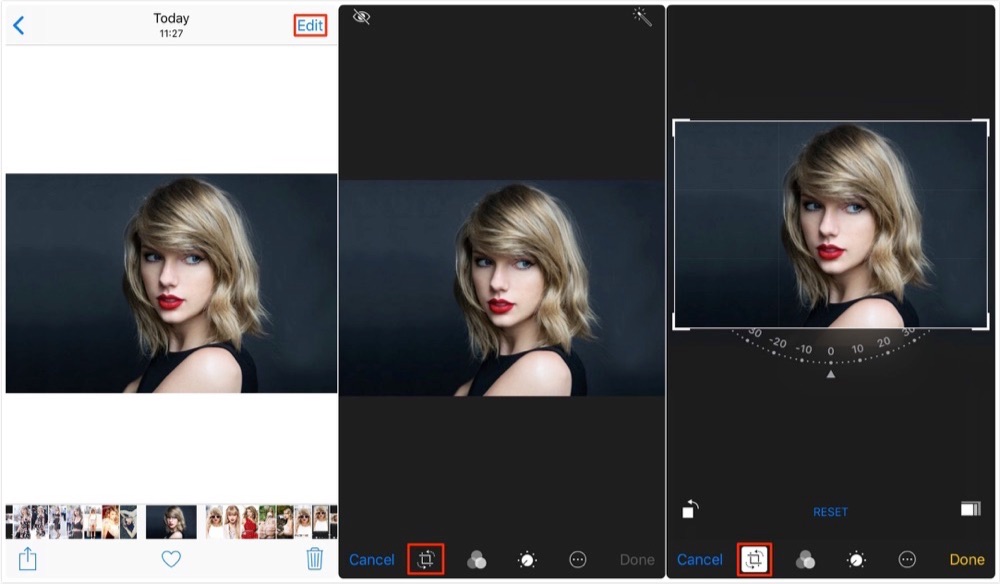
- When it opens in full-screen mode, you need to tap on the Edit option located at the upper-right corner of your screen. This lets you edit your current photo.
- The screen will go black and you are ready to start editing your photo.
- The option that lets you rotate your photo is exactly the same that lets you crop your photo.
- Tap on that crop option to begin rotating your pictures.
- On the following screen, instead of using the usual crop options, you need to find and tap on the rotate option given at the lower-left corner of your screen.
- Soon as you tap the option, it will rotate your photo counter-clockwise. You can tap on it again and it will rotate your photo counter-clockwise.
- Keep on doing it until you are happy with the result.
- Tap on Done at the lower-right corner to save your photo. The rotated photo will be saved in the Photos app on your iPhone.

How to Flip a Photo on iPhone
Part 2: How to Crop a Photo on iPhone
Another great thing about the iPhone is that for some of the basic tasks like cropping your photos, you do not actually need to download or install any apps on your phone. There are built-in apps on your device that let you perform these basic tasks for your photos. In order to crop photos on an iPhone, you can use the built-in Photos app.
It is a fully-featured app that in addition to letting you organize your photos, lets you edit your photos as well. You can use it to crop your photos, apply filters to them, and perform other similar actions on your pictures. Using the app is extremely easy as it has a nice and user-friendly interface. The following should teach you how to crop iPhone photos using the Photos app.
- The first thing you will need to do is launch the Photos app on your device.
- Find the album where your to-be cropped photo is located and tap on it. It will open in full-screen mode on your iPhone.
- When your photo is open in full-screen, you will see an option saying Edit at the top-right corner.
- Tap on it to start editing your photo.
- Several editing tools will begin to appear at the bottom of your screen.
- You need to find the one one that is for cropping your photos, usually located at the front, and tap on it.
- As soon as you tap the option, the cropping tools will appear around your photo.
- Adjust these options as to how you want your photo to be cropped.
- When you are done, tap on the Done option at the bottom-right corner of your screen.
- If you are not happy with your crop, you can have it go back to the original by tapping on the Reset option in the middle. Your cropped photo should be available in the Photos app for you to view.
How to Crop a Photo on iPhone
Bonus Tip: How to Transfer Photos from iPhone to Computer
For most basic photo editing tasks on your iPhone, the Photos app is good enough as it has several editing options available in it. However, if you are looking for more options and more effects to add to your photos, you are better off using a professional photo editing app on your computer.
A computer obviously has more options to edit your photos. You can use professional-grade apps like Adobe Photoshop, GIMP, and Luminar to turn your basic photos into something more appealing. This is not possible to do on a device like an iPhone. In order to edit your iPhone photos on your computer, you are going to need to first transfer photos from your iOS device over to your computer. If it is just a few photos that you want to edit, you will probably want to avoid iTunes sync as it syncs your entire album.
A better approach would be to use an app like AnyTrans. It allows you to selectively transfer photos from your iPhone to your computer. The photos are saved at your chosen location on your PC and you can then begin editing them.
AnyTrans – iPhone Photo Transfer
- Transfer thousands of photos in a matter of a couple of minutes.
- Copy photos from various iPhone albums to your computer.
- The incompatible formats are converted to compatible ones.
- Supports all the latest iPhone models and computer OS versions.
Free Download100% Clean & Safe
Free Download100% Clean & Safe
Free Download * 100% Clean & Safe
If you would like to give the app a shot to transfer your photos, the following will help you get started with it.
Step 1. download AnyTrans to your computer. Then, install the app on your computer. Plug-in your iPhone to your computer using a compatible cable and launch the app.
Step 2. Click on the “Device Manager” category. Then, click on the “Photos” option in the right-hand side pane.
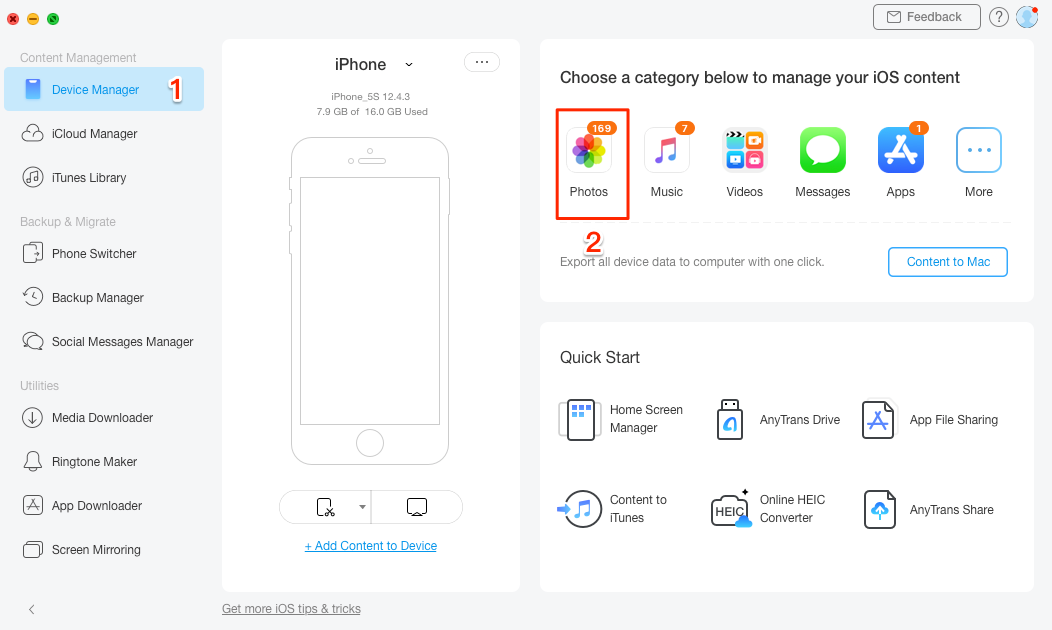
Transfer Photos from iPhone to Computer with AnyTrans – Step 2
Step 3. Click on your photo album from the left sidebar and select the photos you would like to transfer to your computer. Then, click on the “To Computer” button at the top.
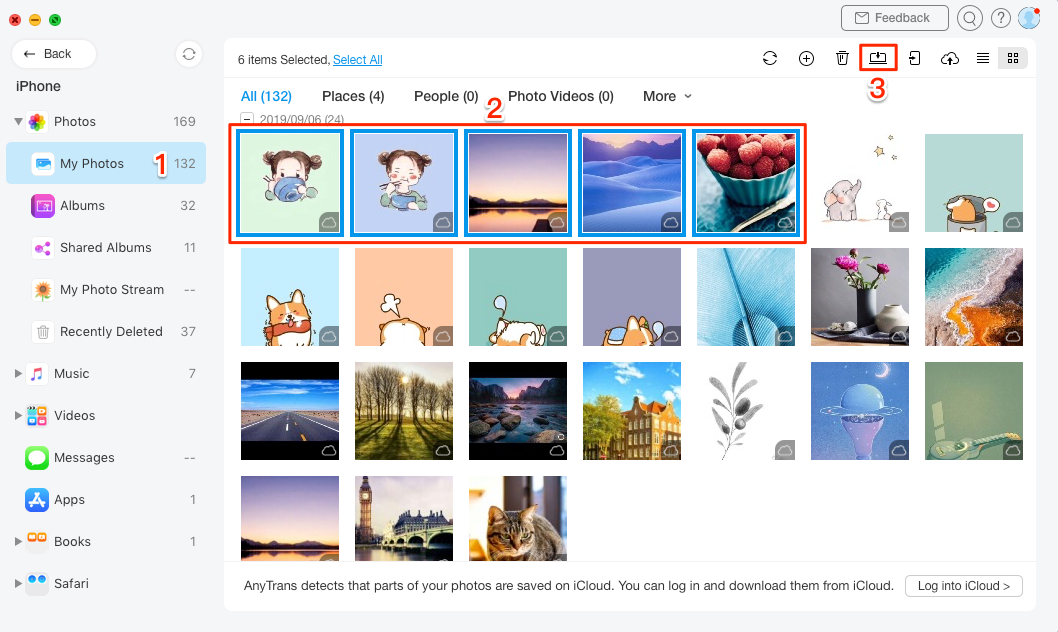
Transfer Photos from iPhone to Computer with AnyTrans – Step 3
Step 4. When your photos are transferred, you will see the following on your screen. Your iPhone photos are now available on your computer for you to edit.
The Bottom Line
Whether you want to learn how to cut out photos on an iPhone or you want to rotate your photos, the ability to do these tasks is already built into your device. Our guide above shows how to reveal this feature and use it to edit your photos on your iPhone.
More Related Articles

Member of iMobie team as well as an Apple fan, love to help more users solve various types of iOS & Android related issues.
Product-related questions? Contact Our Support Team to Get Quick Solution >
