Cannot Verify Phone Number for Apple ID? Here Are the Fixes
Have you set up a two-factor authentication but can’t verify your phone number for the Apple ID? Find fixes in the article below.
When you set up an Apple device, it’s often required that you sign in with your Apple ID and password. This is a security measure that Apple takes to identify the users of the device and prevent others from accessing it. This is not the only way to protect your device. Many people choose to set up two-factor authentication for Apple ID sign-in to add one more layer of protection to the device. With two-factor authentication, a verification will pop up on your trusted device, such as your phone, when you sign in to a new device with your Apple ID.
While two-factor authentication is helpful for your device security, it’s sometimes annoying when you can’t verify your phone number for the Apple ID sign-in. In this case, you won’t receive the verification on your phone and thus cannot sign in with Apple ID on your device. Did this issue occur to you and prevent you from using your Apple device? Don’t worry! The article below will explain to you why this issue happens and provide you with solutions to fix it.
Why Can’t Apple ID Verify My Phone Number?
There could be several reasons why the verification fails on your phone. They are mostly related to the settings of your phone, which may block the verification, or network issues, which prevent your phone from connecting to the Apple ID server. Here are some common scenarios that may apply to you:
- If you have multiple Apple IDs, your phone may be confused about which one to verify.
- You have been registered on one Apple ID which you may have forgotten or are unfamiliar with.
- If you have content blockers set up, the verification pop-up may have been blocked.
- Your phone may be connected to a restricted network that prevents you from connecting to the Apple ID server.
In these cases, you can try to fix the verification failure by keeping only one Apple ID and signing out of the others, removing the content blockers, or connecting to a different network.
And here are some guides on other Apple ID related issues:
4 Tips to Fix “Cannot Verify Phone Number” Apple ID Issue
The above reasons and solutions apply when you still have your phone in hand. However, what if the reason why you can’t verify your phone number is that you have lost your phone and need to sign in on a new device? We give you 4 tips here.
Fix 1. Request Verification Code via SMS
First, if you have access to another Apple device, such as a Mac, you can add your new phone to the trusted device list and request the verification code to be sent to it through text or phone call. Here are the steps to do so:
- Go to the Apple Menu > System Preferences > Apple ID > Password & Security.
- Click Edit next to the Trusted phone numbers: x.
- When a new window pops up, click on the + icon.
- When prompted, enter your Mac password. Then, click on Allow to allow the edit.
- Finally, you can enter the phone number through which you wish to receive the verification. Choose one of the options, Text message or Phone call, to verify your number. Click Continue.
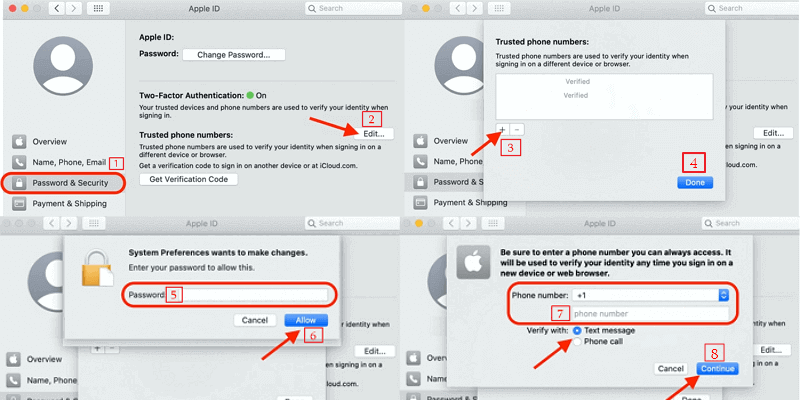
Add A Trusted Phone Number on Mac to Receive Verification Code via SMS
Once your number is verified through either text or phone call, it will be added to your trusted device list. Now, you will be able to receive the verification code through this number.
Fix 2. Fix the Issue with An Apple ID Password
What happens if you don’t have access to another Apple device? Can you still use a different phone number to receive a verification? The answer is yes! You can do so by signing in to your iCloud account with your Apple ID password and select the way you receive the verification in the process. See the steps below:
- Sign in with your Apple ID and password on iCloud.com.
- When the Apple ID sign-in request you to enter the verification code, click Didn’t get a verification code?
- If you have already registered a backup phone number as a trusted one, click Use Phone Number and then click the backup number to receive the verification code.
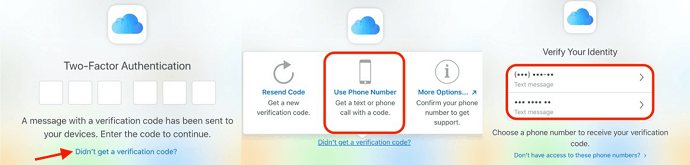
Request Verification Code with A Backup Phone Number
Once you completed the above steps, a verification code will be sent through text message to your backup phone number. Then you can enter the code to the verification pop-up to sign in your Apple ID.
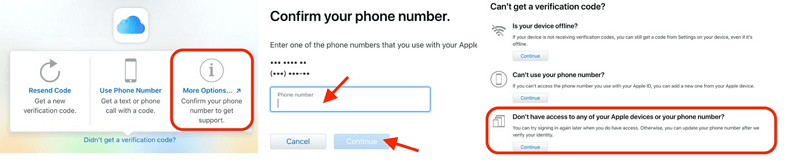
On the other hand, if you do not have a registered backup number, you will need to click More Options at step 3 to add a new phone number for verification. Here are the details on how:
- When you reach step 3 above, click More Options instead of Use a Phone Number.
- Then, enter one of your old phone numbers registered as trusted devices, when prompted. Click Continue.
- You will see a new window pops up listing some options for you. Choose Don’t have access to any of your Apple devices or your phone number? Click Continue.
- Then, follow the steps and prompts on the screen to recover your Apple ID and update your phone number.
Once successfully recover your Apple ID, you should be able to sign in to your account and use your new number for verification.
Update Your Phone Number for Verification through Recovery
Fix 3. Use the Find My iPhone App
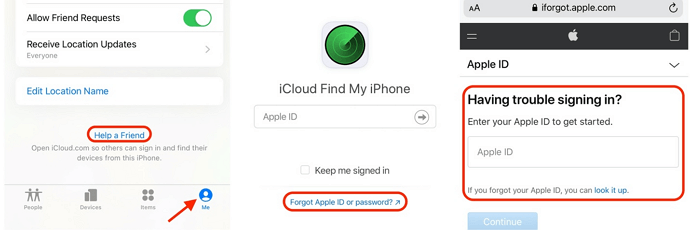
Signing in to your iCloud with an Apple ID password is not the only way to recover your Apple ID. In certain cases when you forget your Apple ID password, you can also use the “Find My iPhone” app on your friend’s or family’s phone to recover of your account. Here’s how:
- On your friend’s or family’s phone, go to Find My Phone.
- Under the section Me, tap on Help a Friend.
- When the sign-in page pops up, do not sign in to your friend’s or family’s account. Tap on Use a different Apple ID instead.
- Then, tap on Forgot Apple ID or password when you see the iCloud Find My iPhone sign-in page. Follow the steps and prompts shown on the screen to recover your Apple ID and password.
Recover Your Apple ID through Find My iPhone
Once successfully recover your Apple ID, you should be able to sign in to your account and use your new number for verification, same as above.
Fix 4. Solve It by Creating A New Password
No matter which way you choose to update your phone number or recover your Apple ID, it’s always important to change your Apple ID password afterward for your information security. In this way, whoever has your lost phone will not be able to access your Apple ID account or steal your information from it. See the steps below about how to create a new Apple ID password:
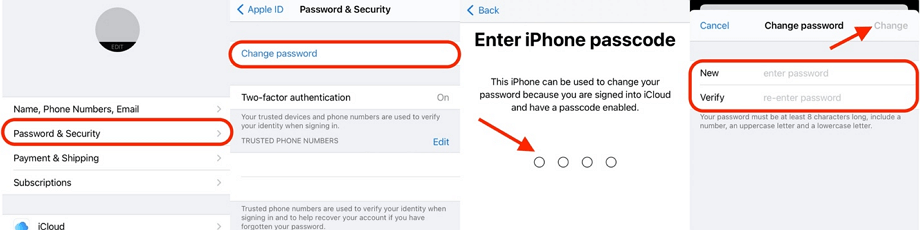
- Go to Settings.
- Tap on Your Name and then tap on Password & Security.
- Tap Change Password. When prompted, enter your iPhone passcode.
- Then, you can enter and confirm your new password for your Apple ID.
Create A New Apple ID Password
Easy and done! Now you should be able to enjoy your phone in a safer condition.
How to Remove Apple ID without Phone Number and Password?
If you cannot verify the phone number Apple ID within the above method, you may seek to delete Apple ID without password and phone number. You are highly recommended to use some Apple ID Unlock software to unlock the Apple ID if you can not verify the phone number.
Among the most popular Apple ID removal tools, AnyUnlock is one of the most reliable and complete iPhone unlockers, which is available for unlocking screen lock, MDM lock, iCloud activation lock, SIM lock, etc. It has established the best reputation among users and it lets you remove the Apple ID from your iOS-based devices without having you enter any passwords. All you need to do is connect your iPhone to your computer and the app will do the rest for you.
AnyUnlock – Complete iOS Unlock Toolkit
- Remove Apple ID/iCloud account from iOS device without password.
- Access a screen-locked iPhone if you fail to recall the passcode.
- Get back or just remove iTunes backup passcodes.
- Manage passcodes you own on your device.
Free Download100% Clean & Safe
Free Download100% Clean & Safe
Free Download * 100% Clean & Safe
The following detailed steps demonstrate how you can permanently delete your Apple ID from your iPhone without a password.
Step 1. Free install AnyUnlock on your computer and launch it > Select the Unlock Apple ID option on the main interface.
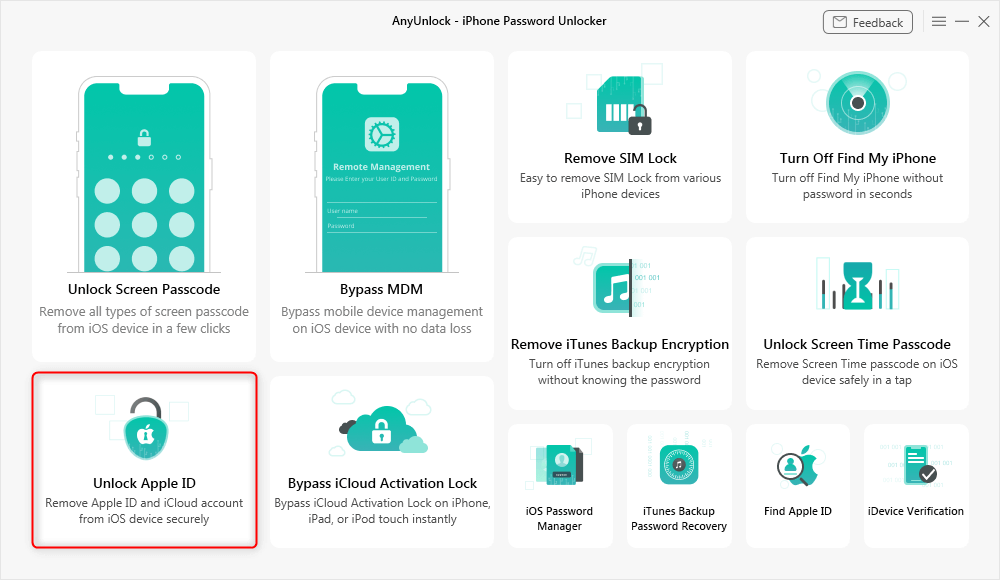
Click Unlock Apple ID from the Homepage
Step 2. And then, please connect your device. Once your phone has been recognized, please click Unlock Now to unlock.
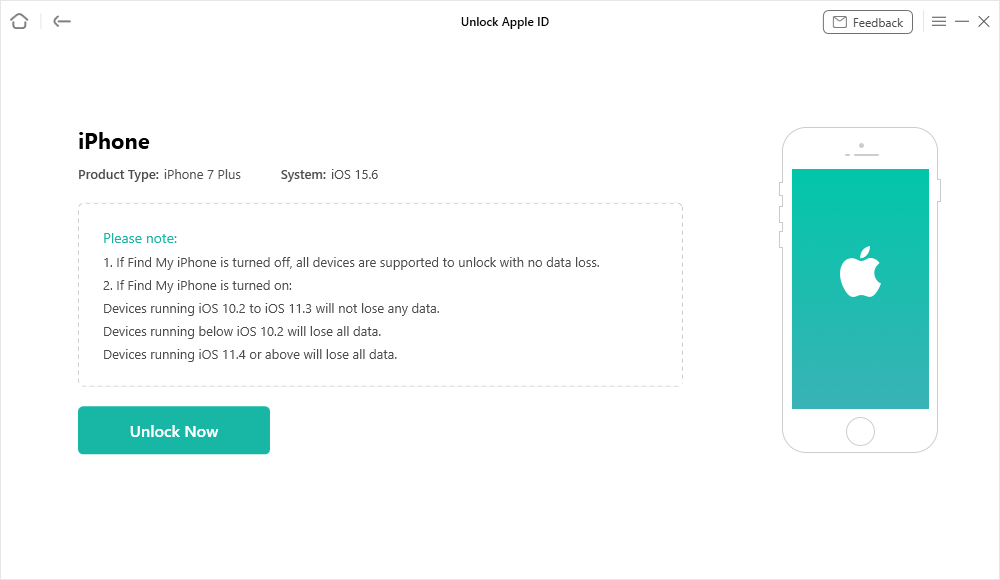
Click the Unlock Now to Start the Unlocking Process
If Find My iPhone is Disabled
Step 3. After clicking Unlock Now, AnyUnlock will automatically start removing Apple ID. Please keep a stable USB connection.
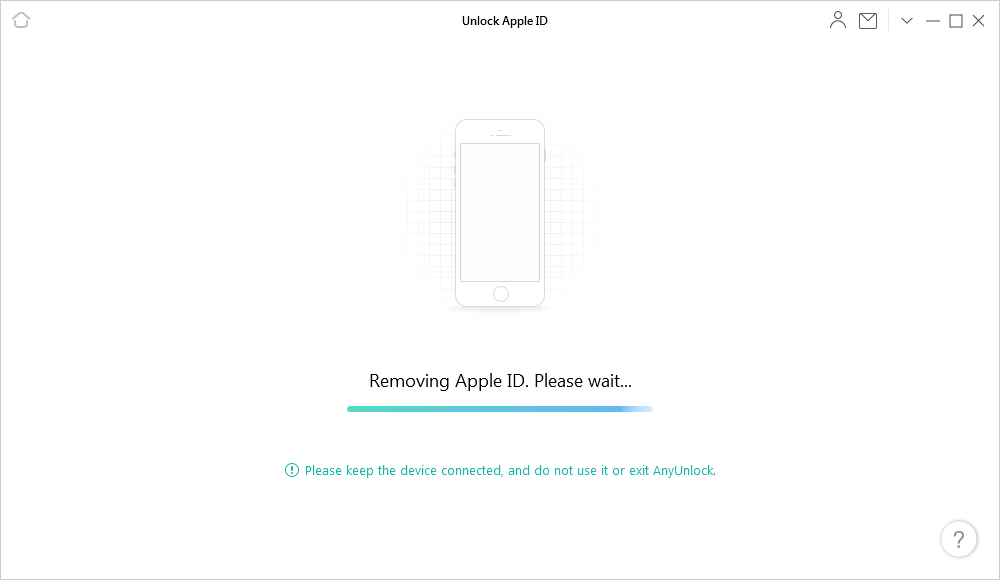
Removing Apple ID
Step 4. Minutes, later, when the unlocking process is complete, you’ll see Apple ID recomved successfully page.
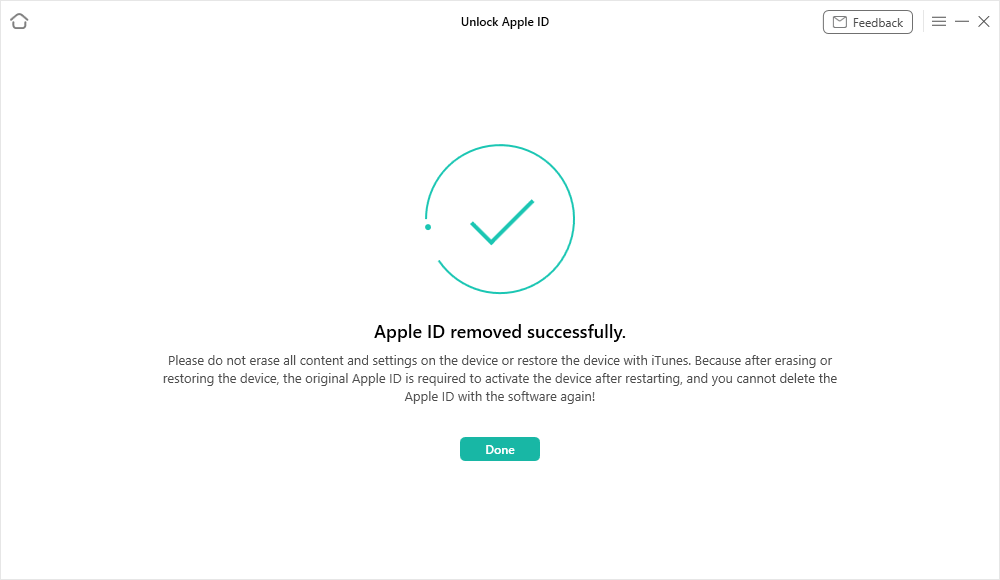
Apple ID Removed Successfully
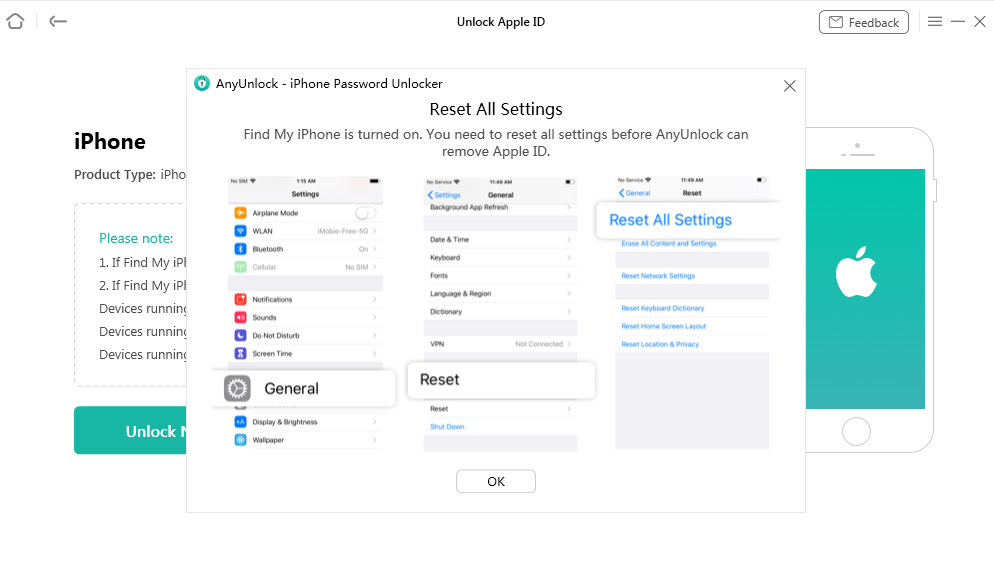
If Find My iPhone is Open and iOS is 11.4 and below
Step 4. After clicking Unlock Now, you need to reset all your device’s settings. Go to Settings > General > Reset All Settings on your device.
Reset your Device
Step 5. After you reset all settings, your iOS device will restart. And it may take some time to restart, please keep patient.
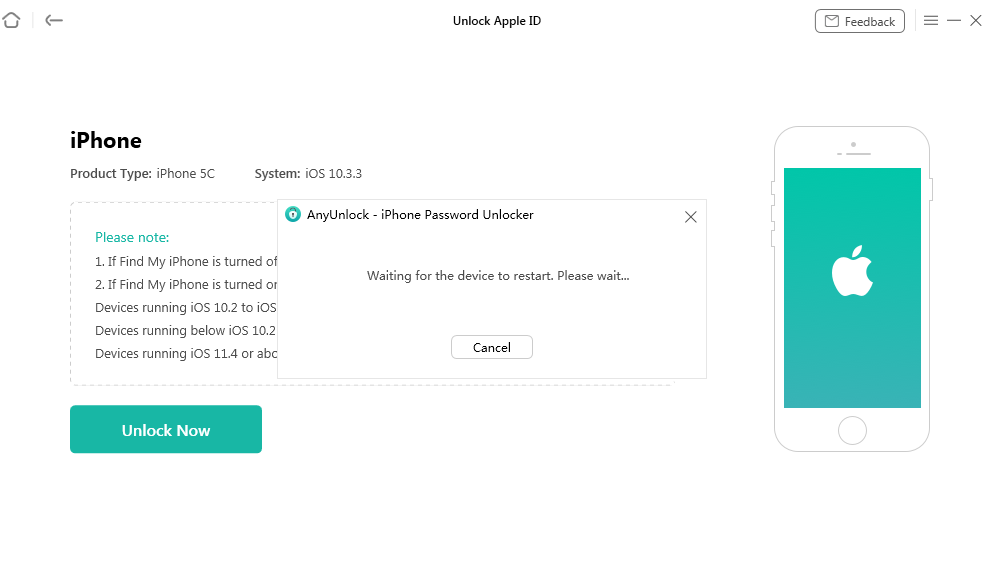
Wait for Reset
Step 6. After the device restarts, AnyUnlock will start the removing Apple ID process automatically. When the process is completed, you will see the interface below.
Apple ID Removed Successfully
The Bottom Line
Have you successfully verified your phone with the tips above? If you still have problems with it, don’t hesitate to comment below. We’ll try our best to help you and let you enjoy your device freely.

Senior writer of the iMobie team as well as an Apple fan, love to help more users solve various types of iOS & Android-related issues.
Product-related questions? Contact Our Support Team to Get Quick Solution >
