How to Transfer Ringtones from iPhone to iPhone [iPhone 17 Included]
Got a new iPhone and want to bring over your old ringtones? This guide explains how to share or transfer purchased and custom ringtones from one iPhone to another, including what you can do with AirDrop, Finder, older versions of iTunes, and a file-management tool.
iPhone to iPhone Transfer Tips
Transfer/Sync iPhone
Transfer Media Data
Transfer Personal Info
If you changed to a new iPhone 17 and want to know how to share ringtones on iPhone, here you are in the right place. In the past, iTunes might be the first choice when it comes to syncing iPhone data. However, since iTunes 12.7, Apple has removed the ability to manage ringtones. You can’t use iTunes 12.7 to sync ringtones anymore. Then how to transfer ringtones from iPhone to iPhone?
Worry not. In this post, we will show you simple ways to send ringtone to iPhone. And even the newest iPhone 17 & iOS 26 are supported. And we will also tell you the iTunes way if you are still using the older iTunes version. Let’s see the methods to transfer ringtones to iPhone.
In addition, here are some other tips about iPhone ringtones, click and read if you need:
Can You Share a Ringtone from One iPhone to Another?
Yes, but the right method depends on what kind of ringtone you have. A purchased ringtone, an original MP3/M4A/M4R audio file, and a custom ringtone that exists only in the old iPhone’s ringtone list are not transferred in the same way.
If you only want to send the source audio file to another iPhone, AirDrop or email can do that. However, sending an audio file is different from directly copying an installed ringtone from one iPhone’s ringtone list to another.
Choose the Right Method Based on Your Ringtone
| What You Have | Recommended First Step | What to Know |
|---|---|---|
| A ringtone purchased from the iTunes Store | Try Download All Purchased Tones on the new iPhone. | You usually do not need to extract the tone from the old iPhone. Availability can depend on your Apple Account and whether the tone is still available for redownload. |
| An MP3, M4A, M4R, or other source audio file | Transfer the source file with AirDrop, email, Files, or a computer. | On iOS 26, supported short audio files can be set as a ringtone directly from the Share menu. On earlier iOS versions, you may need GarageBand or a computer-based method. |
| A custom ringtone that exists only in the old iPhone’s ringtone list | First look for the original audio file. If it is no longer available, consider a compatible iPhone file-management tool. | Do not assume that an installed ringtone can be selected from Settings and AirDropped directly to another iPhone. |
| You only want to send an audio clip to a friend | Use AirDrop, Messages, or email to send the source audio file. | The recipient may still need to set or create it as a ringtone, depending on the file and iOS version. |
Are Your Ringtones Trapped on Your Old iPhone?
Let’s address the most common problem right away. The methods below work perfectly if you have the original ringtone audio files (.m4r format) saved on your computer. But for many people, those files are long gone, and the ringtones now exist only on the old iPhone.
If the custom ringtone exists only as an installed tone on the old iPhone and you no longer have its source audio file, moving it is less straightforward. You cannot simply open the ringtone list in Settings and AirDrop an installed tone to another iPhone. First check whether the original MP3, M4A, M4R, or GarageBand project still exists in Files, iCloud Drive, or on your computer.
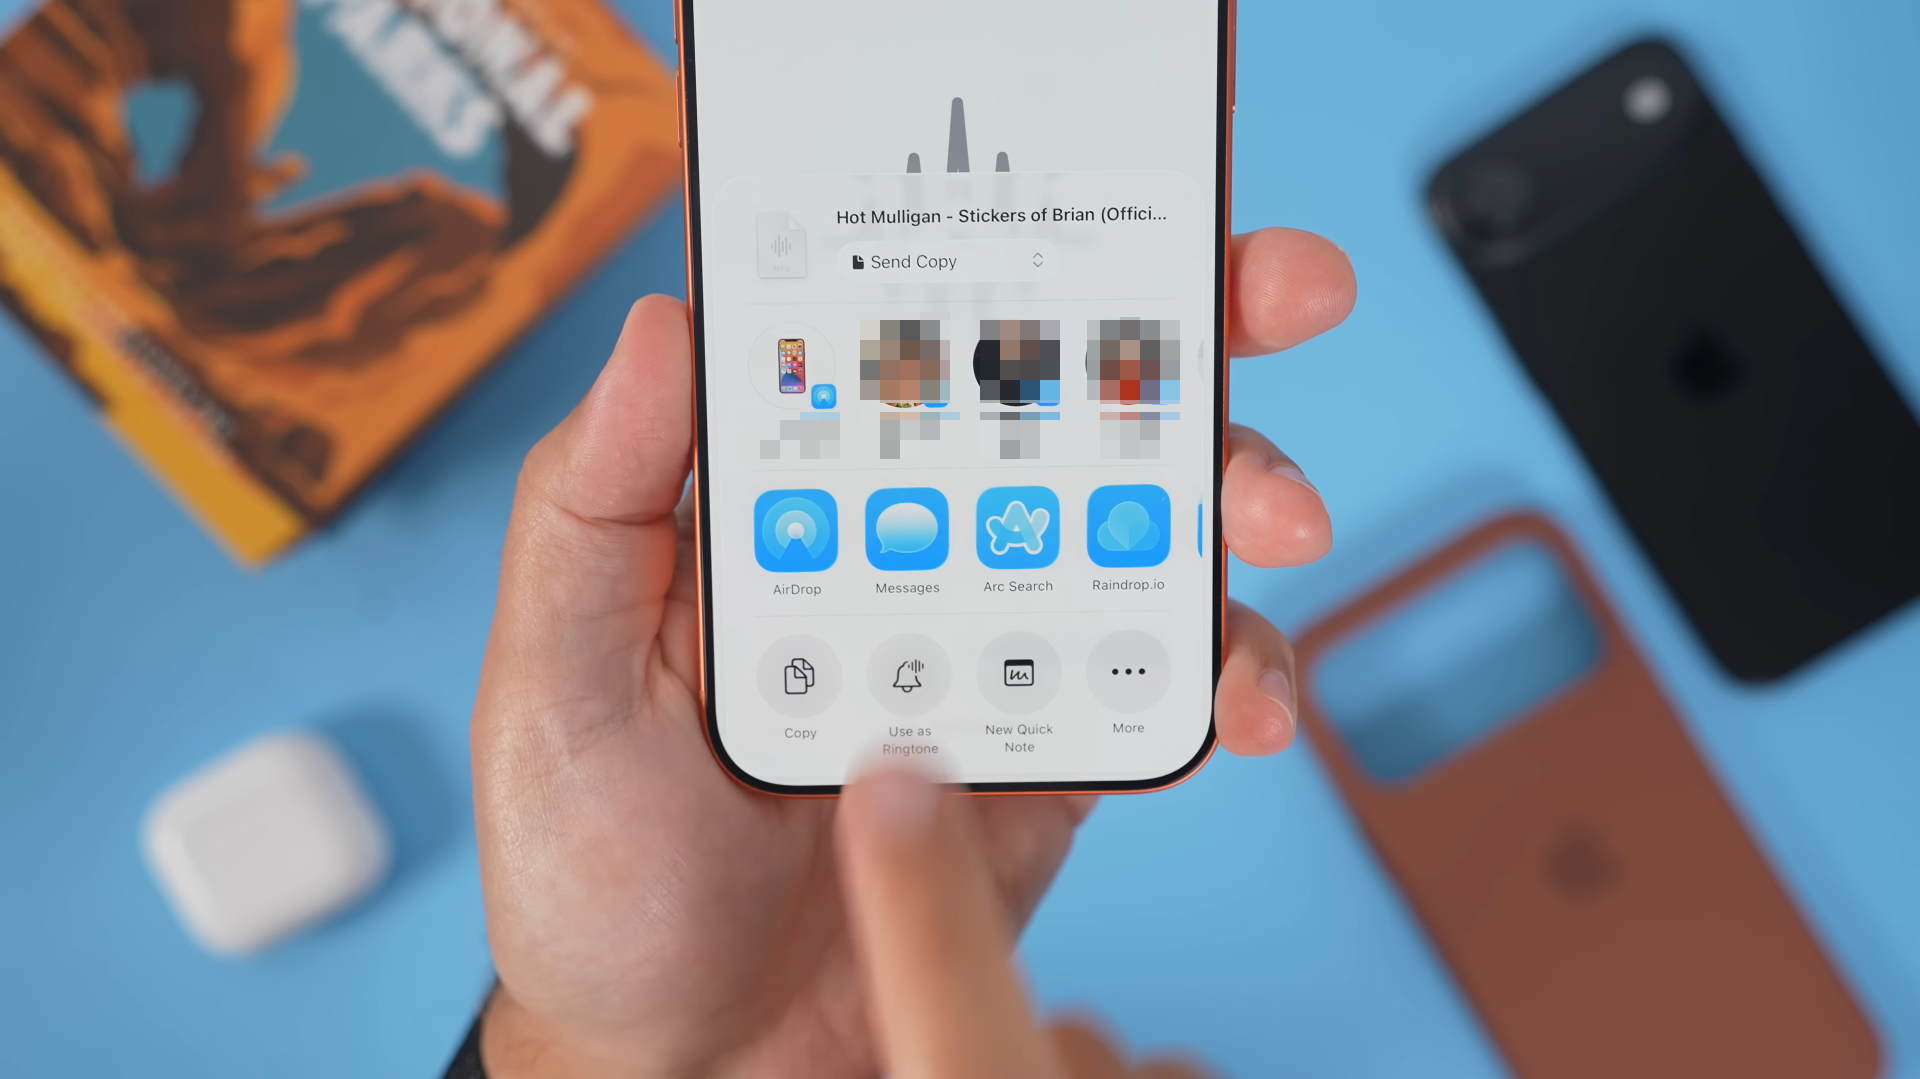
If you still have the source audio file, the process is easier. On iOS 26, a compatible audio file under the supported ringtone length can be set as a ringtone directly from the Share menu. On earlier iOS versions, GarageBand or a computer-based import method may still be required.
Here is what you can do:
- Find the Original Audio File: Your best option is to find the original MP3 or AAC file you used to create the ringtone. If you can locate it on a computer or in a cloud drive, you can easily re-import it using the methods in this guide.
- Consider Third-Party Tools: If the original file is lost for good, your only remaining option is to use a third-party computer application designed for iPhone file management. These tools can often browse an iPhone’s file system and extract the ringtone files. Be sure to research and choose a reputable program, as they require access to your device’s data.
- A Crucial Tip for the Future: Before you ever trade in or wipe an old iPhone, make sure you have a backup of your .m4r ringtone files stored safely in the cloud or on your computer. The final section of this guide shows you exactly how to do this to prevent this problem from happening again.
If you have your .m4r files ready on a computer, proceed with the methods below.
AnyTrans – Transfer Ringtone from iPhone to iPhone
AnyTrans can easily transfer ringtones from an old iPhone to a new iPhone in clicks. Contacts, photos, music, etc., are supported as well. Also, you can send apps or restore iCloud/iTunes/Google account backup to the new iPhone with AnyTrans. Free get AnyTrans to have a try>>

Why Custom Ringtones Disappear on a New iPhone?
The core of the problem lies in a critical distinction Apple makes between purchased and custom ringtones. Understanding this difference is the first step to solving it.
- Purchased Tones (from the iTunes Store): These are linked directly to your Apple ID. When you set up a new iPhone, you can typically re-download them by navigating to Settings > Sounds & Haptics > Ringtones and tapping “Download All Purchased Tones.” They are treated like any other App Store or music purchase.
For purchased tones, try Apple’s option first: Go to Settings > Sounds & Haptics > Ringtone and tap Download All Purchased Tones. The option may not appear if all purchased tones are already downloaded or if there are no eligible purchased tones associated with your account.
- Custom Tones (Your Own Files): This is where the issue arises. Any ringtone you created yourself—whether in GarageBand or by converting an MP3—is treated by iOS as a local media file. These iPhone custom ringtones are not part of your Apple ID’s purchase history and are not included in a standard iCloud backup. Consequently, an automatic iCloud ringtone sync for these files simply doesn’t exist. They must be manually transferred using a computer, which is why they seem to vanish after an upgrade.
How to Transfer Ringtones from iPhone to iPhone
Method 1. Transfer Ringtones from iPhone to iPhone without iTunes 1-Click [Easy & Fast]
If the custom ringtone exists on your old iPhone but the original audio file is no longer available, or if you want to manage several ringtone files from a computer, you can also consider an iPhone file-management tool.
AnyTrans provides a Ringtones section where you can check supported ringtone files, preview available items, and transfer selected files between supported devices or a computer. This method requires a computer and compatible device connections, so check the current device and iOS compatibility before starting.
AnyTrans – Transfer Ringtones to iPhone
- Preview available ringtone files and selectively transfer supported items between connected devices.
- All formats like mp3, m4a, m4r, WMA, Wav, etc. are supported.
- Add ringtones from computer to iPhone, and vice versa.
- Besides, make custom ringtones and then send them to your iPhone.
Free Download100% Clean & Safe
Free Download100% Clean & Safe
Free Download * 100% Clean & Safe
Now, download AnyTrans on your computer first, and then follow us to see how to transfer ringtones from iPhone to iPhone by using this tool.
How to Transfer Ringtones from Old iPhone to New iPhone
Step 1. Free get and open AnyTrans > Connect your two iPhones to the computer via USB cables > Click on “Device Manager” > Select one iPhone as the source iPhone from the top of phone image> Then click on “More” option.
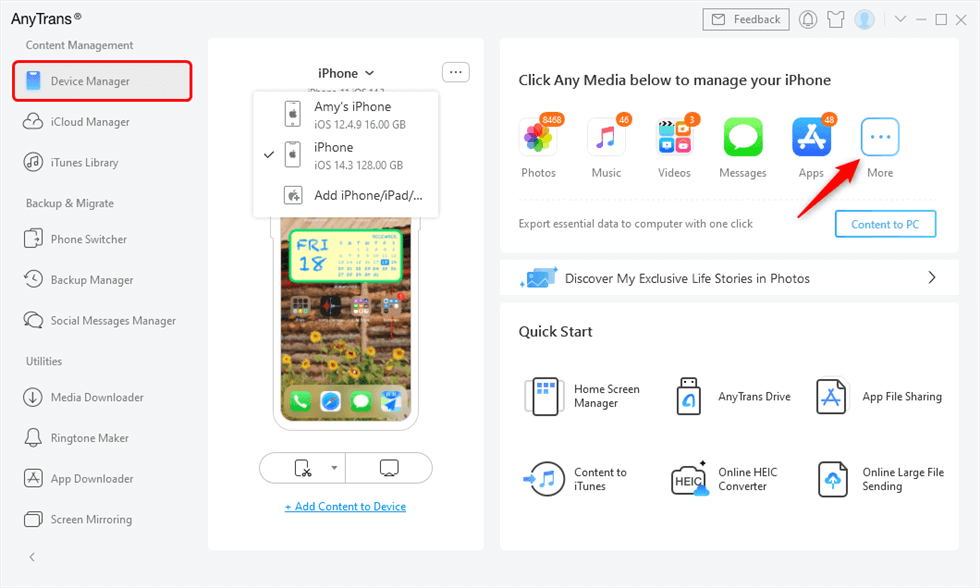
Connect two iPhones
Step 2. Tap on Ringtones > Select the ringtones you want to transfer > Click the “To Device” button to transfer them to your new iPhone. Besides, you can click “Add” button to put ringtones from computer to iPhone or “To PC” button – to share ringtones on iPhone to computer.
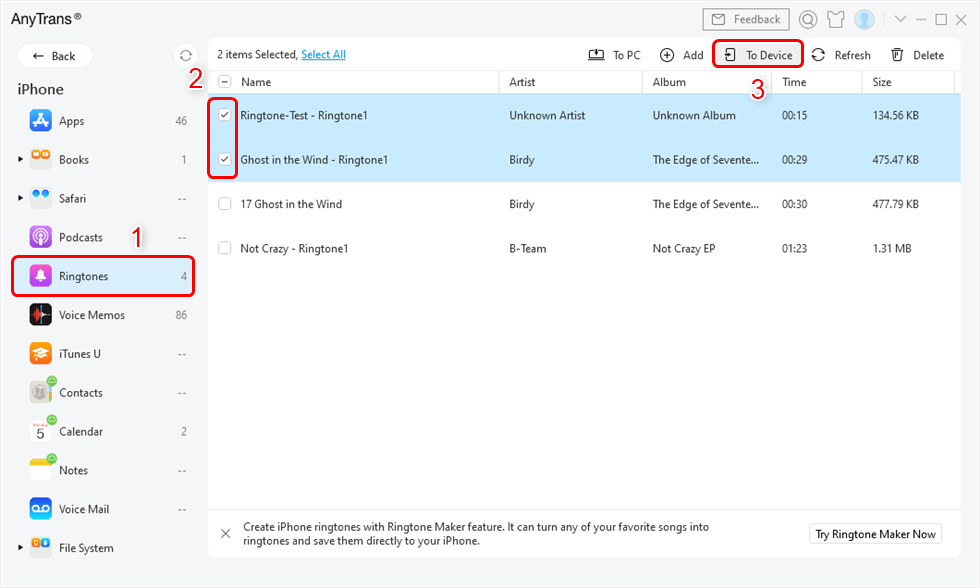
Select Ringtones and Click To Device Button
Tips: Add Music from iTunes Library to iPhone
AnyTrans enables you to enter iTunes Library, so you can sync music playlists, movies, and podcasts from iTunes Library to iPhone.
- Free get and open AnyTrans and click iTunes Library, here are the options for you to add media files from computer, transfer music from iTunes Library to your device.
- Click To Device button and the selected media files will be synced to the iPhone immediately.
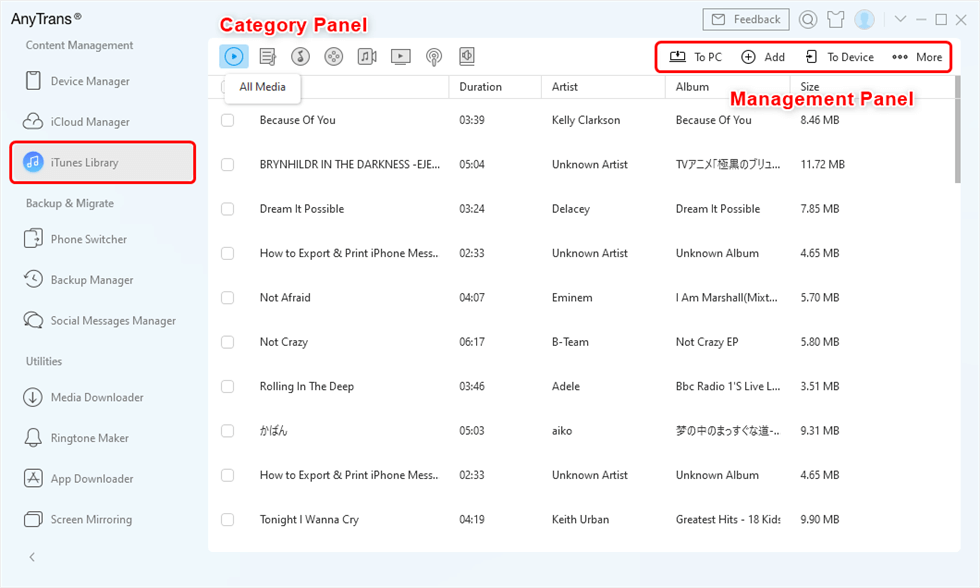
Manage iTunes Library with AnyTrans
Method 2. How to Share a Ringtone Audio File via AirDrop
AirDrop is useful when you still have the source audio file for the ringtone in Files, iCloud Drive, or another app that provides a Share button. It does not directly extract an installed custom ringtone from Settings > Sounds & Haptics > Ringtone on the old iPhone.
Follow these steps if the ringtone’s original audio file is still available:
- On both iPhones, turn on Wi-Fi and Bluetooth and make sure AirDrop receiving is enabled.
- On the old iPhone, open the Files app or the app where the original audio file is stored.
- Touch and hold the audio file, tap Share, choose AirDrop, and select the receiving iPhone.
- Accept the file on the new iPhone and save it if prompted.
If the new iPhone is running iOS 26: For a compatible short audio file, open it in Files, use the Share menu, and check for Use as Ringtone. If this option is not available on your iOS version or for your file, use GarageBand or another compatible import method instead.
Important: If the custom ringtone exists only in the old iPhone’s ringtone list and you no longer have the source file, AirDrop alone will not extract that installed ringtone.
Method 3. Move Ringtones to a New iPhone with Finder on macOS
For Mac users on a modern version of macOS, Finder has replaced iTunes for managing your iPhone. This is the most direct way to move ringtones iPhone to iPhone if you have the .m4r audio files saved on your computer.
- Connect Your iPhone: Use a USB-to-Lightning or USB-C cable to connect your new iPhone to your Mac.
- Open Finder: Launch a new Finder window. In the sidebar under “”Locations,”” click on your iPhone’s name.
- Trust the Connection: If prompted on your iPhone, tap “”Trust”” to allow your Mac to access its data, and enter your device passcode.
- Drag and Drop Your Ringtones: In the main Finder window showing your iPhone’s details, make sure you are on the “”General”” tab. Now, open the folder containing your iphone ringtone files (.m4r format). Drag the files and drop them directly onto the white area of the “”General”” tab. You will see a green plus-sign icon as you hover over the window, confirming it’s a valid drop location.
Method 4. How to Transfer Ringtones from iPhone to iPhone with iTunes on Windows?
While if you are still using the older iTunes versions (iTunes 12.6 and earlier), you can still apply iTunes to share ringtone iPhone. And for the new iTunes versions on 12.7 and later, you can still sync music, movies, TV shows, and audiobooks.
But before taking this method, you need to notice that the whole process is about transferring the ringtones on one iPhone to iTunes library, and then syncing to another iPhone from iTunes library. There are two major things you need to do to solve how to share a ringtone on iPhone via iTunes.
Transfer ringtones from old iPhone to iTunes library first:
1. Open iTunes, and go to Edit.
2. Click on Preference, and then choose Devices.
3. Check Prevent iPods, iPhones, and iPads from syncing automatically.
4. Connect your old iPhone to the computer via USB cable.
5. Launch iTunes if it is not running automatically.
6. Click File, and then choose “Devices”.
7. Click on the “Transfer Purchases from iPhone”.
8. Click Apply at the right bottom.
9. iTunes will automatically sync the purchased ringtones to the iTunes library.
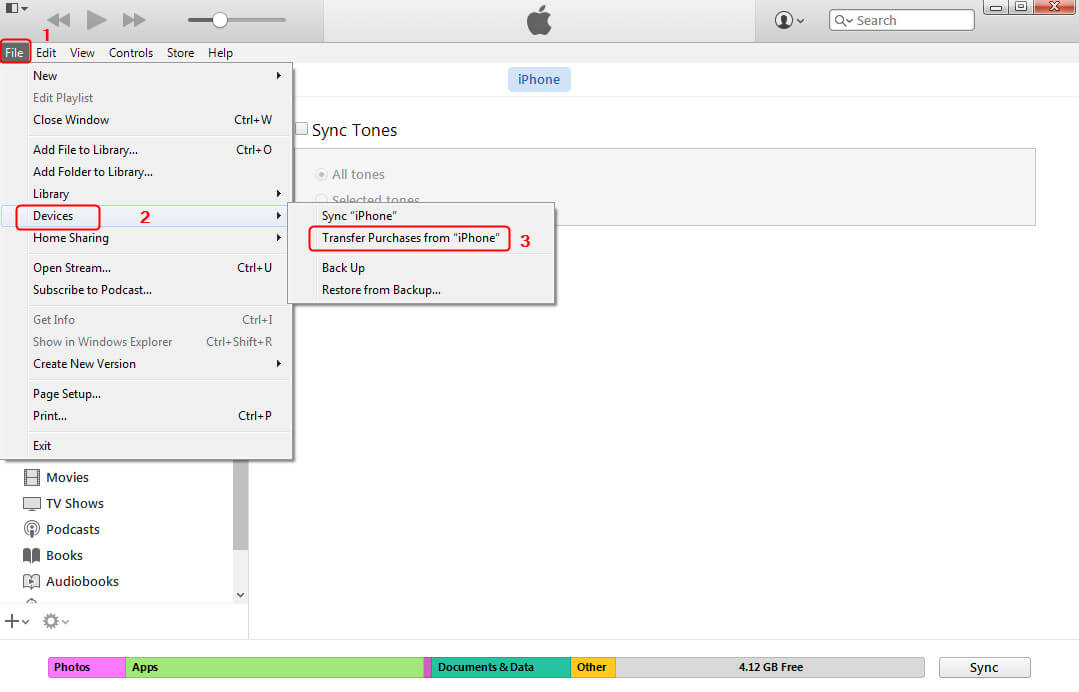
How to Transfer Ringtones from iPhone to iPhone with iTunes – Step 3
Sync ringtones from iTunes to new iPhone:
1. Disconnect the iPhone from the computer.
2. Connect another iPhone to iTunes.
3. Click on your iPhone, and choose the Tones.
4. Check the box for Sync Tones.
5. Check the ringtones you want to sync.
6. At last, click the Sync button in the bottom right corner of iTunes.
7. After it completes, the synced ringtones should be on your new iPhone.
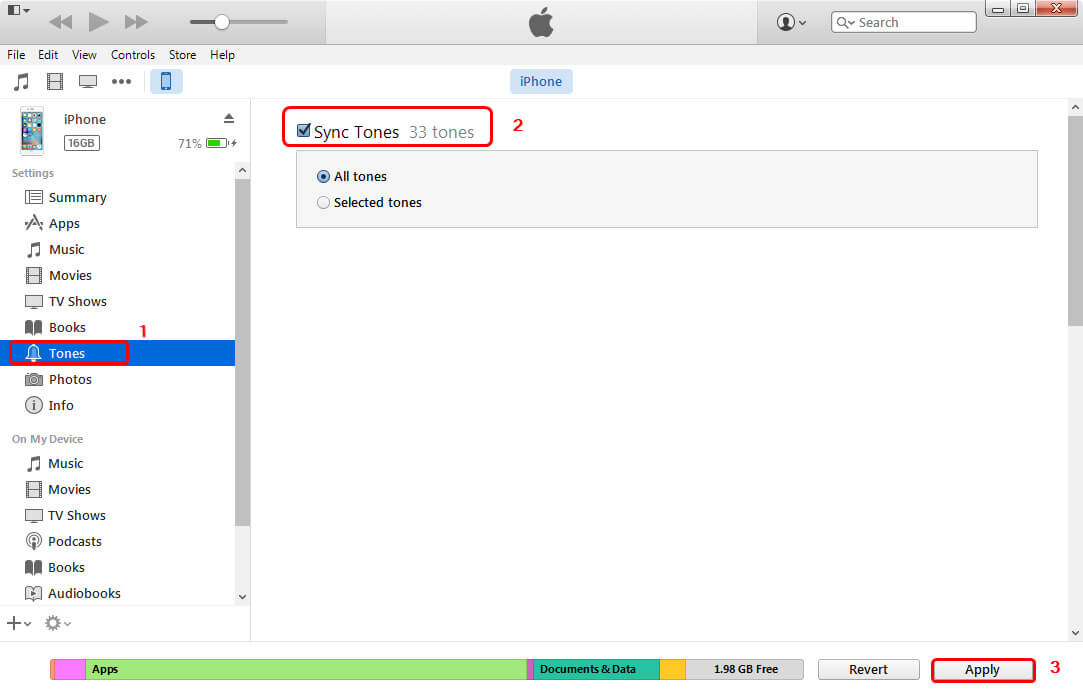
How to Transfer Ringtones from iPhone to iPhone with iTunes – Step 4
- iTunes only supports transferring purchased items transferring to the iTunes library, which means that only purchased ringtones on your iPhone can be transferred to another, not including those items from other sources.
- iTunes syncing will erase the existing media files, such as songs, videos, ringtones, and more, on the iPhone. If your iPhone is not totally new, but has a lot of important data, you had better not use iTunes to transfer ringtones from iPhone to iPhone.
Method 5. How to Transfer Ringtones from iPhone to iPhone via Email
Email can also be used to send the source audio file for a ringtone from one iPhone to another. Attach the audio file to an email, open the message on the receiving iPhone, and save the attachment to Files.
What you do next depends on the iOS version. On iOS 26, compatible short audio files may provide a Use as Ringtone option from the Share menu. On earlier iOS versions, you may need to import the audio into GarageBand or use a computer-based method to install it as a ringtone. The step guide is as follows:
- Select the ringtone to send and tap on the Share icon. Then, select the Mail app.
- Enter the email address associated with the account on your other iPhone and press the Send button.
- Open the mail app on your other iPhone and save the ringtone from the email you just got.
Bonus Tip. How to Make a Custom Ringtone on iPhone
AnyTrans makes it ultra-easy to create your custom ringtones and text tones. You can make your own ringtone with any audio file, no matter MP3, M4A, or other formats. With AnyTrans, you can even make adjustments accordingly to get the perfect tone that you prefer. And here are the steps to make custom ringtones with AnyTrans:
Step 1. Download AnyTrans on your computer > Connect your iPhone to the computer with a USB cable.
Free Download * 100% Clean & Safe
Step 2. Open AnyTrans > Choose “Ringtone Maker” mode > You are able to select music from the computer, iOS device and iTunes Library here (just take Device option as an example) > Click “Import from Device” option and select the music you need.
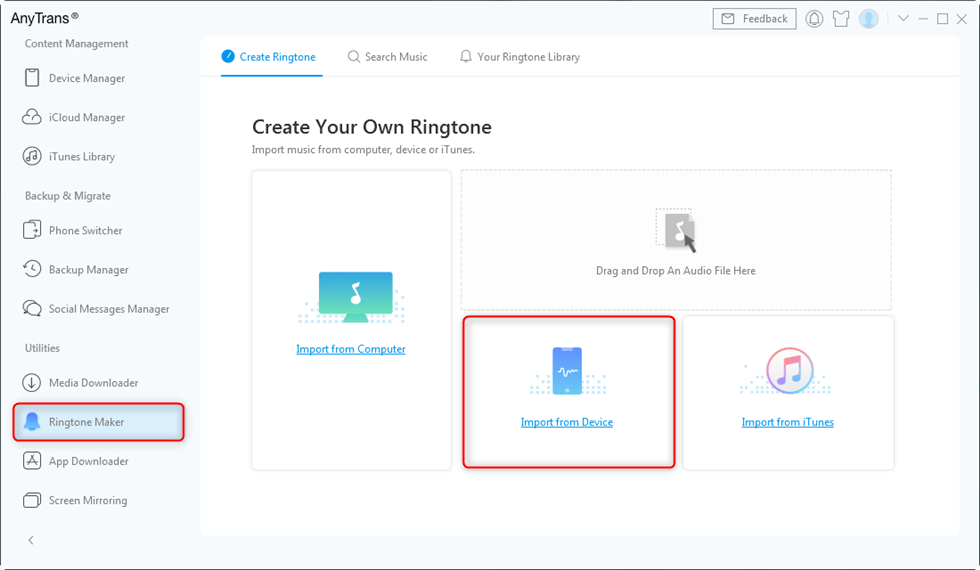
Tap Import from Device
Step 3. The song will be set as a ringtone by default. You can drag the slider to choose your favorite period. After completing the customizing process, click the “Audition” button to listen to the ringtone. If you like it, click the “Import to Device” button and it will be added to the ringtones list on your iPhone.
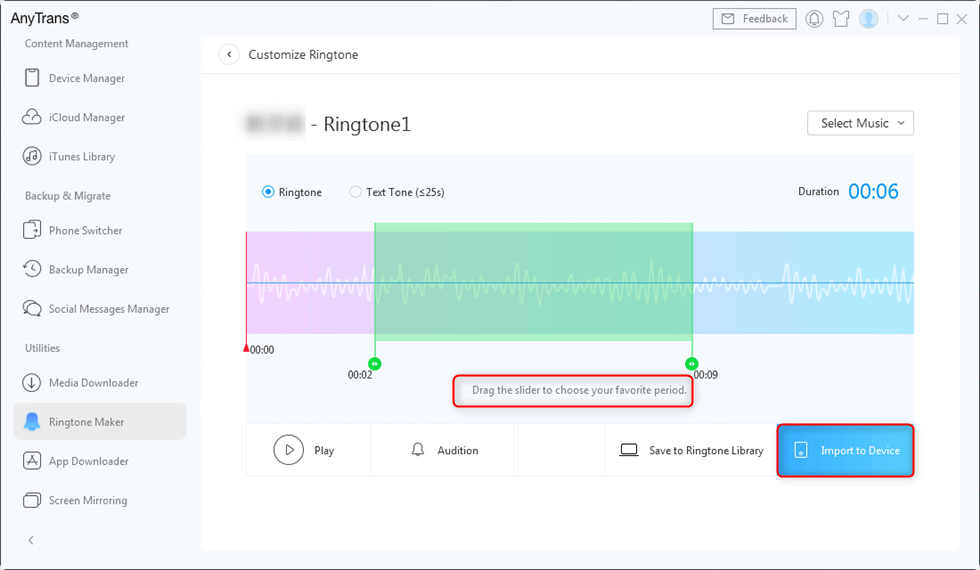
Select and Set Ringtones to Transfer
How to Permanently Safeguard Your iPhone Ringtone Files
The lesson here is that custom ringtones require deliberate management. To avoid the frustration of losing them with your next upgrade, the best solution is to create a permanent, central library for your ringtone files. This simple, proactive step turns a future problem into a predictable, two-minute task.
Create a Central Ringtone Library
- Pick a Cloud Service: Use a service you already trust, like iCloud Drive, Dropbox, or Google Drive.
- Make a Dedicated Folder: Inside your chosen cloud service, create a new folder with a clear name like “”My iPhone Ringtones.””
- Consolidate Your Files: Gather all your custom .m4r ringtone files from your computer and move them into this new cloud folder.
By taking a few minutes to create this library now, you regain full control over your personalised sounds. The next time you get a new iPhone, the process will be simple: open your cloud folder, download the files to your computer, and sync them with Finder or iTunes. This method eliminates the risk of permanently losing your custom tones and ensures that every new device can feel like your own from day one.
Frequently Asked Questions
We have collected the frequently asked questions about iPhone ringtones and have answered them one by one.
Q1. How can I get my custom ringtones off my old iPhone if I don’t have the files?
Unfortunately, you cannot do this without a computer. Apple doesn’t allow direct extraction. Your best bet is to find the original song file you used to create the tone or use a reputable third-party computer program that can access and export files from an iPhone.
Q2. Why won’t my purchased ringtones re-download?
This can sometimes happen due to a temporary store issue or an account sync problem. Try signing out and back into your Apple ID under Settings > [Your Name] > Media & Purchases. If that fails, restarting your iPhone often resolves the connection.
Q3. Can I use iCloud to sync custom ringtones?
No. Custom ringtones are not part of a standard iCloud backup, and there is no dedicated feature for an iCloud ringtone sync. You can, however, use iCloud Drive to store your .m4r files as a safe backup for manual transfer.
Q4. Can I AirDrop a ringtone to another iPhone?
You can AirDrop a ringtone’s source audio file if it is available in Files or another app with a Share option. However, you cannot directly AirDrop an installed ringtone from the ringtone list in Settings. On iOS 26, compatible short audio files can be set as a ringtone from the Share menu. On earlier iOS versions, you may need GarageBand or a computer-based import method.
Q5. Do I need a computer to move a custom ringtone?
Not always. If you still have the source audio file, iOS 26 can set certain compatible short audio files as a ringtone directly from the Share menu. GarageBand is another no-computer option for creating a ringtone from an audio file. A computer or file-management tool becomes more relevant when the original file is unavailable, when you are using an older workflow, or when you need to manage ringtone files in bulk.
We regularly update this guide with each new major iOS release to ensure the steps remain accurate. If you encounter any issues, please refer to Apple’s official support documentation for device-specific guidance.
Q6. Where are the Ringtones Stored on my iPhone?
You can go to Settings > Click Sounds & Haptics > Choose Ringtone, where you can view the default ringtones on iPhone. Also, the transferred and customised ringtones will be saved here. You can choose one and set it as your ringtone.
Q7. How to send a ringtone to another iPhone via text?
Though many people ask this question, we are sorry to tell you that you cannot use text to send ringtone to iPhone. But you can feel free to try the methods above to transfer ringtones to your iPhone.
The Bottom Line
That’s all for how to transfer ringtones from iPhone to iPhone. iTunes supports you to sync tones with two steps, but only for iTunes 12.6 and earlier. Besides, with AnyTrans, you can manage ringtones easily, transferring from iPhone to iPhone, or from a computer or iTunes library to iPhone. Free download AnyTrans to transfer ringtones or make custom ringtones for your iPhone. Any questions on this guide will be warmly welcomed.
Free Download * 100% Clean & Safe
More Related Articles



Joy Taylor is a seasoned technical writer with over a decade of experience in mobile technology. At iMobie, she specializes in producing in-depth content on iOS data recovery, iPhone unlocking solutions, and iOS troubleshooting.
Product-related questions? Contact Our Support Team to Get Quick Solution >
