iPhone Transfer Not Working? Fix Stuck Migration & Save Data [2026 Guide]
While setting up a new iPhone , you might come across the transfer directly from iPhone not working issue. If this happens to you, this guide tells you what to do to fix this issue and get your transfer going.
Common iPhone Issues
iPhone Setting Up Issues
iPhone Internet & Connect Issues
Have you bought a new iPhone, like the latest iPhone 17 series? And it’s necessary to transfer all your data from one iPhone to your new iPhone 17. One of the many good things about owning an iPhone is that you can transfer your data to other Apple devices pretty easily. This includes any newly bought iPhones as well, as you can tap a few options and get all your data moved with the transfer directly from iPhone feature.
However, sometimes you might see issues with the migration process. If you find transfer directly from iPhone not working for some reason, and thus you can’t transfer data to new iPhone, you can apply some of the fixes given in this guide to potentially fix the problem.
Why Transfer Directly from iPhone Not Working
Why won’t my iPhone transfer to my new iPhone? There are many reasons for iPhone transfer not working. And here we have concluded the most common reasons:
- Poor network connection: Data transfer requires your devices to be connected to a stable network. A poor network can cause iPhone transfer failed.
- Old system version: If your device is running a system version below iOS 12.4, this problem will also occur.
- Low battery level: If your iPhone is low on battery, you will also face the iPhone to iPhone transfer not working.
- System Issues: Any issues in the system may influence the data transfer work and eventually lead to failure.
These are the common reasons for transfer directly from iPhone not working. Then, let’s read on to learn some proven fixes to this issue.
Quick Decision Guide: Manual Setup vs. Professional Transfer Tools
When facing an iPhone transfer stuck scenario, the method you choose determines your success rate. While Apple’s native tools are convenient, they are heavily dependent on environmental factors like Wi-Fi stability and thermal conditions. A professional transfer tool acts as a robust alternative when these standard methods fail.
To help you decide, consider this framework based on Success Rate, Time Cost, and Technical Risk.
1. Quick Start (Direct Transfer)
- Best for: Users with strong, uncongested Wi-Fi 6/6E networks, cool ambient temperatures, and plenty of time.
- Pros: Wireless, built-in to iOS, and free.
- Cons: Highly susceptible to interference. If your Wi-Fi fluctuates, you will likely encounter iPhone migration not working errors. It requires both phones to be unusable during the process.
- Risk: High probability of “stuck on preparing” errors during the device handshake.
2. iCloud Restore
- Best for: Users who back up daily and don’t need the phone immediately.
- Pros: Occurs in the background once the initial setup is done.
- Cons: Dependent on internet upload/download speeds. Incomplete backups often result in missing photos or messages appearing days later.
- Risk: If the Wi-Fi drops, the restore pauses, leading to an iPhone transfer frozen state.
3. Professional Transfer Tools (e.g., AnyTrans)
- Best for: Users who need data moved now, those with unstable Wi-Fi, or users who have already set up their new phone and don’t want to factory reset.
- Pros: Bypasses network instability by using a wired or local connection. It offers higher reliability for large data sets (100GB+).
- Cons: Requires a computer intermediary.
- Risk: Lowest risk of data loss or corruption.
10 Fixes to Transfer Directly from iPhone Not Working
If you prefer sticking to Apple’s native tools but find your iPhone transfer stuck on preparing, understanding the technical cause is half the battle.
Expert Insight: Most failures occur during the initial “device handshake” phase. If Quick Start stalls at ‘Preparing,’ it almost always indicates Wi-Fi instability, thermal throttling, or insufficient battery power on the source device. This prevents the secure token exchange required to start the data stream.
Follow these steps to stabilize the connection. Note that if your transfer is currently frozen, you will need to cancel it (see the “Is It Safe to Cancel?” section below) before attempting these fixes.
Fix 1. Enable Bluetooth on Your iPhone
If iPhone transfer not working, check if Bluetooth is enabled or not first. Transfer directly from iPhone requires you enable Bluetooth on your both devices to keep connection between your phones.
Enabling Bluetooth on an iPhone is as easy as tapping an option. You can turn on Bluetooth from the Control Center by following the steps below.
- Pull up from the bottom of your iPhone’s screen and tap the Bluetooth icon. This will turn Bluetooth on.
Or you can turn on Bluetooth in Settings as the following guide.
- Head into the Settings app > Tap Bluetooth, and turn the toggle next to Bluetooth to the ON position.

Turn on Bluetooth from Control Center
Fix 2. Move Device Closer
If you are using the wireless mode to perform the iPhone transfer process, you should know that you need to keep both your old and new iPhone 17 in close proximity.
So if new iPhone transfer not working, you can move device closer to continue iPhone transfer. You can keep your two phones side by side to make sure your devices are always connected to each other during this process. Since there will not be any obstacles in between, the connection will work and you will be able to transfer your data without an issue.
Fix 3. Transfer Directly from iPhone with AnyTrans
Transfer directly from iPhone not working? Don’t worry, AnyTrans, a professional iOS data transfer tool, can help you transfer data from iPhone to iPhone and from Android to iPhone in simple clicks. With this tool, you can move all the data, like photos, movies, songs, ringtones, contacts, calendars, WhatsApp data, etc. to your new iPhone, even after setup. Unlike the Transfer Directly from iPhone feature, AnyTrans also allows you to freely select what to transfer as you like. And the data transfer process will not erase your existing data or disclose your data to anyone else. You can learn more about AnyTrans below.
AnyTrans – Transfer Directly from iPhone
- Transfer all data from iPhone/Android to iPhone in Clicks.
- Supports selective or whole transfer. Just as you like.
- No harm to existing data and will be kept in original quality.
- Supports all iPhone models, like iPhone 17, as well as Mac/Windows.
Free Download100% Clean & Safe
Free Download100% Clean & Safe
Free Download * 100% Clean & Safe
Therefore, if you encounter the transfer directly from iPhone not working, just free download AnyTrans to transfer data from iPhone to iPhone directly with simple clicks.
Step 1. Free download AnyTrans and launch it on your computer > Choose Phone Switcher > Choose Phone to iPhone > Click Migrate Now.
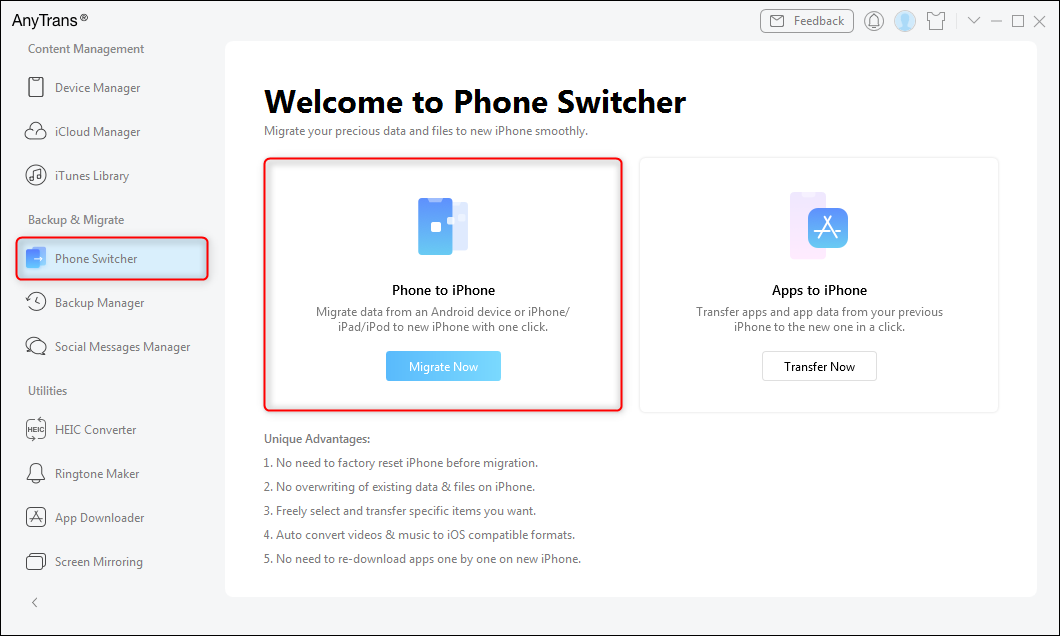
Choose Phone to iPhone on Phone Switcher
Step 2. Connect your two devices to the computer with the USB cable > Confirm the source and target device.
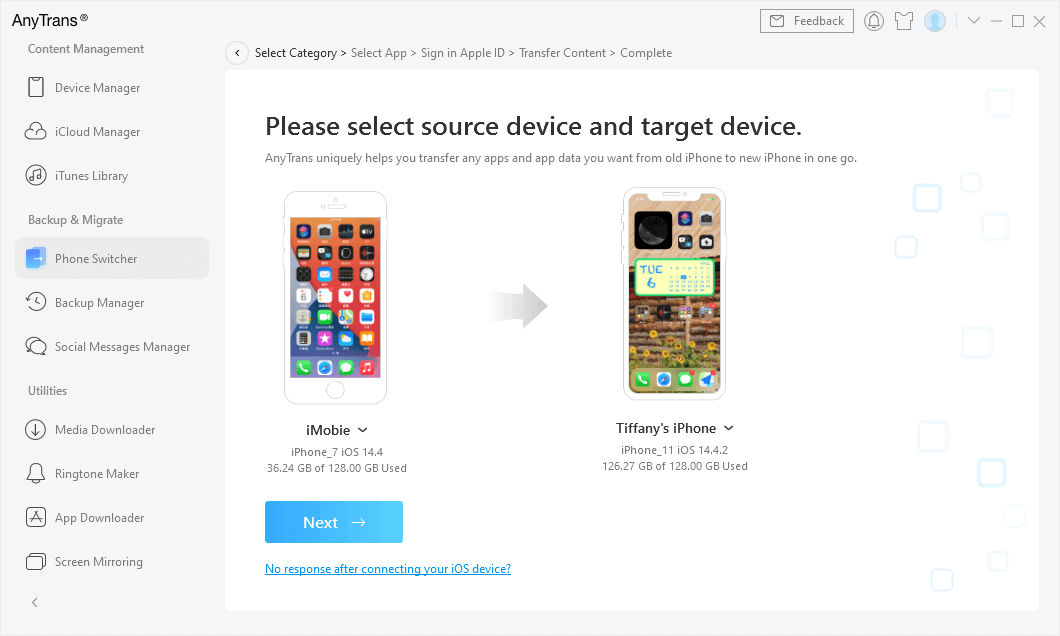
Confirm New iPhone as the Target Device
Step 3. Choose the data that you want to transfer and click the Next button to transfer to your new iPhone.
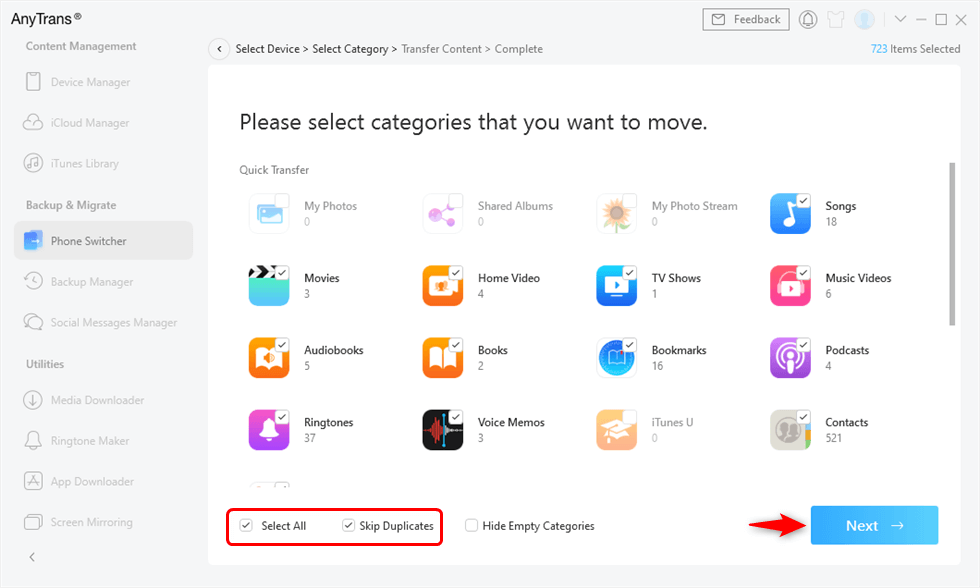
Migrate All Data iPhone to iPhone
Fix 4. Update iOS on Your iPhones
The old iOS verison will also cause the iPhone transfer not showing up and transfer from nearby iPhone not working problems. While most modern iPhones ship with the latest version of iOS, your older iPhone might be using a version of iOS that does not support the transfer directly from iPhone feature.
In order to use this feature, both your iPhones must be running at least iOS 12.4. If transferring from iPhone not supported, you will need to update the phone. Here are the steps to update iOS to fix transfer directly from iPhone not working.
Step 1. To check the current iOS version on your iPhone, head to Settings > General > About and you will see your current iOS version listed next to Software Version.
Step 2. If your iOS version is older than 12.4, head into Settings > General > Software Update and download and install the latest version of iOS on your iPhone.
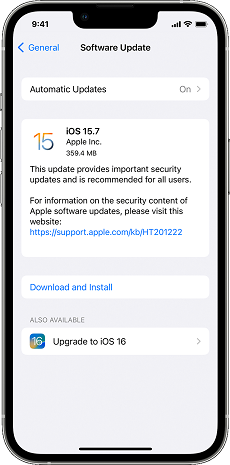
Check the Software Updates
Fix 5. Check the Cable for Issues
If you have chosen to use the cable method to transfer data from iPhone to iPhone, you need to make sure that the cable you use is strong enough and that there is no physical damage to it. This cable must be the one that Apple recommends for this kind of data transfer process.
Using a cheap aftermarket cable can cause iPhone not transferring to new iPhone. If you are using such a cable, discard it and get the official Apple cable and then start the process.
Fix 6. Manage Thermal Throttling (The Hidden Culprit)
This is the most overlooked cause of failure. Transferring data generates significant heat. If you are charging both phones and transferring data simultaneously, the devices often get hot enough to trigger iOS thermal throttling. When this happens, the processor slows down to cool off, causing the transfer bar to stop moving.
Pro Tip: Remove the protective cases from both iPhones. This allows heat to dissipate.
Place devices on a cool, hard surface (like a granite counter or glass table), not on a bed or sofa.
Fix 7. Check Local Storage
If your new iPhone has less storage than the data on your old iPhone (e.g., moving 128GB of data to a 64GB phone), the calculation phase will hang indefinitely. Check Settings > General > iPhone Storage on the source device to ensure the target device has adequate space.
Fix 8. Try the Best Alternative to Set Up New iPhone
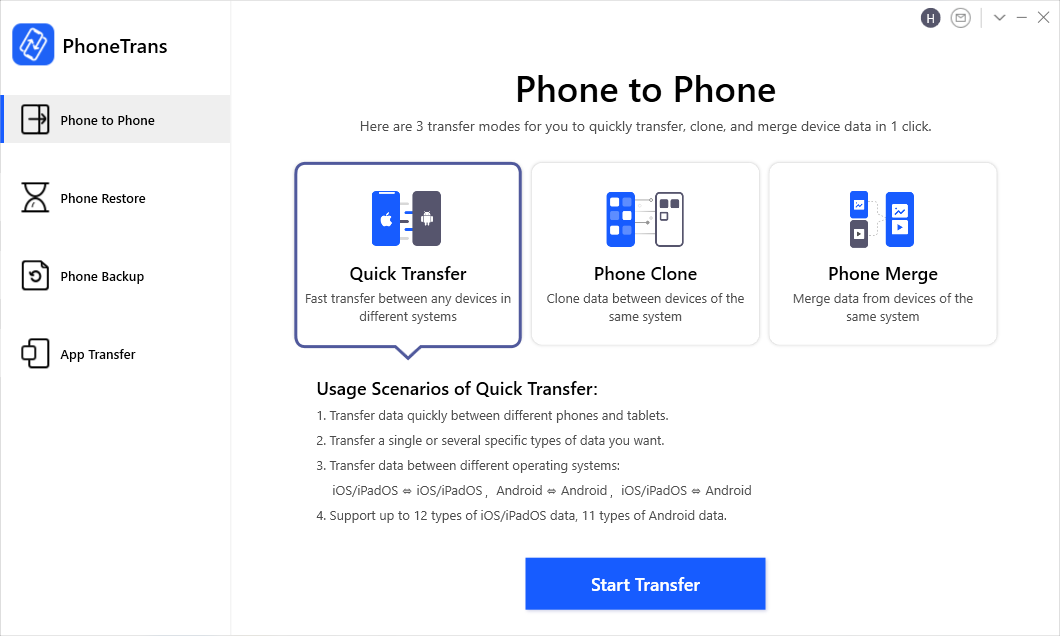
If you found the above methods didn’t solve the new iPhone transfer not working problem and need an easier & quicker way to set up iPhone, then PhoneTrans will help you out of the troublesome steps. As a professional phone-to-phone transfer tool, it provides you with three transfer modes to set up a new iPhone 17:
- Quick Transfer allows you to fast transfer between iOS devices and you can choose a single or several data types.
- Phone Clone enables you to 1-click migrate data from old iPhone to new iPhone.
- And if you want to keep the existing data on the target device and skip the duplicate items after transferring, Phone Merge feature makes it possible.
- Cross-device and app data supported. PhoneTrans supports iOS, iPadOS devices, and AndroidOS devices, transferring most App and WhatsApp chats.
Now, you can get the latest version of PhoneTrans for free on your computer and follow the simple steps below to bypass the transfer directly from iPhone not working issue and set up iPhone flexibly:
Free Download * 100% Clean & Safe
Step 1. Launch PhoneTrans and click Phone to Phone. You can preview the three features and choose the one you want. Here we take Quick Transfer as an example. Move the mouse on it and click on Start Transfer.
Choose the Quick Transfer Mode
Step 2. Connect your old phone and new phone to the computer with USB cables. When your device is detected by our software successfully, the below interface will show. Make sure your source device and target device. Then click Transfer to continue.
![]()
Confirm Your iPhones
Step 3. Now you can select one or several data types you want to transfer and tap on Transfer Now button. PhoneTrans will start the transfer process automatically. Once the transfer process completes, you will see “Successfully transferred” interface.
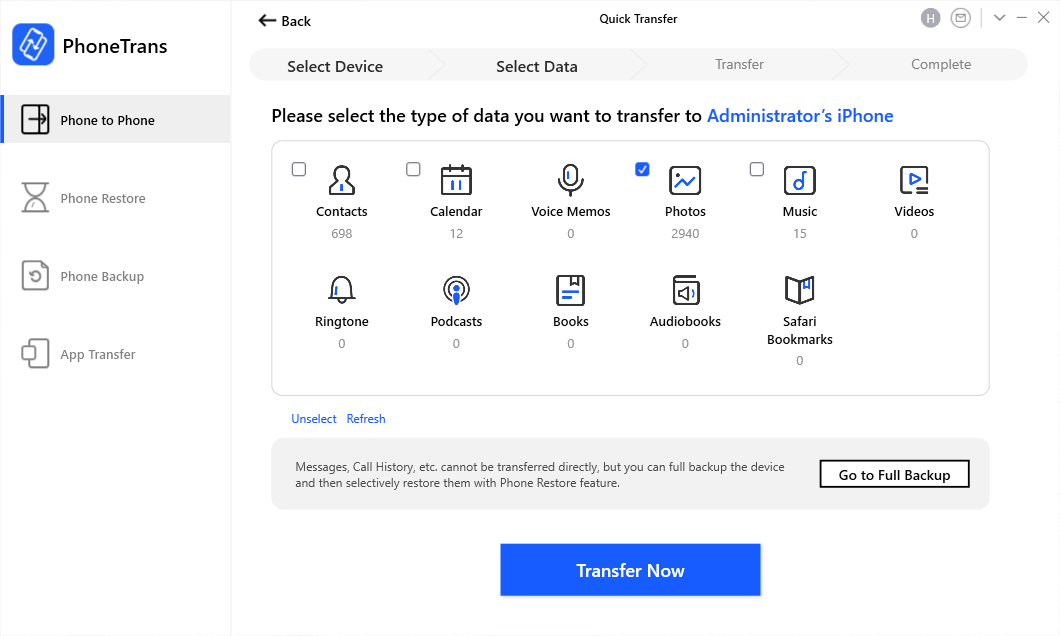
Choose Data to Transfer from iPhone to iPhone with PhoneTrans
Fix 9. Fix Transfer Directly from iPhone Not Working with AnyFix
If you are still unable to complete data transfer, there may be some system issues in your iOS. Then you may try an iOS system recovery tool – AnyFix to solve the iPhone to iPhone transfer not working. AnyFix enables you to fix 150+ iOS/iPadOS/tvOS problems and get your iPhone back to normal. Now, you can get the latest version of AnyFix and follow the steps below to fix the problem when you can’t transfer data to new iPhone:
Free Download * 100% Clean & Safe
Step 1. Free download and open AnyFix and head to System Repair panel.
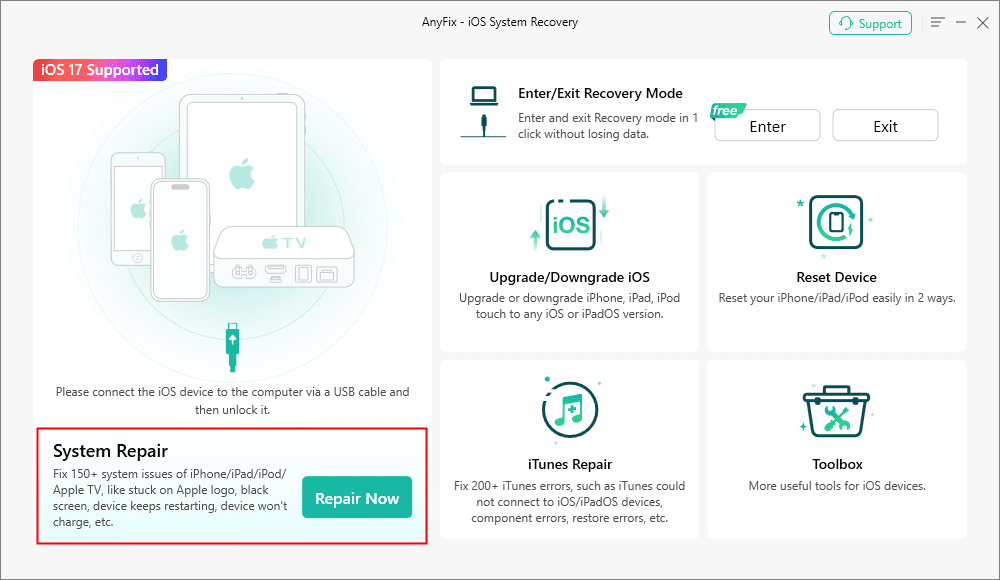
AnyFix System Repair Option
Step 2. Choose Device Bug and Start Now. Here you can preview what problems that AnyFix can help you.

AnyFix System Repair Device Bug
Step 3. Next, you need to select one repair mode for your iPhone. AnyFix provides you three repair modes, including Standard Repair, Advanced Repair and Ultimate Repair to improve the success rate. Here we take Standard Mode as an example.
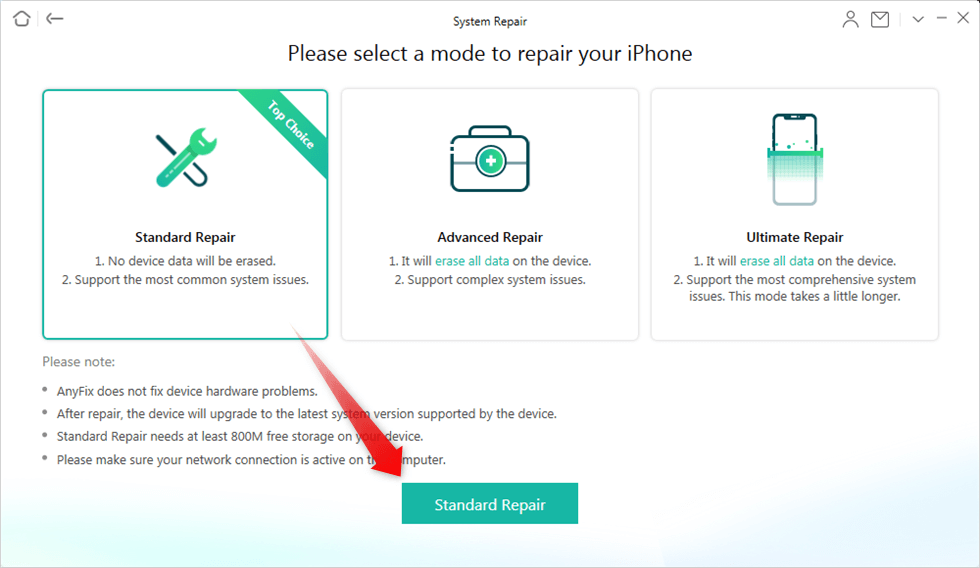
Choose Standard Repair Mode
Step 4. Download the matching firmware and enter your iPhone into Recovery Mode.
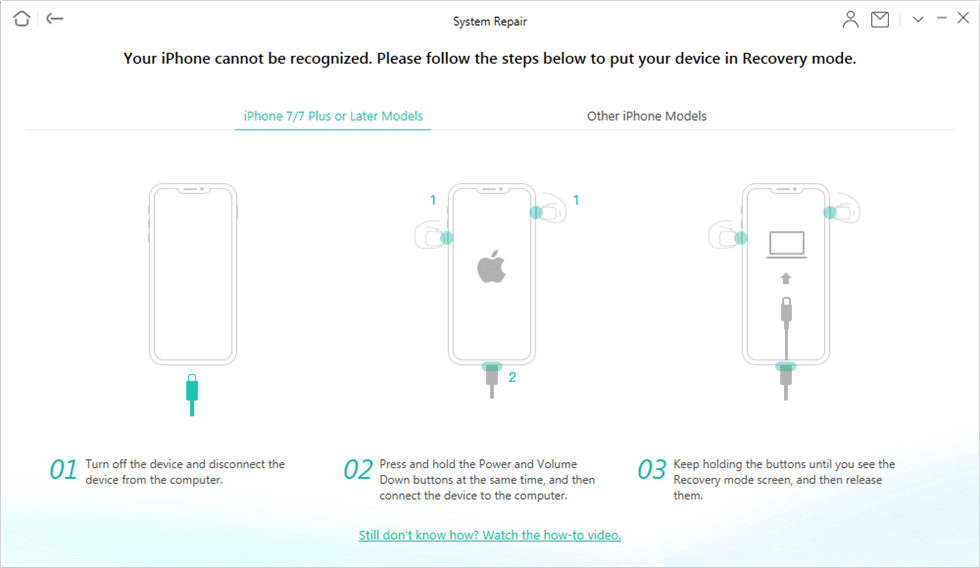
Enter Your Device into Recovery Mode
Step 5. Click Fix Now button and it will start the repairing process immediately. Wait for a minute and see a Repair Completed page.
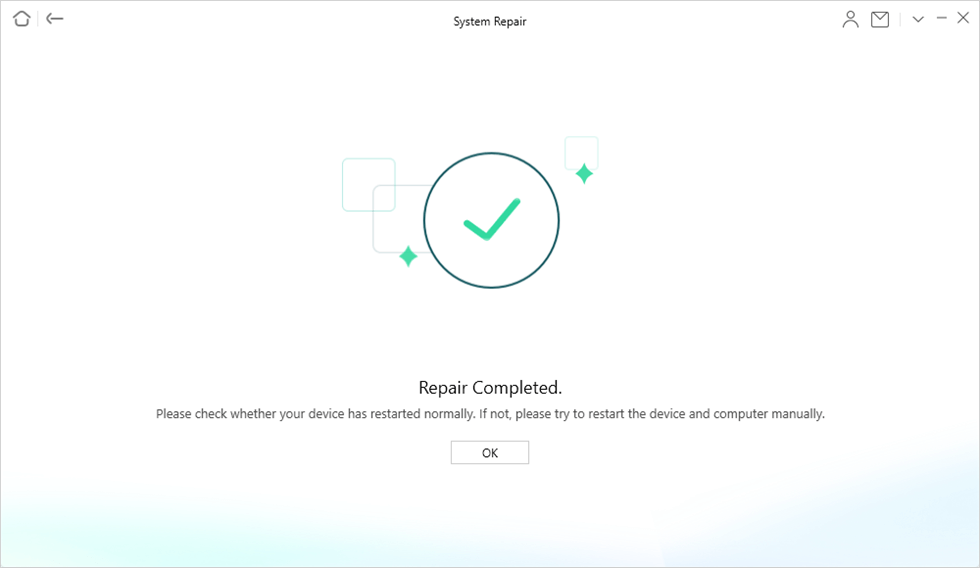
Repair Completed
Fix 10. Reach out to Apple Support
If nothing else works, there might be an issue beyond what you can fix. In this case, it is best that you get in touch with the Apple support team and seek their help. They might have a solution to your problem and they might even be able to apply it directly to your device.
Visit the nearest Apple support center and see what they can do to fix transfer directly from iPhone not working.
Is It Safe to Cancel? Dealing with a Frozen iPhone Transfer
Facing an iPhone transfer frozen screen is stressful because it is unclear if stopping the process will corrupt your files.
The Reality: The source data on your old iPhone remains untouched until you manually wipe it. The transfer process copies data; it does not move (cut and paste) it. Therefore, stopping a failed transfer is generally safe for the source data, though the new device will need to be reset.
However, distinguishing between a “slow” transfer and a “frozen” one is critical.
How to Identify a True “Freeze”
Look closely at the screen on the new iPhone:
The “Spinning Gear” Test: If the gear icon next to the progress bar is still spinning, the device is likely still processing, even if the bar hasn’t moved.
The Time Estimate:
- Time increasing (e.g., 2 hours -> 4 hours): Not Frozen. This usually means your Wi-Fi speed has dropped, but data is still moving.
- Time estimate disappears: Likely Frozen. If the text says “Transferring Data” but the time remaining vanishes and doesn’t return for 15 minutes, the process has crashed.
The 30-Minute Rule: If the progress bar has not moved by a single pixel for more than 30 minutes, or if the screen is unresponsive to touch, a force restart is necessary.
Safe Cancellation Procedure
Step 1: Force Restart the New iPhone
This cancels the incoming data stream safely.
- For iPhone 8, X, 11, 12, 13, 14, SE (2nd/3rd gen), 15, 16, 17: Press and quickly release Volume Up. Press and quickly release Volume Down. Then, press and hold the Side button until the screen goes black and the Apple logo appears.
- For iPhone 7: Press and hold Volume Down and the Side button simultaneously.
Step 2: Restart the Old iPhone
Perform a standard restart to clear the cache from the failed attempt.
Once both devices reboot, you can restart the Setup Assistant on the new iPhone. Your original data on the old device remains safe and intact.
Alternative Method: Using Encrypted Computer Backups
When iPhone data transfer not working errors persist despite troubleshooting, the wireless protocol is likely the failure point. In these cases, using a computer is the reliable fallback method. A wired connection eliminates Wi-Fi interference entirely.
Expert Insight: Many users avoid computer backups because they believe they have to re-enter all their passwords and health data on the new device. This is a common misconception. If you select “Encrypt local backup”, the transfer will include your saved passwords, Wi-Fi credentials, and Health/Activity data.
Procedure for a Complete Transfer
1. Choose the Right Tool:
- Mac (macOS Catalina or later): Use Finder.
- Windows 10/11: Download the “Apple Devices” app from the Microsoft Store.
- Older Windows/Macs: Use iTunes.
2. Connect Source Device:
Plug your old iPhone into the computer via USB. Trust the computer if prompted.
3. Enable Encryption (Crucial Step):
Select your device. Look for the “Backups” section. Check the box for “Encrypt local backup.” You will need to create a password for this backup—do not lose it, as there is no way to recover the data without it. This step ensures your Health data and keychains are saved.
4. Create Backup:
Click “Back Up Now” and wait for the process to finish.
5. Restore Target Device:
Connect the new iPhone. If it is already set up, you will need to factory reset it (Settings > General > Transfer or Reset iPhone > Erase All Content and Settings). Once at the setup screen, select “Restore from Mac or PC” (or “Restore from Backup”). Select the encrypted file you just created and enter the password.
This method is often faster for devices with large storage usage (256GB+) because USB data transfer rates are more consistent than peer-to-peer Wi-Fi connections.
Q&A for Transfer Directly from iPhone
The transfer directly from iPhone is an important feature as this handles all of the critical data that you have stored on your phone. Hope you have fixed transfer directly from iPhone not working with the above methods. And if you have some questions about this feature, and the following answers some of the important questions for you.
1. What Can be Transferred with Transfer Directly from iPhone?
Everything can be transferred with Transfer Directly from iPhone. This feature allows you to transfer basically everything that you have on your old iPhone to the new iPhone 17.
2. How to Speed Up Transfer Directly from iPhone Process?
You can speed up the transfer directly from iPhone process by keeping both your devices close to each other if you use the wireless mode. A cable migration will be a bit faster than the wireless one in case of low connection.
3. If the iPhone is already Set Up, How Can I Use This Feature?
No, you cannot use the official migration feature on an iPhone that has already been set up. To use the feature, you must erase your iPhone by heading to Settings > General > Reset and tap Erase All Content and Settings.
You May Like: How to Transfer Photos from New iPhone 17 to PC >
The Bottom Line
These are the fixes to transfer directly from iPhone not working. And to help you transfer your data to iPhone much more easily, we highly recommend you try AnyTrans for free to transfer data in simple clicks. All data types are supported. No data erasing. Just free download AnyTrans to have a try!
Free Download * 100% Clean & Safe
More Related Articles

Joy Taylor is a seasoned technical writer with over a decade of experience in mobile technology. At iMobie, she specializes in producing in-depth content on iOS data recovery, iPhone unlocking solutions, and iOS troubleshooting.
Product-related questions? Contact Our Support Team to Get Quick Solution >
