Phoenix Service Tool (2026): What It Is, Safe Download, How to Use & Better Alternatives
Struggling with a bricked phone? Our 2026 guide for the Phoenix Service Tool offers step-by-step instructions, error fixes, and safe download advice.
Table of ContentsHide
What Is the Phoenix Service Tool (Core Uses)
Is Phoenix Service Tool Safe to Use in 2026?
Price & Licenses (Credits, Resellers, Refund Notes)
How to Download & Install Phoenix Service Tool
Should You Use Phoenix Service Tool? (Important)
How to Use Phoenix Service Tool (Step-by-Step)
Common Errors & Connection Issues (Fixes)
Phoenix Service Tool Alternatives for Specific Needs
FAQ
If you’re dealing with a bricked phone, FRP lock, or system crash, you may have come across the Phoenix Service Tool.
But here’s the reality in 2026:
- It’s a technician-level flashing tool, not designed for beginners
- Many operations require paid credits
- Using the wrong firmware can permanently damage your device
So before you download or use it, the key question is:
Is Phoenix Service Tool really the right solution for your situation?
This guide will give you a clear answer — including risks, real use cases, and easier alternatives.
What Is Phoenix Service Tool (Core Uses)
The Phoenix Service Tool is a PC-based software designed for firmware flashing, device repair, and low-level system access.
Technicians widely use it to:
- Flash stock firmware (ROM)
- Fix boot loops or soft-bricked devices
- Remove certain locks (including FRP in supported cases)
- Repair system-level issues on Qualcomm and MediaTek devices
Unlike standard Android tools, Phoenix works by establishing a low-level connection (EDL mode) to directly write firmware to device memory.
If you’re looking for general Android unlocking solutions, you may also want to check this Android unlock tool guide.
Is Phoenix Service Tool Safe to Use in 2026?
Short answer: It depends on your experience level.
✅ It can be safe if:
- You use the correct firmware
- You install proper drivers
- You understand flashing procedures
❌ It becomes risky if:
- Firmware does not match your device
- Connection fails during flashing
- You use unofficial/cracked versions
⚠️ Risks include:
- Device hard brick
- Data loss
- Authorization failure (wasted credits)
That’s why many non-technical users prefer guided tools instead of manual flashing
Price & Licenses (Credits Explained)
Phoenix Service Tool does not follow a simple one-time purchase model.
- What you pay for: license tier + usage credits (varies by operation).
- Where to buy: official Distributors & Reseller page (authorized sellers only)
- Refunds & limits: check each reseller’s policy; some operations consume credits and cannot be reversed.
- Tip: avoid “free credits/cracks”—they are unsafe and often lead to account bans or malware.
Before purchase, confirm that your exact model/firmware is supported and that the operation you need (e.g., FRP removal) is available for that build.
How to Download & Install Phoenix Service Tool Latest version
Use only official sources and authorized resellers. Avoid cracks or repacked installers.
Where to get it
- Official site: Phoenix Service Tool (features, contact)
- Authorized distributors/resellers: purchase license/credits → receive installer and activation info
- Drivers: install required ADB/Fastboot and chipset drivers (MTK/Qualcomm) from trusted sources
Install checklist
- Download the installer from an official/authorized link
- Scan the file; keep Windows Defender on
- Install as Administrator
- Install necessary USB drivers (ADB/Fastboot, MTK/Qualcomm)
- Reboot PC, verify Device Manager shows the phone correctly when connected in the intended mode
Security note: Do not use “free/cracked” versions. They often contain malware, break updates, or lead to account bans.
Should You Use Phoenix Service Tool?
Before jumping into flashing, you need to decide if this tool is right for you.
You SHOULD use Phoenix if:
- You are a technician or advanced user
- You need deep firmware repair
- You understand flashing risks
You should NOT use Phoenix if:
- You are a beginner
- You just want to bypass FRP or unlock your phone
- You want a quick and safe solution
In these cases, using a simpler and guided tool is often a better choice
How to Use Phoenix Service Tool (Step-by-Step)
Success with Phoenix Service Tool depends on preparation. Follow the sequence below to reduce risk of soft- or hard-brick.
Part 1. Preparation (Do this before any flashing)
1) Identify exact device & firmware details
- On the phone: Settings → About phone → record Model (e.g., SM-G991U), Build, Region/CSC.
- Why: A mismatched region/carrier build can cause boot loops or loss of functions.
2) Confirm support for your exact build
- In the tool’s documentation/support list, check that the operation you need (flash, FRP, repair…) is available for your model/firmware/security patch.
3) Gather the correct stock firmware (ROM)
- Use trusted sources and match model + region + build; verify checksum if provided.
4) Environment & data safety
- Backup data (PC suite/cloud). Flashing may wipe everything.
- Battery ≥ 70%.
- Use an OEM/quality USB cable and a rear USB port on desktop.
- Turn off sleep/hibernation.
Part 2. Pre-Flashing Safety Checklist
Before you click ‘Start,’ run through this final checklist. It dramatically increases the chance of a successful operation.
- Drivers installed; Device Manager shows the phone properly in target mode (no yellow warnings)
- Firmware build, region, and variant exact match
- Stable cable/port; no USB hubs
- Admin rights confirmed; antivirus not blocking the tool
- Logs folder path ready (for support in case of failure)
Part 3. Flashing with Phoenix Service Tool (Step-by-Step)
With everything prepared, it’s time to begin flashing your phone. Follow the steps carefully in the exact order shown.
Step 1. Run the Tool with Administrator Rights
Right-click the Phoenix Service Tool shortcut and choose Run as administrator. This ensures the program has the proper permissions to work correctly.
Step 2. Load the Firmware File
Inside the tool, go to the main flashing tab. Click Open or Load, then select the stock ROM you downloaded. Always confirm it matches your device model and region before proceeding.
Step 3. Connect Your Device in Flash Mode
Next, you’ll need to put your device into its special flash mode before connecting it to the computer.
- Power off your phone completely.
- Hold the correct key combination while plugging it in via USB.
- For Samsung: Volume Down + Power
- For Xiaomi: Volume Down + Power (Fastboot mode)
- For other brands: Search online for “[Your Model] flash mode combination.”
Step 4. Begin the Flashing Process
Double-check the firmware one more time, then click Start or Flash. During this step, avoid disconnecting the cable, using other programs, or letting your PC go to sleep.
Step 5. Wait for Completion
The process may take several minutes. When it’s done, the tool will display a Pass or Complete message. At this point, your phone should reboot automatically into its initial setup screen.
Using Phoenix Service Tool successfully is all about preparation first, action second. By identifying the right firmware, downloading from safe sources, and completing the pre-flash checklist, you minimize risks. Once you’re ready, the step-by-step flashing process is straightforward.
Solving Phoenix Service Tool Errors and Connection Issues
Even with proper preparation, errors can still occur. Fortunately, most Phoenix Service Tool errors are linked to drivers, firmware mismatches, or unstable connections, and they can usually be fixed with a few adjustments.
| Error Code / Issue | Solution Steps |
| ‘Connection Error’ or ‘Device Not Found’ |
|
| ‘Flash Failed’ or ‘Write Operation Error’ |
|
| ‘Authorization Failed’ |
|
Phoenix Service Tool Alternatives (Easier & Safer)
If troubleshooting doesn’t solve your problem—or if you’re working with a specific brand—consider alternatives. The best Phoenix Service Tool alternative depends on your device and your goal.
Option 1: Official Tools (Free but Limited)
- SP Flash Tool (MediaTek devices) – Industry standard for MTK chipsets.
- Odin (Samsung devices) – Official Samsung firmware flashing tool.
- Mi Flash Tool (Xiaomi devices) – Official Xiaomi solution for Fastboot ROMs.
Best Alternative: DroidKit (Recommended)
If you prefer a beginner-friendly and guided solution, DroidKit is a much easier option.
Why many users choose DroidKit:
- No credits required
- Step-by-step guided process
- No manual flashing needed
- Supports FRP removal, screen unlock, and system repair
DroidKit vs. Phoenix Service Tool (Quick Compare)

DroidKit vs. Phoenix Service Tool (Quick Compare)
Don’t want to risk flashing errors or deal with complicated drivers? Try DroidKit to safely and quickly fix your Android device — no credits, no flashing risks.
How to Use Droidkit (Step-by-Step)
1. Download DroidKit
DroidKit runs on both Windows and macOS, so you can use it on your preferred computer.
Free Download * 100% Clean & Safe
2. Connect and Select:
Launch DroidKit on your computer, choose the FRP Bypass feature, and connect your locked device.
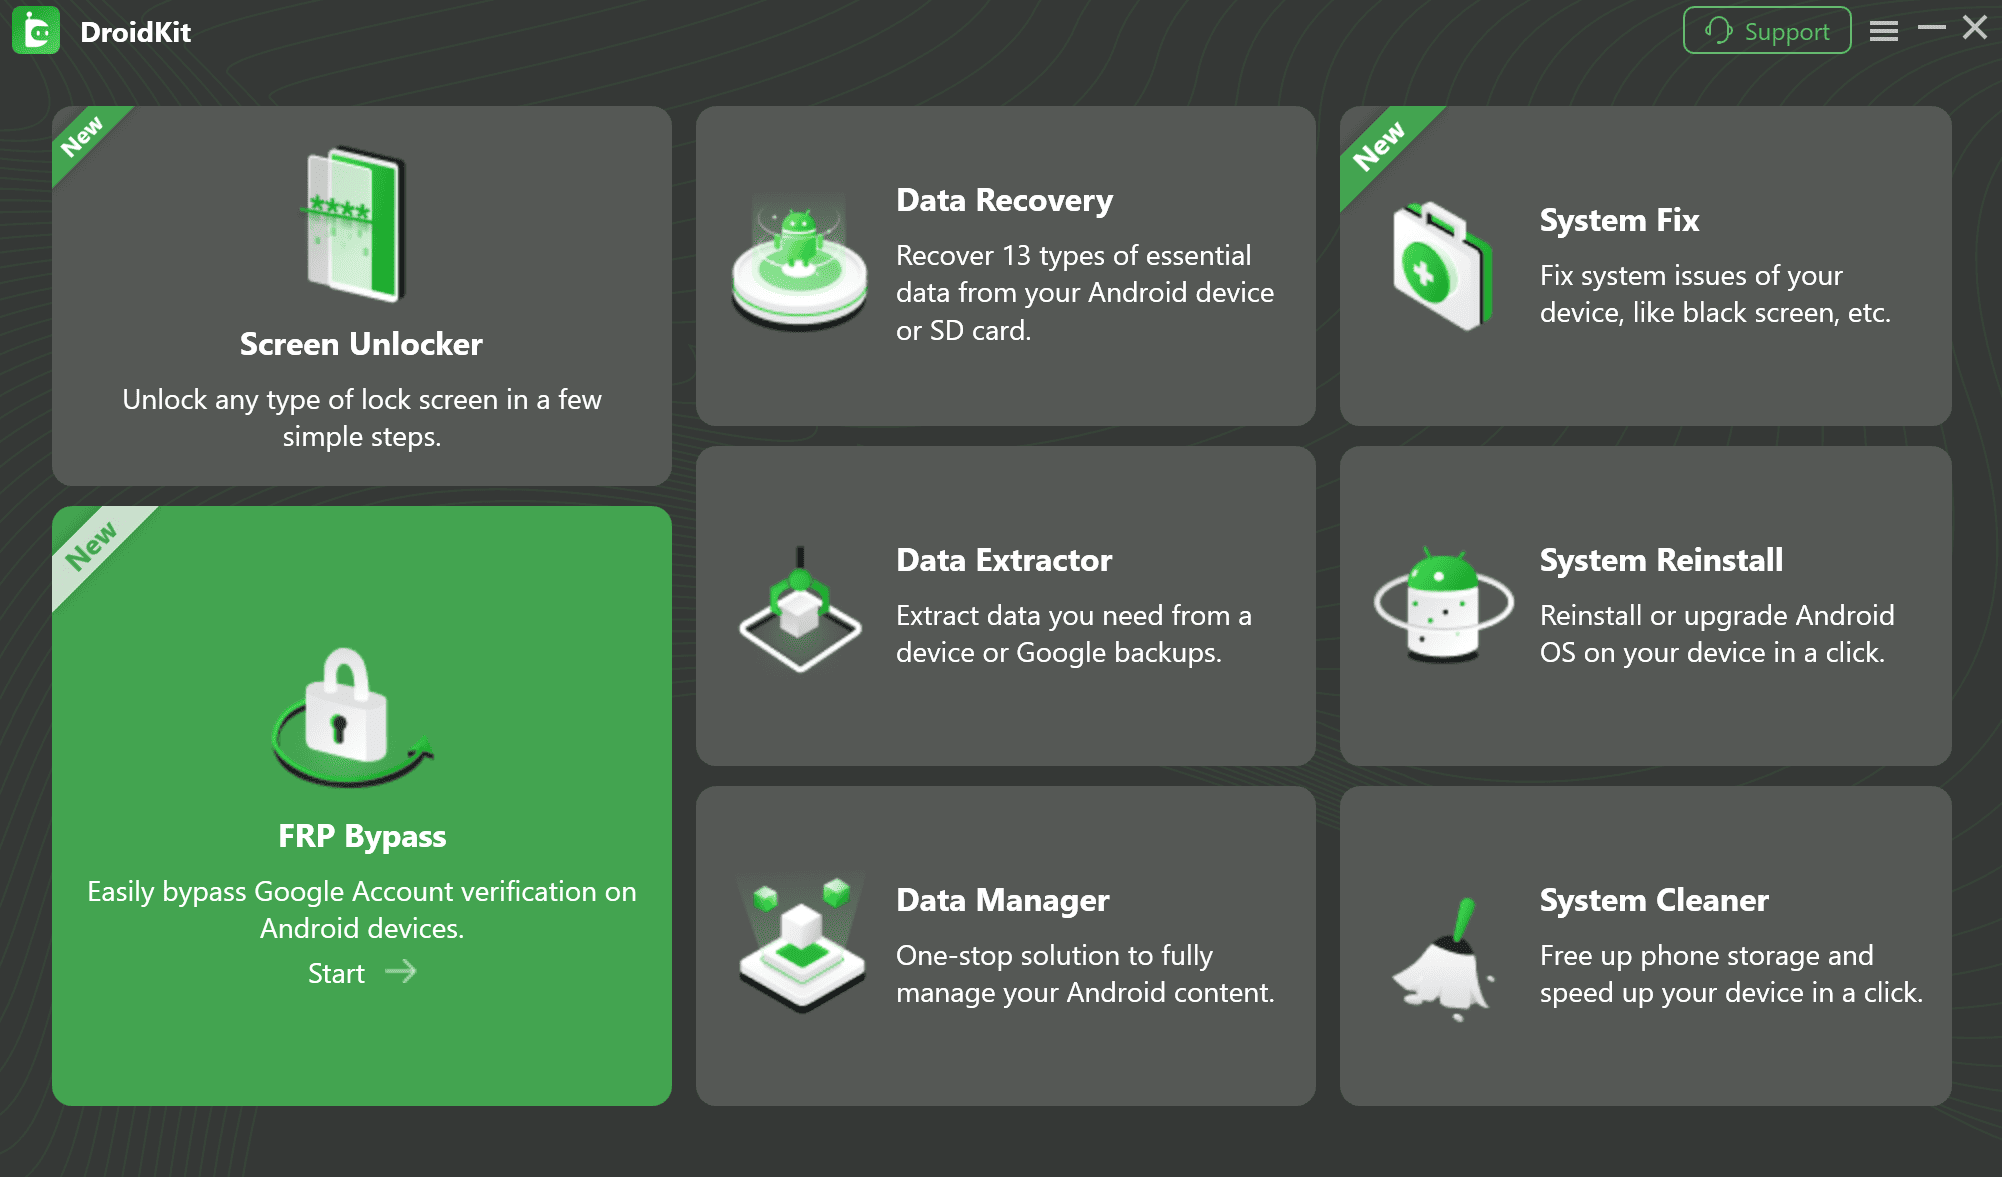
FRP Bypass Function in Mainmenu
3. Configure:
The tool automatically identifies your device and prepares the correct configuration file.
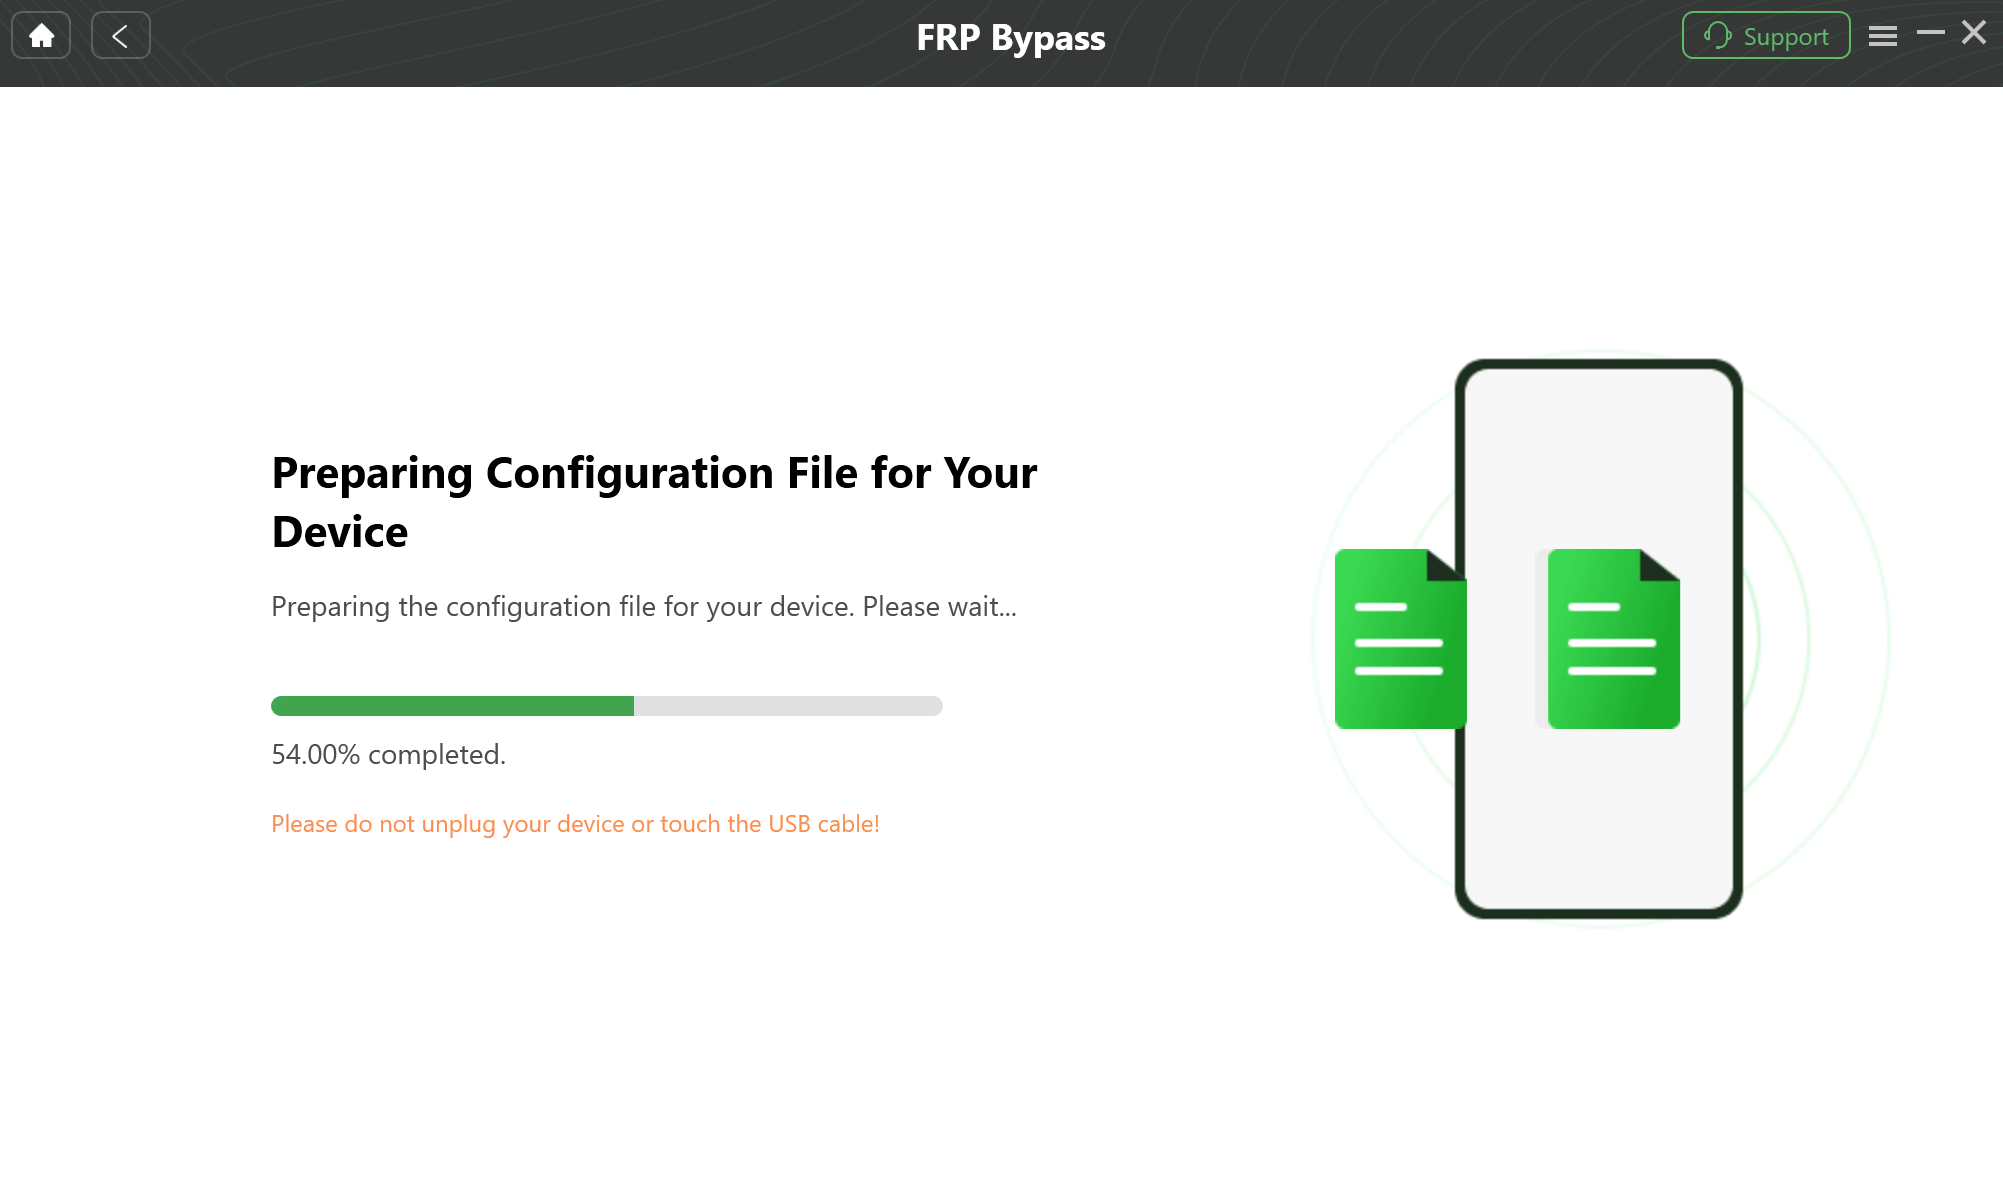
Prepare the Device-Specific Configuration
4. Execute Bypass:
Follow the simple on-screen instructions to put your device into the required mode and complete the removal.
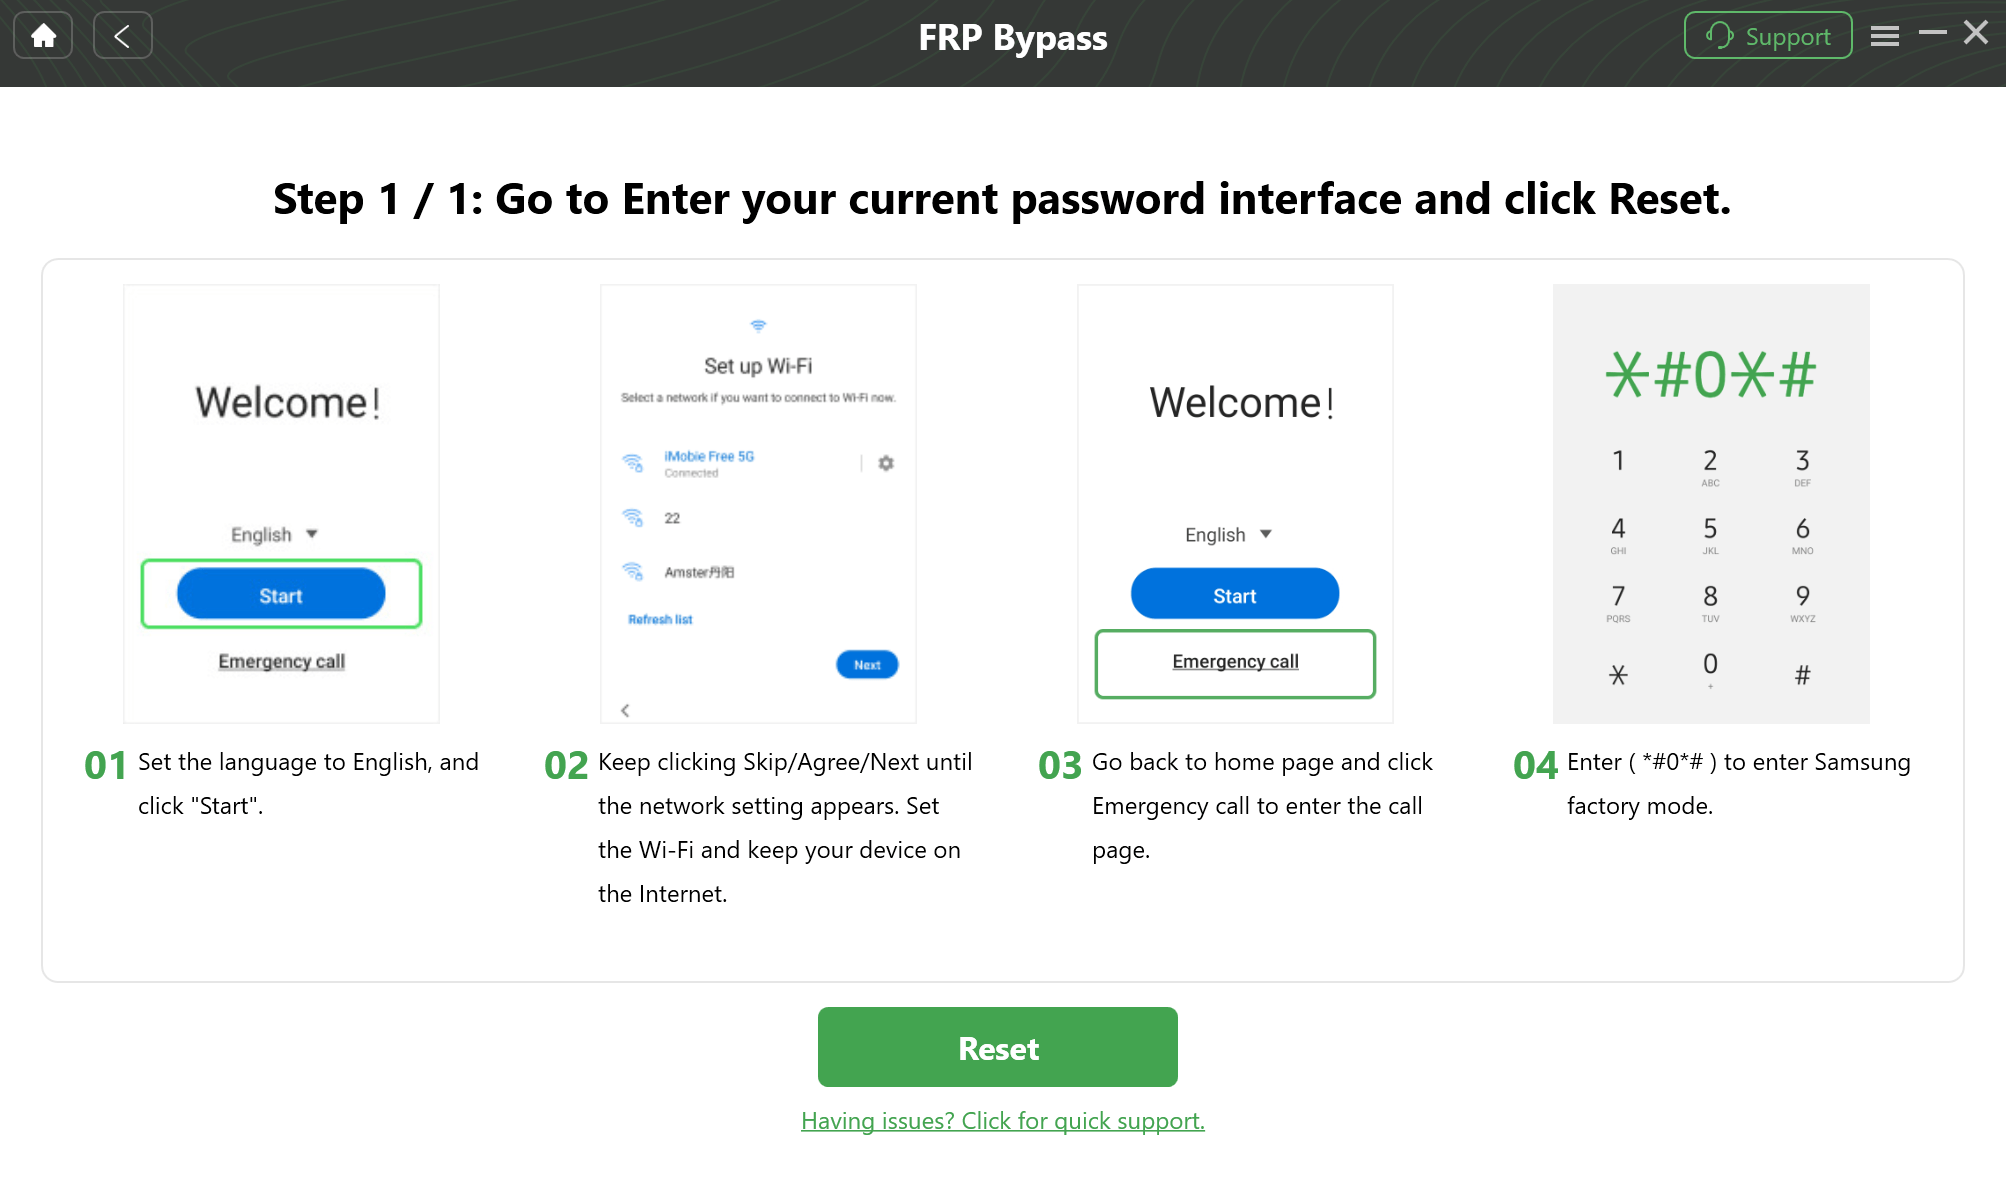
Follow the On-Screen Setup
Conclusion
The Phoenix Service Tool remains a powerful utility for flashing firmware, repairing devices, and handling advanced service tasks. While errors like connection issues, flash failures, or authorization problems can be frustrating, most of them can be resolved by carefully checking drivers, firmware compatibility, and system configurations.
At the same time, it’s worth noting that this tool isn’t always the most convenient option—especially for users who only need to perform specific tasks like FRP bypass or brand-specific flashing. In such cases, alternatives like SP Flash Tool, Odin, Mi Flash Tool, or a dedicated solution such as DroidKit may provide a faster and more user-friendly experience.
By applying the troubleshooting steps outlined above and choosing the right tool for your needs, you can overcome Phoenix Service Tool errors and ensure a smooth, reliable flashing or repair process for your device.
Free Download * 100% Clean & Safe
Phoenix Service Tool FAQ
What is Phoenix Service Tool used for?
It’s used for flashing, repairing, FRP removal, and maintenance on supported Android devices.
What is the price ofthe Phoenix Service Tool?
Pricing varies by license tier and credits; buy from authorized resellers and check current rates.
Where can I download it safely?
From official sources only; avoid repacks/cracks.
Is DroidKit a safe alternative to Phoenix Service Tool?
Yes. DroidKit provides verified installers, guided steps, and works on Windows/macOS. It’s designed for legitimate owners and simpler jobs without a dongle or credits.
Is it legal to use?
Use only on devices you own or are authorized to service; follow local laws.
More Related Articles

Roger Smith is a senior technical writer with years of experience in providing Android solutions. He loves to help users solve various problems such as Android unlock, Android data recovery, and Android system repair.
Product-related questions? Contact Our Support Team to Get Quick Solution >
