Always on Display Not Working on Android/iPhone 14 Pro? 10 Fixes!
Always on Display not working on Android or iPhone 14 Pro? Why does this happen? And how to fix this issue? Here we will provide you with 10 easy solutions in this post.
The Always on Display (AOD) is one of the most impressive features tucked into Android and iPhone. It’s designed to put your device on display so you can easily access time, check battery percentage level, and more without needing to touch it.
always on display is a wonderful feature known always to be active, but there have been complaints about it tripping off. Several Android and iPhone 14 Pro/Max owners now report that the AOD feature no longer works on their devices. If this situation sounds familiar, this article will be of help as it’s structured to provide the various troubleshooting techniques to fix always on display not working on Android and iPhone.
Bonus Tip: Here are some other Android/iPhone-related tips for you.
- 6 Ways to Fix “Android Messaging App Not Working” Issue >
- iPhone Swipe Up Not Working? Here Are 10 Fixes! >
Why Is My Always On Display Not Working?
By default, the Always on Display functionality is automatically enabled. Also, you are eligible to manipulate the feature, as in putting it off and on manually.
If you haven’t tampered with the Always on Display feature on your iPhone/Android, then something must be wrong somewhere, whether hardware or software issues.
So as mobile experts, we researched why always on display not working. Find below some:
- Outdated operating system
- Wrong configuration settings
10 Solutions to Always on Display Not Working Problem
Use any of the solutions below to fix always on display not working on Android, iPhone 15, and iPhone 14 Pro.
Solution 1. Restart Android/iPhone
Restarting your Android/iPhone 14 Pro fixes the always on display not working problem. When you turn off your device, then turn it on again, the system is refreshed and every bug disrupting the functionality is cleared.
To restart an Android operating system:
Step 1. Hold the corresponding power buttons and follow the on-screen commands to put it off.
Step 2. Wait for a few minutes, then hold the buttons again till the device comes on.
For iPhone 14 Pro/Max:
Step 1. Hold the Volume Up and Lock buttons concurrently till you find the response page below on your screen:
Step 2. Now drag the Slide to power off button to turn off the device.

Drag the Slide to Power off
Step 3. After a while, simultaneously hold down the Volume Up and Lock buttons till the Apple logo appears.
If you cannot restart your iPhone, you can read this guide: iPhone Won’t Restart or Force Restart Not Working? How to Fix >
Solution 2. Make Sure to Enable Always on Display
The always on display feature must be active for it to work. If for any reason you’ve tampered with the settings in the past, it won’t work. However, you can fix that by making necessary changes to the settings. Follow the steps below to enable the always on display feature:
Android Devices:
- Head to the Settings app page on your device.
- Tap on the Lock Screen tab and select Always on Display.
- Now select Show always to enable always on display.
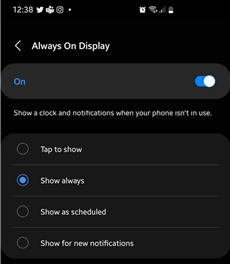
Select Show Always
iPhone 14 Pro/Max:
- Navigate to the Settings menu page and click on Display & Brightness.
- Scroll down and drag the Always on Display toggle button right to enable it.
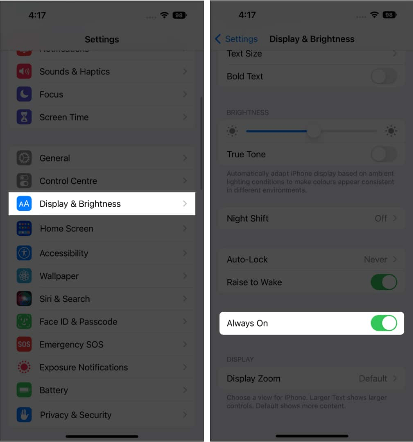
Drag the Always on Display Toggle Button
Solution 3. Disable Power Saving/Low Power Mode
Low power mode/power saving is a feature designed to help you manage your iPhone/Android device battery life respectively. It works by slowing down your device’s operations and disabling some apps and features including always on display.
However, this feature may cause Android/iPhone always on display not working. If you have low power mode/power saving enabled, kindly disable it for always on display to function effectively. Here is how to do that:
For Android:
Step 1. Launch the Settings menu.
Step 2. Tap on Battery and device care to proceed.
Step 3. Now click on Battery and slide the Power Saving toggle button left to disable it.
For iPhone:
Step 1. Open Settings, scroll down and click on Battery.
Step 2. Next, drag the Low Power Mode toggle button left to disable it.
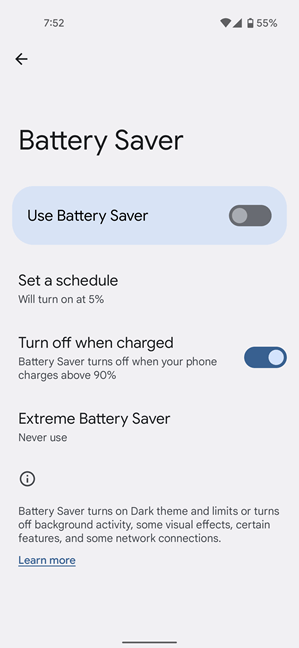
Disable Low Power Mode
You can also read the tips on Android and iPhone power/battery issues:
- How to Fix iPhone Battery Draining after iOS 17 Update >
- How Fix Battery Draining too Fast on Android Phone >
Solution 4. Repair Android OS/iOS
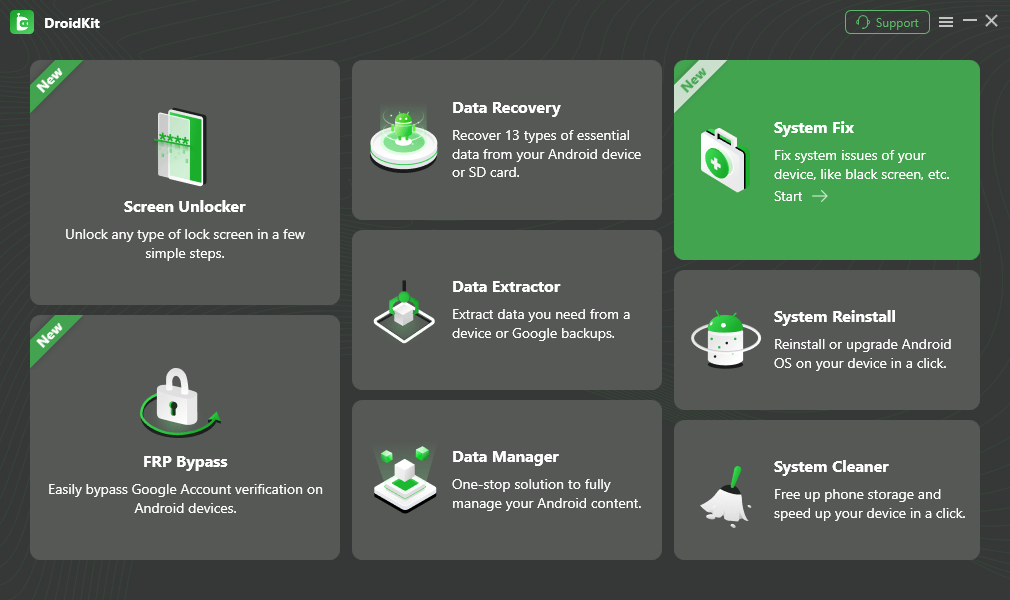
If always on display still malfunctions after applying the solutions above, there may be some system issues with your device. Then, we recommend you use an Android or iOS system repair tool. Here, we have two powerful tools, one for Android and the other for iOS, to fix always on display not working issues. Check them out below:
For Android users:
DroidKit – Android Phone Toolkit is one of the most fantastic system repair solutions designed primarily for fixing Android operating systems. It resolves issues like Samsung always on display not working you are currently experiencing. Most importantly, it is not as complicated as other common methods. All you need to do is to click on the buttons. And after a few minutes, all the system errors will be fixed successfully by this powerful tool. And it’s often referred to as the ultimate Android system repair solution because of the top-notch results it offers. You can learn more about DroidKit with the following content.
Free Download * 100% Clean & Safe
- Fix all system problems – Solve almost all Android system problems, such as black screen, always on play not working, touch screen not working, stuck on logo and so on.
- No skills, no root – Just click buttons to fix without root. Even a technical novice can operate easily and successfully.
- High compatibility – It supports to fix the system on all Samsung devices running Android 5 to Android 13.
- Absolutely safe – All downloaded and installed ROMs are from the official and never contain any viruses or malware. 100% clean and safe.
And DroidKit, an all-round Android Tool, can also recover your lost data from device directly or extract your data from Google account. And if you are locked out of your device but can’t remember the password, it is a good unlocker for you as well.
Just free download DroidKit and simply apply the following instructions below to fix always on display not working on Android using it:
Step 1. Run the DroidKit software and use a USB drive to establish a connection with your Android phone. Click System Fix > Start.
Click System Fix Function
Step 2. Once done with the step above, a PDA code will pop up on your mobile device. Copy the code and paste it in the empty field provided on DroidKit. Hit the Download Now button to get the firmware.
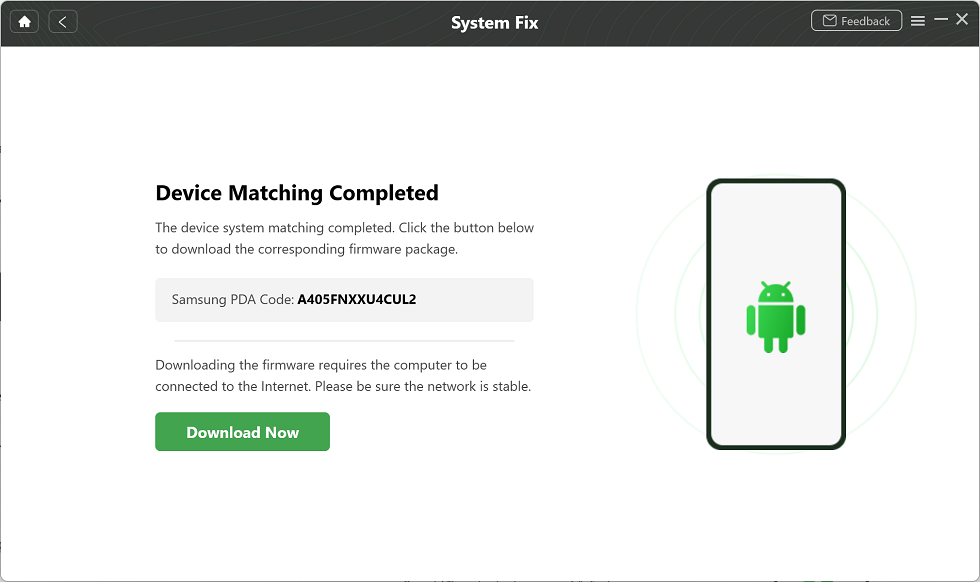
PDA Code Matched
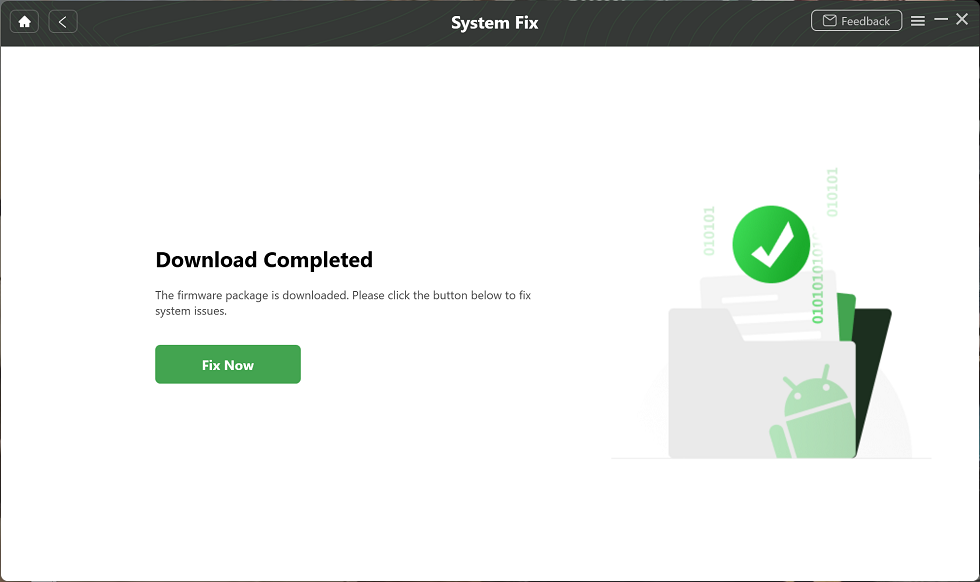
Step 3. Wait for the firmware downloading to complete. Then you will see the Fix Now button and please click it.
Firmware Downloaded and Click Fix Now
Step 4. DroidKit will require you to put your device in download mode. Simply apply the stepwise guide provided for your Android model, and hit the Next button.
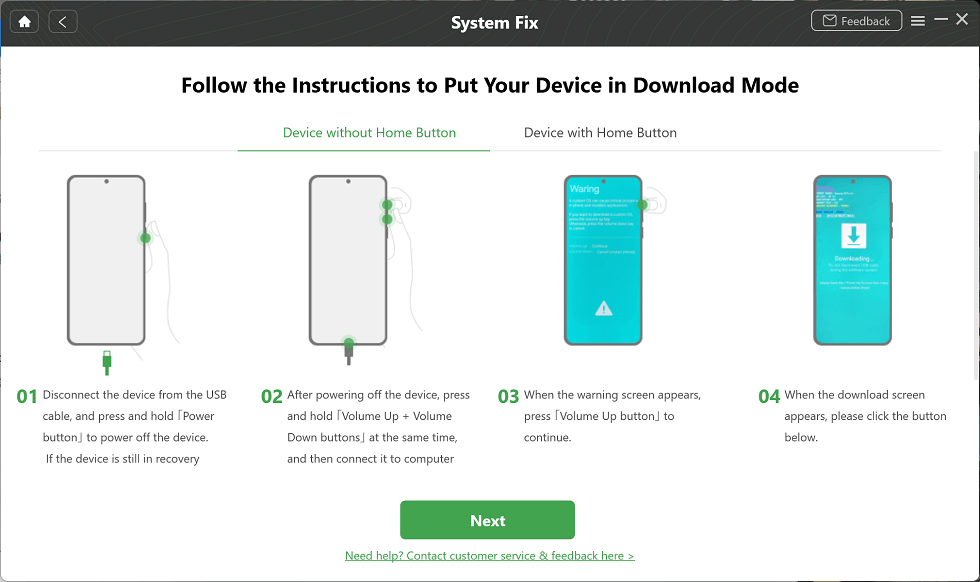
Put Samsung into Download Mode
Step 5. Now DroidKit will fix your device with the newly installed firmware package. After the repair, disconnect your Android from the computer and check out the always on display feature.
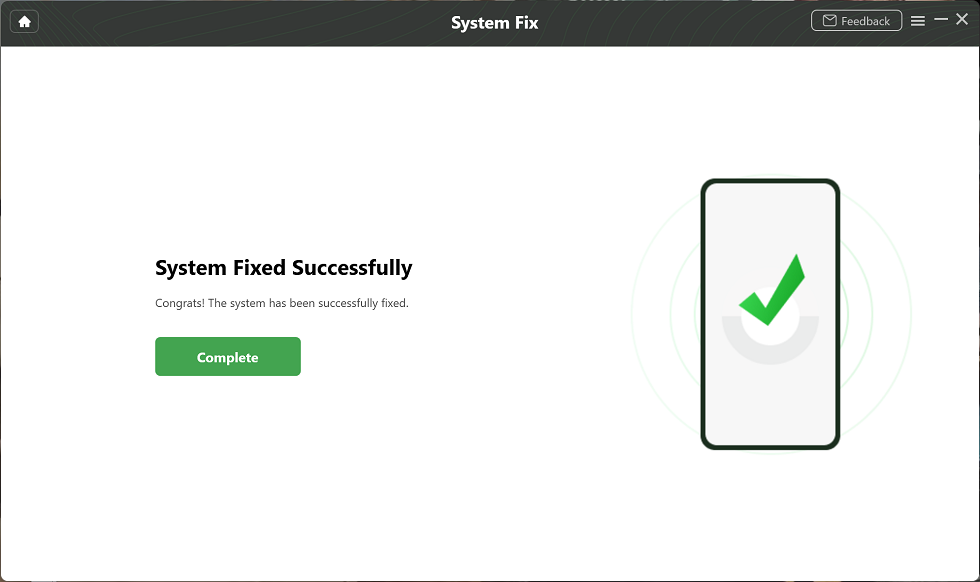
Completing the Repair Process
For iOS users:
PhoneRescue for iOS is one of the top system recovery solutions available for fixing iOS devices. It’s loaded with an impressive feature that fixes all iOS system issues including always on display not working iPhone. The software is one of the handiest iOS system repair tools because of its sleek interface and multipurpose functionality. What’s more, with this tool, you can get rid of system errors even without any data loss. To find out more about PhoneRescue, please keep reading.
Free Download * 100% Clean & Safe
- This repair tool covers all iOS system problems, including black/white/blue/green/pink screen, vertical lines on the screen, stuck on Apple logo, stuck in recovery mode, etc.
- Many iOS repair tools will erase the data on the device, which is really distressing and frustrating. But with PhoneRescue, all data will still be completely stored in your device after repair. No data loss!
- This tool makes system repair quite simple and fast. You only need to click the button according to the prompt and wait for a few minutes to repair system issues successfully.
- PhoneRescue currently supports all iOS versions and iPhone/iPad models, so you don’t have to worry about compatibility at all.
PhoneRescue boasts a high data recovery success rate, one reason it’s an industry-leading data recovery solution. Besides helping you repair iOS system errors, Phonerescue functions as an iOS data recovery solution as well. Users can retrieve all iOS data types, including contacts, images, call logs, and others.
Therefore, get PhoneRescue for free and with the step-by-step instructions below, you can fix always on display not working on iPhone with PhoneRescue:
Step 1. Click the PhoneRescue icon to launch it. Connect your iPhone to PhoneRescue with the help of a USB cable and click Device Rescuer > Repair iOS System.
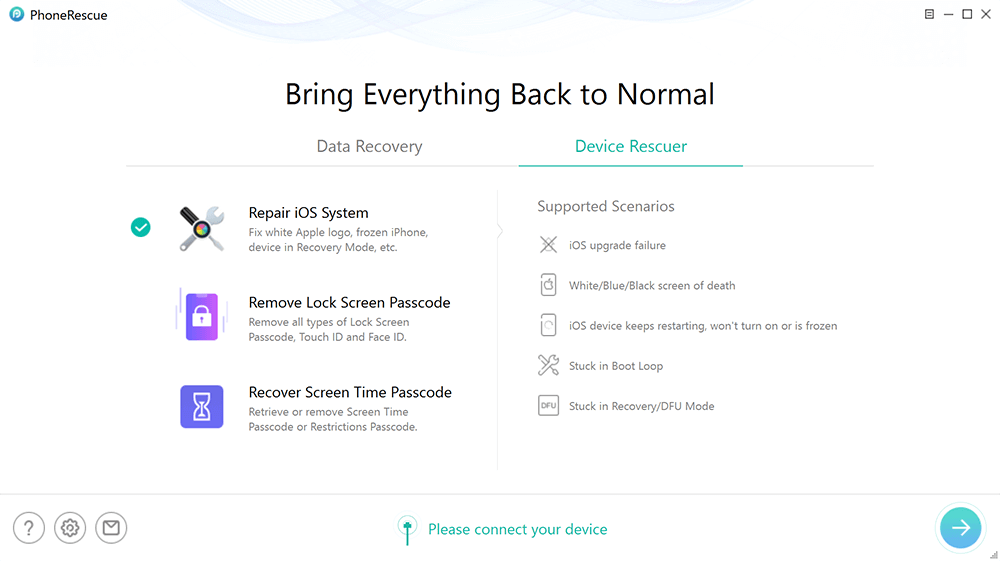
Click Device Rescuer and Choose Repair iOS System
Step 2. Choose your preferred repair mode on the next screen that appears. We recommend that you select Advanced Mode because it will not erase your data, and tap on the arrow key at the bottom of the software page.
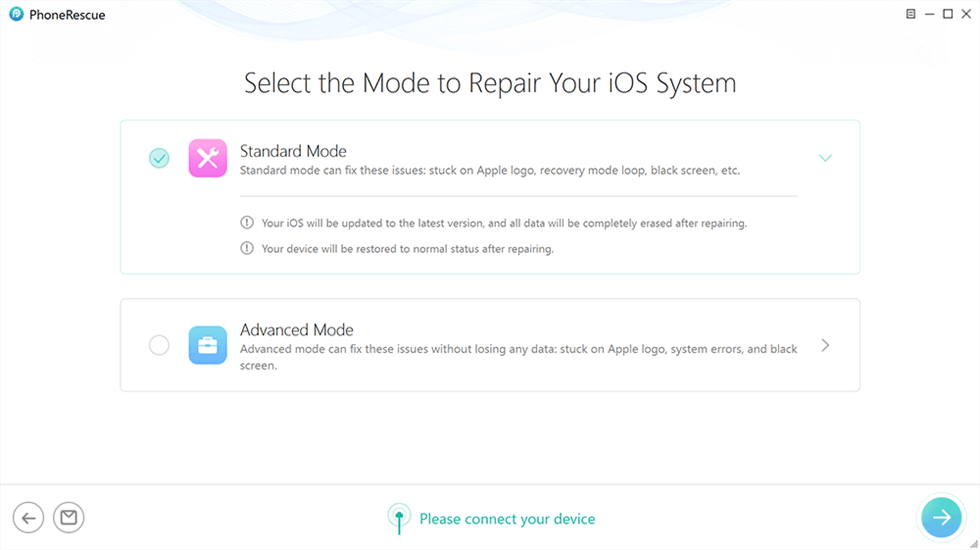
Choose Advanced Mode
Step 3. Next, set your device to recovery mode. You can follow the instructions provided on the screen directly.
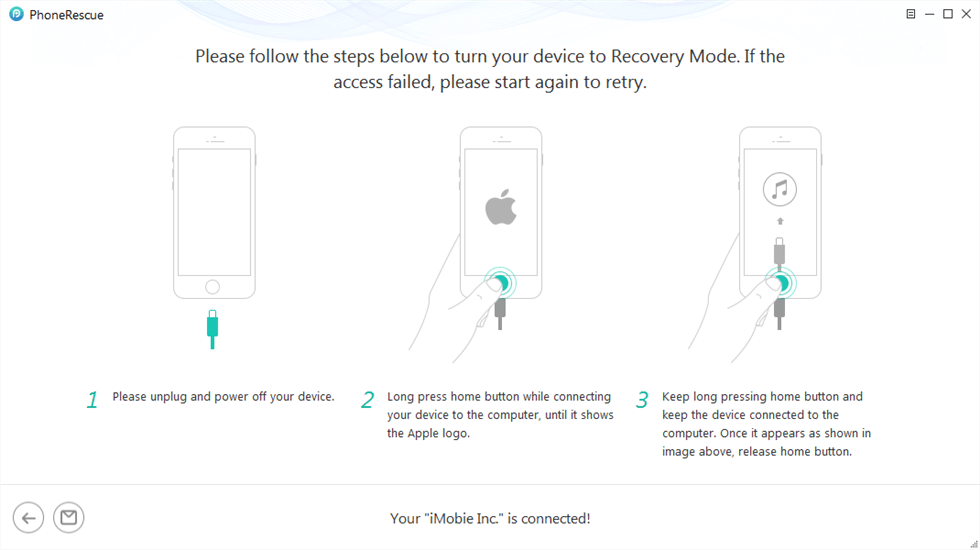
Enter Recovery Mode
Step 4. Now PhoneRescue will scan your iDevice for possible errors and recommend a firmware package that you can use to fix it. Download the firmware by clicking Download.
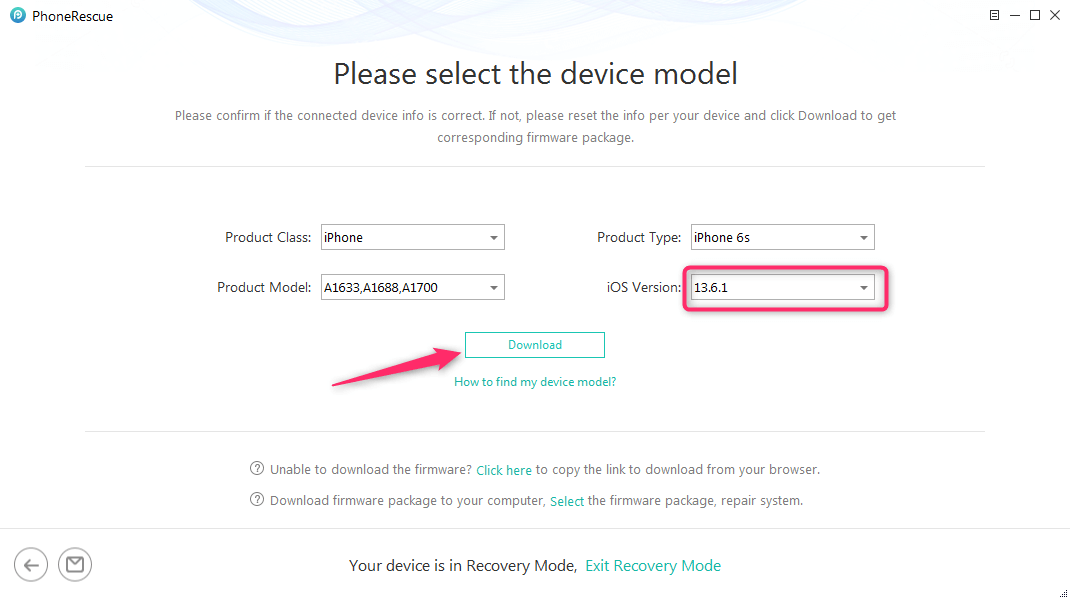
Click Download to Get Firmware
Step 5. Once done, PhoneRescue will fix your device using the newly installed firmware package. Your device will reboot when the repair is over. Kindly unplug it from the computer to start using it again.

iOS Repairing Completed
Solution 5. Turn off Lift to Wake/Raise to Wake up
Here is another solution to fix the always on display not working challenge you are currently experiencing on your device.
Turn off the lift to wake option on your Android by:
- Opening the Settings menu page.
- Head to Display, and click on the button.
- Next, disable the Ambient Display feature by sliding the icon next to it left.
For iPhones:
- Visit the Settings app page and click Display & Settings.
- Slide the toggle next to the Raise to Wake option left to turn it off.
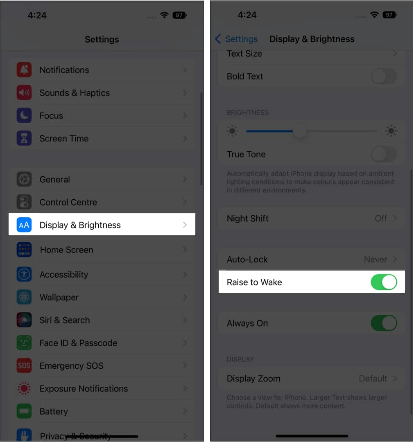
Turn off Raise to Wake
Solution 6. Update Always on Display
Updating the always on display feature rolls out outdated files, improves its functionality, and fixes all software bugs disrupting the operation. And it is very easy to update this feature.
- Go to Settings > Select the Lock Screen option > Choose Always on Display feature.
- You will see the About Always On Display option at the bottom. Click on it.
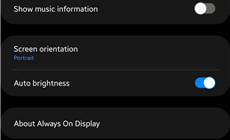
Click About Always On Display
- Then your deivce will check if there is available updates. If yes, please click on Update.
Solution 7. Wipe Storage Data of Always on Display
You may also encounter always on display not working after update. Too much cache data has a significant effect on the performance of your device and could affect the always on display feature. We recommend that you clear the data so your device can function well. Plus so always on display can start working.
Solution 8. Clear Cache Android
Although designed specifically for Android operating systems, clearing cache is another simple approach to fixing always on display not working issues freely and quickly. It helps you eliminate those temporary files that prevent always on display from working. Clear caches on your Android device following this stepwise guide:
Step 1. On your device, open the Settings app page.
Step 2. Scroll down and select the Lock Screen option.
Step 3. Next, tap on Always on Display and click on the icon at the top right corner of the next screen that appears.
Step 4. Now click on Storage. Finally, tap on Clear Cache at the bottom left corner of the screen.
Solution 9. Update Android OS/iOS
Should the always on display feature keep malfunctioning after the aforementioned solution, consider updating your device operating system to fix the issue. OS update improves your device performance and wipes software bugs hindering always on display from working.
Apply the stepwise instructions below for your Android OS:
Step 1. Click Settings to quickly access the app page.
Step 2. The next page that appears will contains several options. Select System > System Updates.
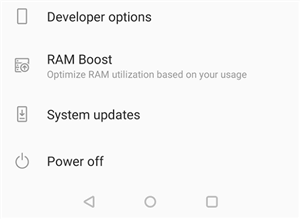
Select System Updates
Step 3. If there is an update, you will find the Download and Install button. Click on it and connect to a stable data source.
Step 4. Wait for the update to complete and your device will restart automatically.
For folks using iDevices, simply apply the following instructions to update your iOS:
Step 1. Tap on the Settings icon to visit the menu page.
Step 2. Navigate and click on General > Software Update.
Step 3. Connect your device to a stable internet connection and wait for your iPhone to source for the latest updates.
Step 4. Once done, click on the blue Download and Install button.
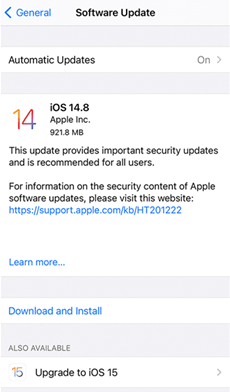
Click Download and Install Button
Solution 10. Factory Reset Android/iPhone
Factory reset is the last solution we’ve got on our list. You should try this if the solutions above don’t give positive results. By factory resetting your device, you are clearing all of the installed apps and downloaded files.
The aim of this solution is to give your device a fresh start and clearing unnecessary data disturbing the always on display feature. Here is how to fix always on display not working via factory reset.
Factory Reset Android
- Launch the Settings menu page. Select System > Reset.
- Underneath the reset option, click on Erase all data.
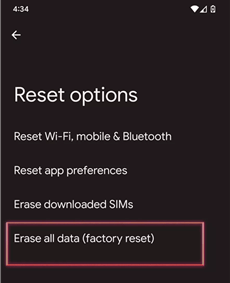
Click on Erase All Data
- Provide your password if necessary and click Erase all data to complete everything. Wait a while and your device will act accordingly.
Factory Reset iOS
- Click on Settings. Choose General on the next page that pops up.
- Scroll down and click on Transfer or Reset iPhone.
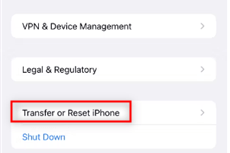
Click on Transfer or Reset iPhone
- Next, reset your device by clicking on Reset.
- Confirm you own the device by entering your passcode correctly in the space given. Once confirmed, your iPhone will reset.
The Bottom Line
These are the solutions to always on display not working. Choose one of them to fix this issue today. If it is caused by system issues, DroidKit and PhoneRescue are the best options for you because of their easy operation and high success rate. We recommend that you employ the services of one of the software to fix your device. Ensure you selected the appropriate software for your mobile operating system to repair your device now.
Free Download * 100% Clean & Safe

Senior writer of the iMobie team as well as an Apple fan, love to help more users solve various types of iOS & Android-related issues.
Product-related questions? Contact Our Support Team to Get Quick Solution >
