How to Wipe Android Phone Before Selling
If you are going to give away or sell your Android phone, you might want to learn how you can wipe your Android clean before selling it. This is a comprehensive guide on how to fully and permanently clean your phone before selling it.
Android Phone Tips
Android Backup Tips
If you want to change Android to a new Android or switch Android to iPhone, you may want to sell your old Android phone. Then, how to wipe an Android phone before selling it? There are a few things you need to do before the phone leaves your hands. One of these things is to wipe off all of the personal data saved on the phone. A popular way is resetting the phone.
However, how to securely and completely wipe an Android phone before selling? First, you need to make all your data on the old phone is secure, then you can delete all personal data. But that is not all. Here in this post, we will introduce how to prepare your Android phone before trade-in, i.e. what to do before selling an Android phone.
Further Reading: How to Transfer WhatsApp to a New Phone >
Steps to Delete Data from Android Permanently Before Selling
Step 1. Make a Backup Before Deleting All Data from Android
Before you go ahead and begin to erase your data, you might prepare to back up some of your important files. You can choose to transfer Android data to your computer, back up with cloud services like Google Drive, Dropbox, OneDrive, etc., or directly move data to your new Android phone or iPhone. So, you can restore the data backup whenever you need it. Here are some of the quick ways to transfer data to a safe place before a factory reset.
Method 1. Back-Up Android Files to the Cloud
One of the easiest ways to back up some of your Android files is to use a cloud backup. And for Android users, Google offers a free phone backup solution and you can use it to backup & restore Android phones.
What will be backed up to Google account:
- Apps and apps data
- Call history
- Contacts
- Device settings
- SMS text messages
If you want to back up other file types, use Google Photos or Google Drive. Using this method does not require an app since the backup option is built right into your phone. To back up with Google:
- Launch the Settings app on your Android phone.
- Scroll down and tap the System option.
- Tap Backup on the screen that follows.
- You should see a toggle that says Back up to Google Drive. Turn this option on and your phone will be backed up.
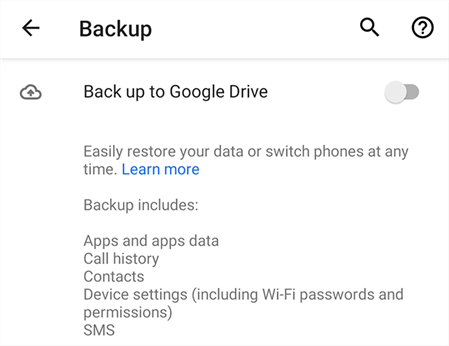
Back Up Android to Google
Further Reading: How to Recover Contacts from Google Account >
Method 2. Back-Up Android Files Locally
If you do not have a fast and stable Internet connection, or you do not want to use online backups for some reason, you can back up your phone locally to your computer as well. This basically includes plugging your phone into your computer and copying the files that you wish to preserve.
Keep in mind that you cannot back up your settings and other items while using this method. To transfer files from Android to the computer with Android File Transfer:
- Head into Settings > System > Developer options on your phone and turn on the USB debugging option.
- Plugin your phone to your computer using a USB cable, pull down the notification bar and use File Transfer as the connection mode.
- If you are on a Windows PC, your phone should appear under This PC. If you use a Mac, install and use Android File Transfer. (Tips: How to fix Android File Transfer not working)
- Copy all of the files you want to preserve from your phone over to your computer.
Further Reading: More Ways to Back Up Android Phone >
Step 2. Remove Google Account from Your Android Phone
Before you can reset your phone, you need to remove the Factory Reset Protection from your device. Factory Reset Protection is a lock that can protect your phone from being lost or stolen, which is introduced from Android 5.0 Lollipop. The FRP is enabled automatically when you registered a Google account on your phone. And the FRP lock will be activated after your phone was factory reset in an untrusted environment. At the time, the one needs to enter your Google account to verify.
To disable factory reset protection, you need to remove your Google account from your phone:
- Open the Settings app on your phone.
- Tap Accounts to view your added accounts.
- Choose your Google account in the list.
- Tap Remove Account to remove your account from your device.
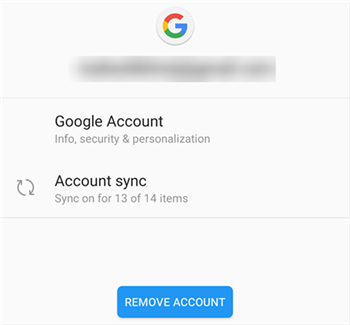
Remove A Google Account
And, if you forgot to turn off FRP, here is the guide to bypass Google account verification after reset.
Step 3. Encrypt Your Phone’s Data
You can apply encryption to your device data, and this way even if someone manages to access your data, all they will see is some gibberish text and not your actual data.
- If your Android phone came with Android 6.0 or later out of the box, your phone automatically encrypts your data. You need to check which version of Android you are running first: Launch the Settings app > Scroll all the way down and tap About phone > You will see your Android version.
- If you are on an older Android version, head into Settings > Security > Encrypt phone to encrypt your data.
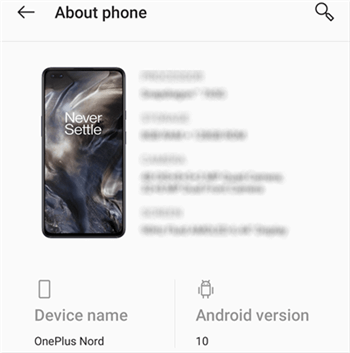
Find the Current Android Version
Further Reading: Encrypting Android Phone Unsuccessful? How to Fix >
Step 4. Wipe Android Phone from Settings
When your phone has encrypted your data, you can begin to factory reset your device. Keep in mind you will not be able to recover your data once you do this.
Open the Settings app, scroll down, and tap System > Select Reset options on the resulting screen > Tap Erase all data (factory reset) to start resetting your device.
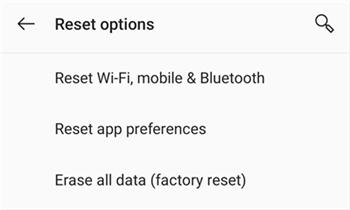
Reset Android to Factory Settings
Also Read: How to Reset a Samsung Phone That is Locked >
How to Erase All Data from Android Phone Remotely
If you already sold out your phone but forgot to wipe data, you can perform a factory reset remotely. Both Google Find My Device and Samsung Find My Mobile can help you to erase your phone remotely.
To erase all data on Android remotely with Google Find My Device:
- Go to https://www.google.com/android/find and sign in to your Google Account.
- You can locate your phone on the map.
- Simply click ERASE DEVICE on the screen, you can permanently delete all data on your phone.
Frequently Asked Questions about Wipe Android Before Selling
You probably have a few questions about erasing data from your phone, especially if you are doing this for the first time. The following answers to your questions.
1. Does factory reset remove all data permanently?
Factory reset removes all your data from your phone. This data, in most cases, is permanently deleted. However, some recovery tools might be able to find and restore this data. You need to shred your files for good to ensure they can never be recovered.
2. If I erase my old phone, will it affect my new one?
No, if you erase your old phone, that will not affect your new phone. However, if you do not back up your old phone, you will not be able to restore your data on the new phone. This is because the new phone checks your Google account for any backups, and if it does not find any, it will not prompt you to restore your data.
3. How to wipe a Samsung phone?
If your phone or tablet is Samsung, you can wipe a Samsung with some extra tips as below:
- Remove your Samsung account: Go to Settings > Tap Accounts and backup > Click Manage accounts and find your Samsung account > Choose Remove account from the bottom of the screen > Enter your password to sign out.
- Erase all data on Samsung remotely with Samsung Find My Mobile: Go to https://findmymobile.samsung.com/ on your phone or computer > Sign in to your Samsung account > Choose Erase data > Enter your Samsung account password to confirm.
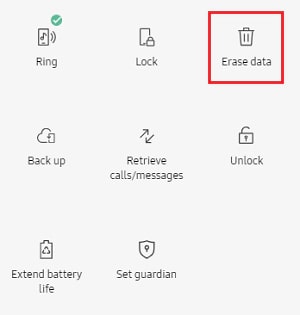
Erase Data on Samsung Phone Remotely
The Bottom Line
That is how you wipe your Android phone completely before selling it. The steps above will ensure your data does not go into others’ hands when the phone goes away. Feel free to share your tips with us and leave your comments below.
More Related Articles

Member of iMobie team as well as an Apple fan, love to help more users solve various types of iOS & Android related issues.
Product-related questions? Contact Our Support Team to Get Quick Solution >
