Motorola FRP behavior varies by Moto model, Android build, and the setup screens still available after reset. Use this hub to find Moto G, Moto E and Moto Edge guidance, compare no-PC, Fastboot and PC-based routes, and troubleshoot Google verification problems before choosing a tool.
If your Motorola phone asks for a previously synced Google account after a factory reset, Google Factory Reset Protection (FRP) is active. The next step should depend on your exact Moto model, Android build, security patch, and the setup screens still available on the phone—not simply on a bypass trick that worked on another Motorola device.
This Motorola FRP hub helps you choose the right path for Moto G, Moto E, Moto Edge, and other Motorola phones. Start with account recovery or a model-specific guide when possible, then compare no-PC routes, Motorola FRP tools, Fastboot-based options, and a guided PC solution if the available manual path does not match your device.
If you want to understand the lock itself first, see what FRP lock means. For Android-wide scenarios beyond Motorola, use the Android FRP bypass guide. You can also compare broader FRP bypass tool options if tool selection is your main concern.
Use this guide only for a Motorola phone you own or are authorized to service. If the phone is second-hand, ask the previous owner to remove the device from their Google account or help complete verification before trying another route.
The right Motorola FRP route depends first on why you are locked out. If you know the Google account previously synced with the phone, use account recovery instead of searching for a bypass. If you have a specific Moto G model, go to the corresponding model guide. If the required setup menu from an older tutorial is missing, treat that as a sign that the method does not match your current build.
| Your Situation | Best Next Step | Why |
| You know the previous Google account | Recover or sign in with that account | This directly satisfies the verification request without relying on a setup-screen workaround. |
| You bought a used Motorola phone | Contact the previous owner | The seller may be able to remove the account or complete verification. |
| You have a specific Moto G model | Use the model-specific guide below | Model pages can narrow down Android version, menu behavior, and tool considerations. |
| You are following an old no-PC tutorial | Check whether every required menu still exists | If the expected setup screen is missing, the tutorial does not match your current device path. |
| You are comparing Motorola FRP software | Use the Moto FRP Tool guide | This is the dedicated tool-intent page for Motorola FRP utilities. |
| You prefer a computer-guided route | Evaluate DroidKit for the connected device | It provides an on-screen FRP workflow instead of relying on a single manual setup shortcut. |
Many Motorola FRP tutorials remain online long after the setup screen or Android build they were created for has changed. Before repeating any method, identify the dependency behind it.
A useful failure signal: If the next menu shown in a tutorial simply does not exist on your Motorola phone, stop treating the problem as a missed tap. The tutorial may be written for another model, Android build, or security patch.
This page is the main Motorola FRP hub, so model-specific searches should branch into narrower guides rather than forcing every Moto phone through the same instructions.
| Moto Model / Intent | Recommended Guide | Use It When |
| Moto G 5G 2024, 2023, or 2022 | Moto G 5G FRP bypass guide | Your search includes Moto G 5G, Android 13/14, no-PC methods, or Moto G 5G-specific FRP problems. |
| Moto G Play | Moto G Play FRP bypass guide | You have a Moto G Play and need device-specific guidance rather than generic Motorola steps. |
| Moto G Fast | Moto G Fast FRP bypass methods | The locked phone is specifically a Moto G Fast. |
| Moto G Pure | Moto G Pure FRP bypass guide | You need Moto G Pure-specific FRP information, including Android 11/12 scenarios. |
| Moto E, Moto Edge, or another Motorola model | Use the Android-version and troubleshooting sections on this page first | There is no confirmed model-specific child guide listed here for your exact phone, so identify the build and failure point before choosing a tool. |
| Motorola FRP software or tool search | Moto FRP Tool guide | You are comparing Motorola-specific PC utilities instead of looking for one manual trick. |
For Moto E or Moto Edge devices, do not assume a Moto G setup sequence will behave identically. Use the exact model name, Android build, and the screen where verification stops to narrow down the next step.
The options below serve different situations. Use them as a decision map rather than a list of methods to try one after another.
| Route | PC Needed? | Best For | Main Limitation |
| Google Account Recovery | No | Owners who still know or can recover the account previously used on the phone | Does not help if the account cannot be identified or recovered |
| Model-Specific Guide | Depends on guide | Moto G and other users with a confirmed device-specific article | A model guide should not be applied blindly to a different Motorola phone |
| No-PC / Setup-Screen Route | No | Phones where the exact required menus still appear | Menu paths can differ by model, Android build, and security patch |
| Motorola FRP Tool / Fastboot Utility | Yes | Users comfortable with drivers, USB modes, device detection, and model checks | Tool support and device mode requirements vary |
| DroidKit FRP Bypass | Yes | Users who prefer a guided computer workflow for a supported device scenario | Requires a Windows or Mac computer and the appropriate device route |
| Remote Service | Usually | Owners considering technician assistance | Requires careful provider, privacy, and ownership verification |
Yes, but Android version should be treated as one signal rather than a compatibility guarantee. Two Motorola phones running the same Android generation can still behave differently because of model, carrier firmware, setup configuration, and security patch.
| Android Version | What to Check | Recommended Direction |
| Android 10 / 11 | Check whether the older setup menus shown in your chosen guide are actually present. | A model-specific manual route may be worth evaluating when every required screen still matches. |
| Android 12 | Compare the exact device model and setup flow instead of assuming an Android 10/11 sequence still applies. | Use a model guide where available and keep a PC-based alternative in mind. |
| Android 13 | Confirm the current setup-screen behavior, security patch, and required entry point. | Use Android-version context together with Motorola model guidance. |
| Android 14 | Do not assume an older Emergency Information, browser, APK, or Settings sequence remains available. | Identify the exact failure point before choosing a manual or PC route. |
| Android 15 or newer | Check current device support and on-screen behavior rather than relying on an older version-based tutorial. | Prioritize exact model/build compatibility and official account recovery when available. |
In other words, “Motorola FRP bypass Android 14” is not one universal procedure. A Moto G 5G and a Moto Edge can show different setup behavior even when both report the same Android generation.
If you cannot use the previous Google account and the manual route shown in an older Motorola tutorial does not match your phone, you may prefer a computer-guided workflow. DroidKit is a desktop Android toolkit that includes an FRP Bypass feature for supported device scenarios.
DroidKit may be relevant when the issue is not simply “I want a tool,” but one of these specific problems:
Compatibility note: Do not assume any FRP program works with every Motorola model or security patch. Use the device route and instructions shown for the connected phone.
Step 1. Download DroidKit and install it on your Windows PC or Mac.
Free Download * 100% Clean & Safe
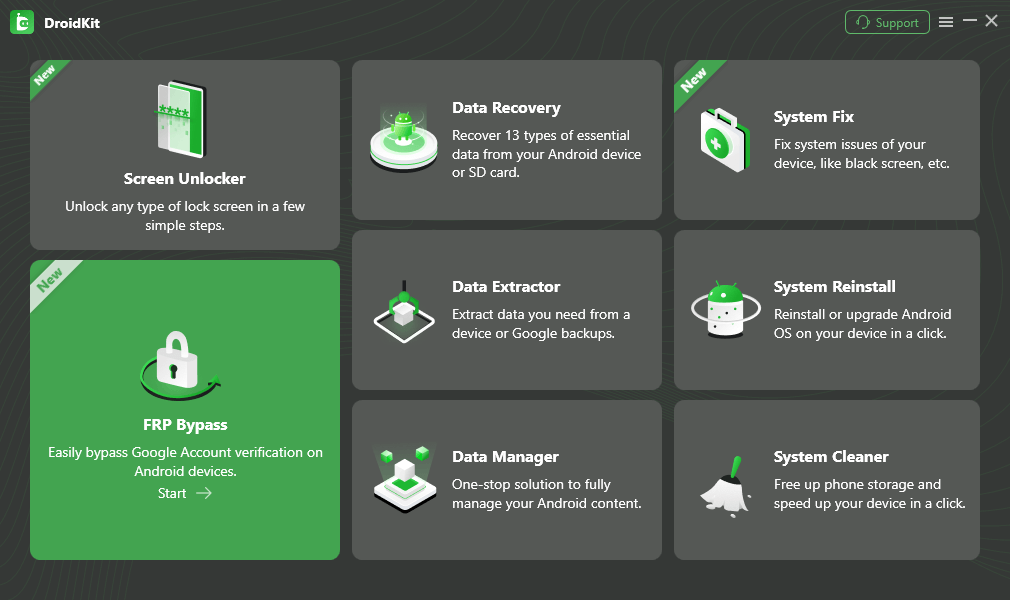
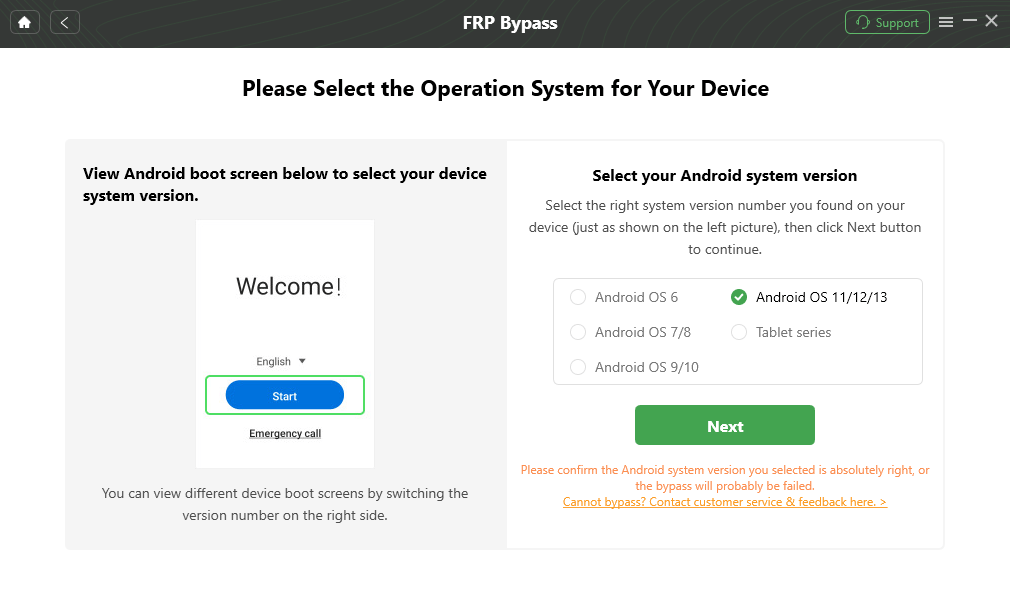
Step 2. Launch DroidKit and select FRP Bypass from the main interface.

Select FRP Bypass Mode in DroidKit
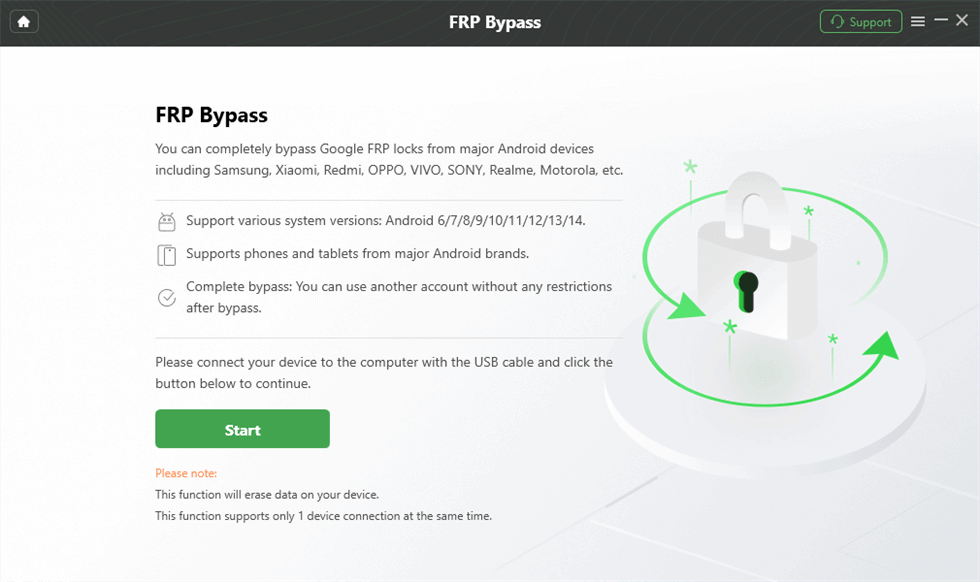
Step 3. Connect the locked Motorola phone to the computer with a reliable USB cable. If the device is not detected, first check the cable, USB port, and Motorola driver installation.

Connect the Motorola Phone to the Computer
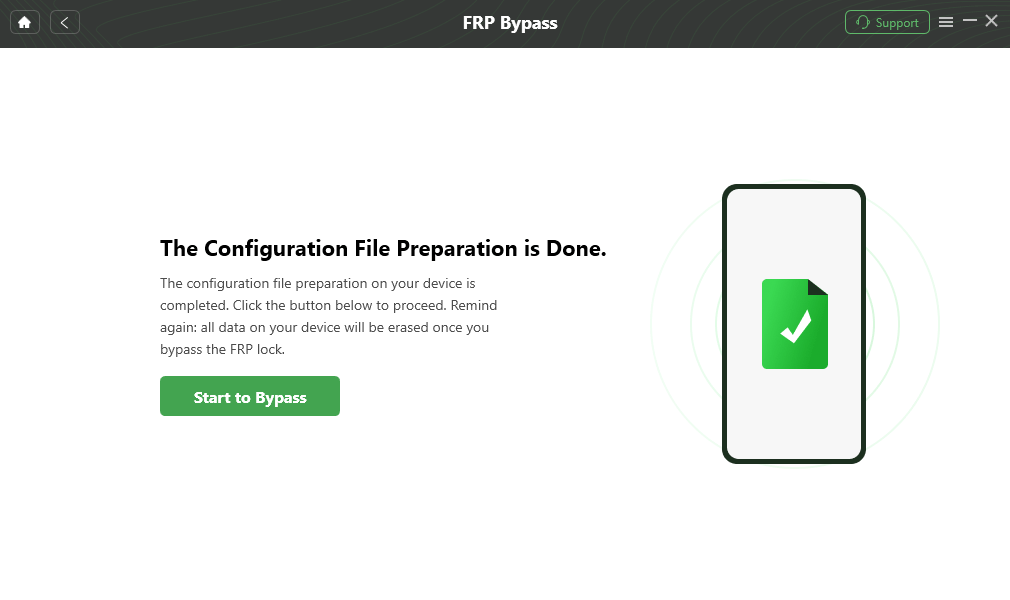
Step 4. After the phone is recognized, click Start. DroidKit will prepare the configuration required for the selected device route.

Prepare the Configuration for the Connected Device
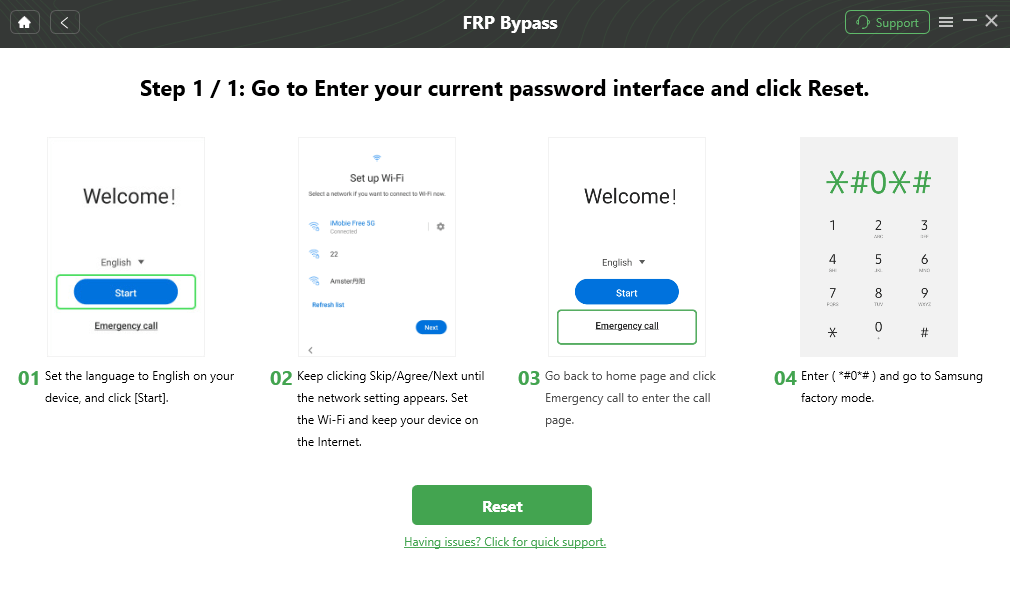
Step 5. Follow the instructions displayed in DroidKit. The screens and operations can differ by Motorola model, Android build, and selected route, so use the current on-screen instructions rather than substituting steps from another phone.

Follow the On-Screen Motorola FRP Instructions
Step 6. Keep the phone connected until DroidKit reports that the selected process has finished. Do not disconnect the device during an instructed system operation.

Complete the Selected Motorola FRP Process
No-PC Motorola FRP searches often lead to Emergency Information, TalkBack, browser-opening, file-picker, or Settings-based tutorials. Whether one of these routes is relevant depends on the screens that actually appear on your phone.
Before trying a no-PC route, check four things:
If the required menu does not appear, use that as your stopping point. Do not repeatedly reset the phone hoping that a missing setup option will suddenly become available.
For Moto G users, the model-specific guides above are a better next step than applying a generic no-PC sequence to every Motorola phone.
FRP APK and OTG searches remain common because they promise a free route without a desktop program. The difficulty is that this approach depends on two separate conditions: the phone must expose a way to open or install the file during setup, and the APK itself must come from a source you trust.
Before considering an APK route, ask:
If the APK cannot be opened, installation is blocked, or the app cannot reach the screen expected by the tutorial, the route does not fit your current setup environment.
For download-safety considerations before using this type of file, see the FRP Bypass APK guide.
Fastboot and MotoReaper appear frequently in searches such as “Motorola FRP bypass Fastboot.” These routes are different from no-PC setup tricks because they depend on a computer, Motorola drivers, a recognized USB connection, the correct device mode, and support for the specific phone.
| Requirement | Why It Matters |
| Windows PC or compatible computer environment | The utility must be able to communicate with the Motorola phone. |
| Motorola USB drivers | Driver problems are a common reason a phone is not recognized. |
| Reliable USB data cable | A charging-only or unstable cable can prevent proper detection. |
| Correct device mode | A tool expecting Fastboot cannot work if the phone is in the wrong connection state. |
| Exact model support | A tool built around an older Moto device should not be assumed to support a newer Moto Edge or Moto G build. |
If a Fastboot utility cannot see your phone, confirm the driver, USB cable, port, device mode, and supported model before changing anything else. A detection failure does not automatically mean the FRP lock itself is the problem.
Users who primarily want to compare Motorola-specific utilities should use the Moto FRP Tool guide linked earlier instead of treating every Fastboot program as interchangeable.
Remote services are sometimes marketed to people who do not want to install drivers or work with setup menus themselves. They should be evaluated differently from a normal downloadable tool because another person may request remote access to your computer or phone.
Before paying for a remote service, verify the provider, understand what remote-access software will be used, and avoid sharing Google passwords, payment credentials, personal files, or unrelated account information. A legitimate service should also be willing to work only with a device you own or are authorized to repair.
If you cannot verify the provider or the service asks for unnecessary account access, do not continue. For most users, account recovery, a model-specific guide, or a clearly documented tool is easier to evaluate than an unknown remote operator.
Instead of trying every method on this page, use the following sequence to narrow down the right route.
| Check | If Yes | If No |
| Can you recover the previously synced Google account? | Use the account recovery route. | Continue to the model check. |
| Is there a dedicated guide for your Moto model? | Use the narrower device guide. | Check Android build and current setup screens. |
| Does the no-PC tutorial exactly match the menus on your phone? | Evaluate that route cautiously. | Do not keep repeating a missing menu path. |
| Are you comfortable with drivers and device modes? | Compare Motorola FRP / Fastboot tools. | Consider a guided computer workflow. |
| Is the problem actually device detection or a blocked setup screen? | Use the troubleshooting section below. | Choose the route that best matches the confirmed model and build. |
The exact point where a Motorola FRP attempt stops usually tells you more than the name of the method itself.
| Problem | Likely Issue | What to Check Next |
| Stuck on “Checking for updates” | The current setup route is not progressing | Confirm the network connection, model guide, and whether the manual path matches the current build. |
| The Settings route from a tutorial is missing | The setup-screen path differs on your device | Stop repeating the same sequence and use a model/build-specific alternative. |
| Computer does not detect the phone | Driver, cable, port, or USB mode issue | Check Motorola drivers, change the cable or USB port, and reconnect the phone. |
| APK will not open or install | The installation route is unavailable or the file is incompatible | Do not download additional random APKs; use another route. |
| Fastboot utility does not detect the phone | Wrong device mode, driver issue, or unsupported model | Verify mode, drivers, and exact tool support. |
| Google verification returns after another reset | The reset did not remove the account-verification requirement | Use the previous Google account, previous-owner assistance, or a supported FRP workflow. |
If the main problem is the post-reset Google verification screen rather than something unique to Motorola, see the guide to Google account verification after reset. If several different routes have already failed, use the FRP bypass not working guide to diagnose the failure before trying another tool.
The best time to deal with FRP is before the phone is reset. If you still have normal access to the Motorola and plan to sell, give away, trade in, or factory-reset it, remove the account and screen-lock relationship first.
Step 1. Confirm that you know the Google account and password currently used on the Motorola phone.
Step 2. Remove the screen lock from the device before handing it to someone else.
Step 3. Open the account settings and remove the Google account or accounts from the phone.
Step 4. After the accounts are removed, perform the factory reset through the normal Settings menu.
Step 5. If you are selling or trading in the phone, confirm that the new setup process no longer asks for your old Google credentials before transferring the device.
For used Motorola phones: Ask the seller to complete this process while they still have access to the device. Seeing the phone reach normal setup without requesting the seller’s previous Google account is much safer than discovering the lock after purchase.
Not necessarily. If Google account verification is still active after the first reset, repeating the reset does not automatically remove the requirement. The phone may continue asking for the previously associated Google account.
A no-PC route depends on the exact menus available on your Motorola model and software build. If the Emergency Information, browser, file-picker, accessibility, or Settings path shown in a tutorial does not exist on your phone, that route does not currently match your device.
The other phone may use a different Moto model, Android build, carrier firmware, or security patch. FRP tutorials that rely on setup-screen behavior are especially sensitive to those differences.
Android 14 alone is not enough to determine compatibility. Check the Moto model, security patch, setup screens, and the requirements of the particular route or tool you are considering.
First confirm the network connection and whether the method you are following actually matches your model and current setup flow. If the tutorial expects a screen that never appears, switch to troubleshooting or a model-specific route instead of repeating the same sequence.
There is no single best tool for every Moto phone. Motorola-specific utilities may suit users comfortable with drivers and device modes, while DroidKit provides a more guided computer workflow for supported FRP scenarios. Your exact model and software build should decide which option you evaluate.
Some Motorola utilities use Fastboot-related device communication, but they depend on drivers, the correct device mode, and model support. Do not assume an older Fastboot tool supports every current Moto G, Moto E, or Moto Edge phone.
An APK route is only relevant when the current setup environment actually permits access to the file and installation flow. It also adds download-source risk, so avoid unknown APK packages and misleading download sites.
While you still have normal access, make sure you know your Google credentials, remove the screen lock, remove Google accounts from the phone, and then perform the factory reset through Settings. Confirm that your old account is no longer requested before giving the phone to another person.
Motorola FRP is easier to troubleshoot when you stop treating every Moto phone as the same device. Start with ownership and Google account recovery, then identify the exact model and Android build. Moto G users should use the dedicated model guides when available, while Moto E and Moto Edge users should compare their current setup screens with the requirements of the route they are considering.
No-PC, APK, and Fastboot searches remain useful because they reveal what users are trying to do, but none of those labels guarantees that the required entry point exists on your phone. If a menu is missing, an APK cannot be installed, or a computer cannot detect the device, diagnose that failure before moving to another method.
If you prefer a guided computer route and your Motorola scenario is supported, DroidKit provides an alternative to combining unrelated setup tricks and Fastboot utilities.
Free Download * 100% Clean & Safe
Product-related questions? Contact Our Support Team to Get Quick Solution >