Moto G Fast FRP Bypass 2026: Android 10 & 11 Methods
Locked out of a Moto G Fast XT2041-4 after factory reset? This guide explains how to identify your Android version, try Android 11 TalkBack and Android 10 APK methods, and choose a safer fallback when manual FRP bypass steps no longer work.
Locked out of your own Moto G Fast after a factory reset? If your phone asks for the previously synced Google account, you are facing Factory Reset Protection (FRP) lock.
This guide focuses specifically on Moto G Fast (XT2041-4), also known by the codename sofia. Generic Motorola FRP instructions often fail on this model because Android version, carrier firmware, and security patch level can change which method works.
In this updated 2026 guide, you will learn how to check whether your Moto G Fast is running Android 10 or Android 11, which manual FRP bypass method to try first, and what to do when TalkBack, APK, or setup tricks no longer work.
⚠ Legal Notice: Use these steps only on a Moto G Fast you own or are authorized to unlock. Bypassing FRP on a lost, stolen, or unauthorized device may be illegal. Some steps may erase data from the phone.
Quick Answer: Can You Bypass FRP on Moto G Fast in 2026?
Yes, but the best method depends on your Android version and security patch.
- Android 11: The TalkBack route may still work on some older patches.
- Android 10: The APK method may work, but it is more complex and less safe.
- Newer security patches: Manual methods are often blocked, so a PC-based fallback may be needed.
If you want the broader Motorola guide for other Moto models, see this Motorola FRP bypass guide. For tool comparisons, check the best FRP bypass tool guide.
Choose the Right Moto G Fast FRP Bypass Method
Before jumping into steps, use this table to choose the most realistic path for your Moto G Fast.
| Situation | Recommended Method | PC Needed? | Main Limitation |
| Moto G Fast on Android 11 | TalkBack method | No | Often patched on newer updates |
| Moto G Fast on Android 10 | APK method | No | Requires APK installation and careful source checking |
| TalkBack or APK method fails | DroidKit or another guided FRP tool | Yes | Requires a Windows or Mac computer |
| Phone has latest security patch | PC-based FRP tool | Yes | Manual loopholes may no longer work |
| All software methods fail | Test point / repair technician | Yes | High hardware risk; not recommended for normal users |
Table of ContentsHide
Quick Answer: Can You Bypass FRP on Moto G Fast in 2026?
Choose the Right Moto G Fast FRP Bypass Method
First: Check Whether Your Moto G Fast Runs Android 10 or 11
Method 1: Moto G Fast FRP Bypass on Android 11 with TalkBack
Method 2: Moto G Fast FRP Bypass on Android 10 with APK Method
What If Moto G Fast FRP Bypass Doesn’t Work?
Method 3: Use DroidKit When Manual Methods Fail
Advanced Last Resort: Moto G Fast FRP Test Point
What to Do After Bypassing FRP Lock
Moto G Fast FRP Bypass FAQs
Conclusion: Best Path for Moto G Fast FRP Bypass
First: Check Whether Your Moto G Fast Runs Android 10 or 11
Before trying any manual Moto G Fast FRP bypass method, you need to confirm the Android version. The Android 10 and Android 11 methods are different, so using the wrong steps can waste time.
Step 1. Power off your Moto G Fast.
Step 2. Press and hold Volume Down + Power until the bootloader menu appears.
Step 3. Use the Volume buttons to highlight Recovery mode, then press Power to select it.
Step 4. When you see the No command screen, hold the Power button. While still holding Power, press and release Volume Up once.
Step 5. Look at the software build information at the top. If the string contains 10, your phone is on Android 10. If it contains 11, your phone is on Android 11.
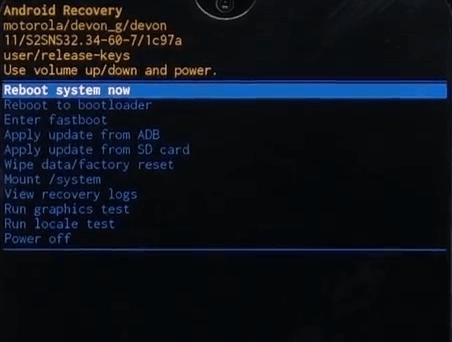
Moto G Fast recovery mode showing the software version string.
Method 1: Moto G Fast FRP Bypass on Android 11 with TalkBack
This no-PC method may work on some Moto G Fast devices running Android 11 with older security patches. It relies on TalkBack and Assistant access, so it may fail if your phone has already received a newer update.
Step 1. From the Hi there welcome screen, tap Vision Settings > TalkBack.
Step 2. Turn on Use TalkBack.
Step 3. Draw a backward L gesture by swiping down, then right, to open the TalkBack context menu.
Step 4. Double-tap Use voice commands.
Step 5. When prompted, say Open Google Assistant.
Step 6. If Assistant opens, tap the keyboard icon, type Open Settings, and send it.
Step 7. In Settings, go to Accessibility > Accessibility Menu.
Step 8. Enable the Accessibility Menu Shortcut. A new accessibility icon should appear on the screen.
Step 9. Return to the Wi-Fi setup screen.
Step 10. Tap the accessibility icon, select Assistant, and type Setup.
Step 11. Tap the Android Setup app entry with the blue gear icon.
Step 12. Tap Force Stop, confirm, then tap Disable if available.
Step 13. Go back one screen, find Google Play Services, then tap Force Stop and Disable if available.
Step 14. Go back to the setup wizard and continue the setup offline.
Checkpoint: If TalkBack does not open Assistant, if Settings cannot be opened, or if Google Play Services cannot be disabled, your Moto G Fast is likely patched. Move to the fallback section instead of repeating the same steps.
Method 2: Moto G Fast FRP Bypass on Android 10 with APK Method
The Android 10 APK method is more complicated than the Android 11 TalkBack path. It may still work on some Moto G Fast devices, but it requires downloading and installing APK files, so proceed carefully.
Safety Note: Do not download FRP APK files from random websites. Unknown APK files may contain malware or fail to install. Use this method only if you understand the risk.
Phase 1: Open a Browser or App Settings Path
Step 1. On the Hi there screen, change the language to Russian (Русский).
Step 2. Continue to the Wi-Fi connection page.
Step 3. Tap Add network to bring up the keyboard.
Step 4. Tap and hold the globe icon on the keyboard to open language settings.
Step 5. Add another keyboard language, such as English (United States).
Step 6. Tap the three-dot menu and choose Help & Feedback.
Step 7. Search for delete or disable apps on Android.
Step 8. Tap the link that opens Application Settings.
Phase 2: Install Required APK Files
Step 9. In the app list, find and open Chrome.
Step 10. Search for the required APK files from a source you trust. Common APKs used in older Android 10 routes include Google Account Manager 10 and QuickShortcutMaker.
Step 11. Open Chrome Downloads and install Google Account Manager first.
Step 12. Install QuickShortcutMaker after that.
Phase 3: Try the Google Account Manager Shortcut
Step 13. Open QuickShortcutMaker.
Step 14. Search for Google Account Manager.
Step 15. Find the entry named Type Email and Password, then tap Try.
Step 16. Tap the three-dot menu and choose Browser sign-in.
Step 17. Sign in with your own working Google account.
Step 18. Restart your Moto G Fast and complete setup.
Checkpoint: If Chrome cannot open, APK installation is blocked, or the shortcut does not appear, this Android 10 method is no longer suitable for your device.
What If Moto G Fast FRP Bypass Doesn’t Work?
Many users fail at the same points, especially after Motorola or Android security updates. Use this table to identify the likely reason and next step.
| Problem | Likely Reason | What to Try Next |
| TalkBack does not open Assistant | The TalkBack route has been patched | Try a PC-based FRP method instead |
| Settings will not open | The setup loophole is blocked | Stop repeating the same path and use a guided tool |
| APK installation is blocked | Unknown source access or Android 10 workaround is unavailable | Avoid unsafe APK downloads and switch methods |
| Still stuck on Google verification | The old method no longer matches your patch level | Review Google verification after factory reset options |
| Not sure which Moto tool to use | Different Moto models need different workflows | Compare Moto FRP tool options |
If your Moto G Fast has a newer patch and both manual methods fail, a PC-based tool is usually the next practical option.
Method 3: Use DroidKit When Manual Methods Fail
DroidKit is a PC-based Android unlock tool with a guided FRP Bypass feature. It can be useful when TalkBack does not open Assistant, APK installation is blocked, or your Moto G Fast gets stuck during setup.
Use this method if:
- Your Moto G Fast is on a newer security patch.
- The Android 11 TalkBack method fails.
- The Android 10 APK method is blocked or looks unsafe.
- You prefer a guided workflow on Windows or Mac.
Step 1. Install and launch DroidKit on your computer. Select FRP Bypass and connect your Moto G Fast with a stable USB cable.
Choose the FRP Bypass feature in DroidKit.
Step 2. Follow the on-screen instructions. DroidKit will guide you through the required mode and configuration steps for the connected device.
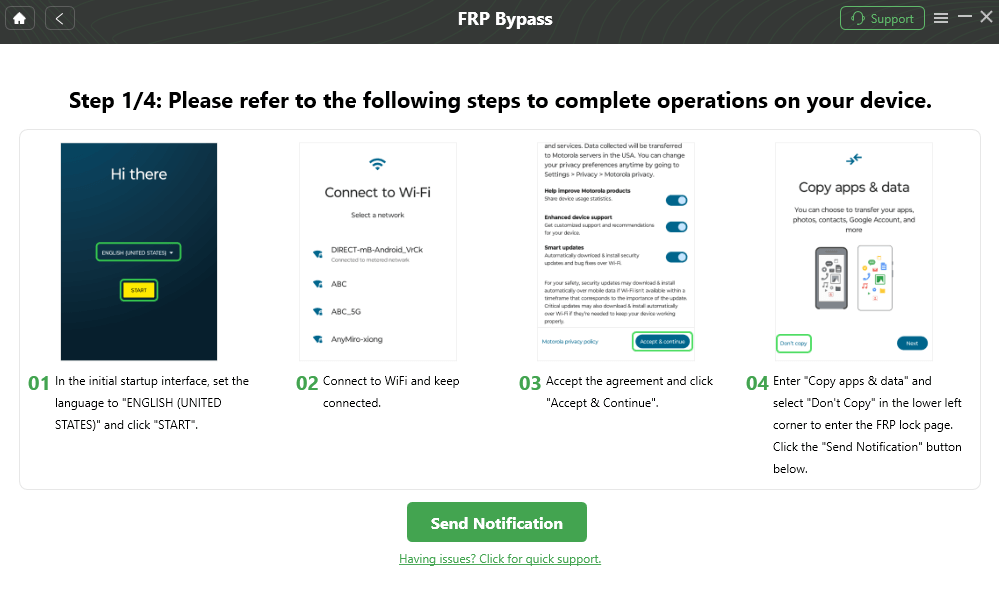
DroidKit provides guided steps for Moto G Fast FRP bypass.
Step 3. Start the FRP removal process and wait for the phone to restart. After the process finishes, continue setting up your Moto G Fast.
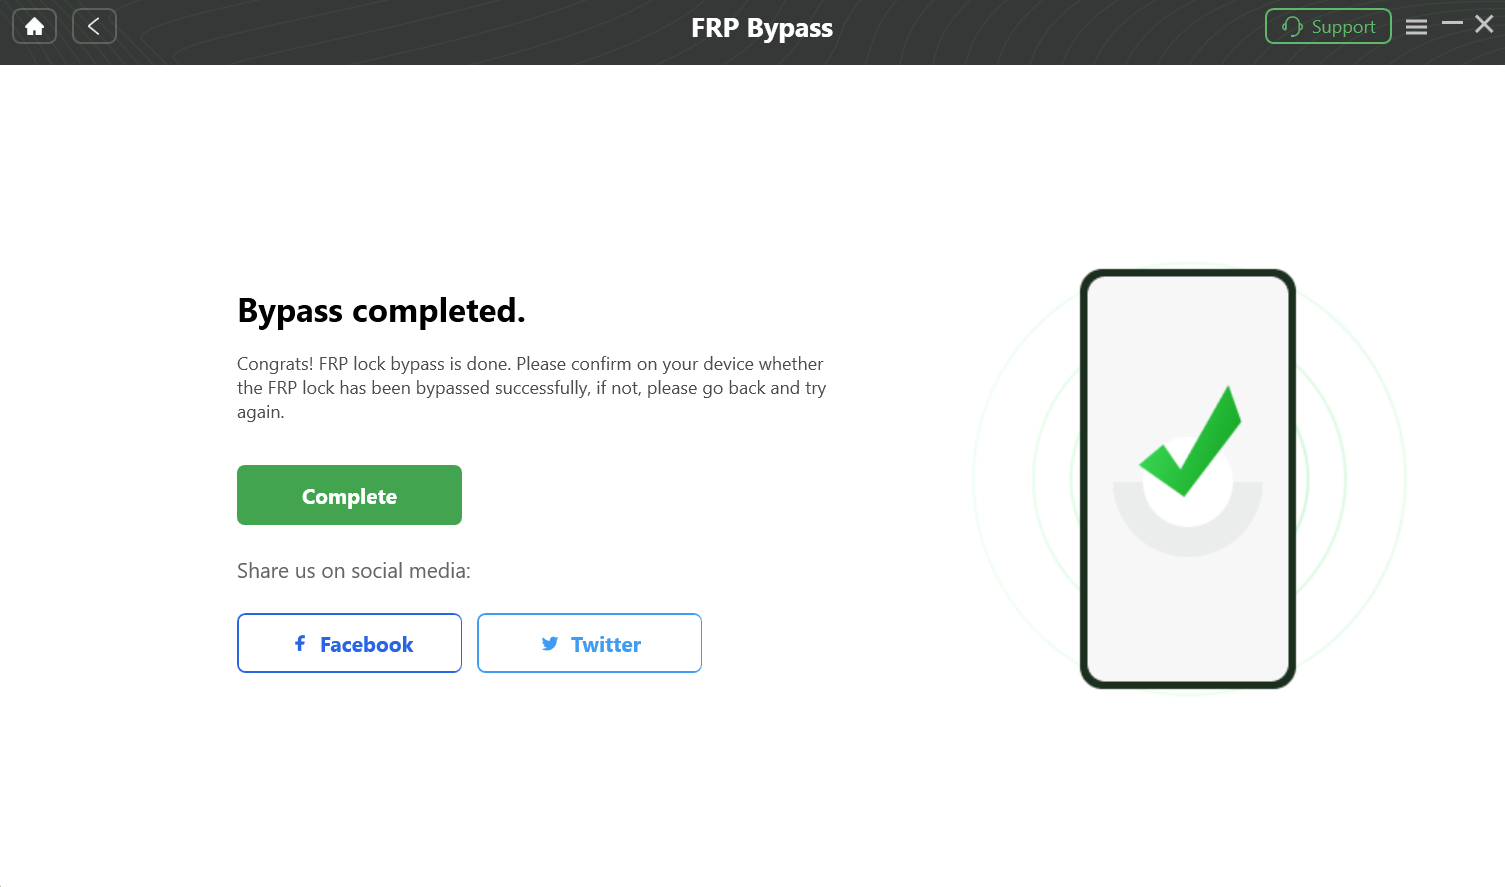
The FRP bypass process is complete.
Advanced Last Resort: Moto G Fast FRP Test Point
Warning: The test point method requires disassembling the Moto G Fast. It may void the warranty and can permanently damage the phone if done incorrectly. This option is for repair technicians, not normal users.
The Moto G Fast uses a Qualcomm chipset. In some repair scenarios, technicians may force the device into EDL Mode by connecting specific test points on the motherboard. This allows specialized repair software to communicate with the phone at a low level.
Procedure Overview:
Step 1. Disassemble the phone carefully and expose the motherboard.
Step 2. Disconnect the battery before touching internal components.
Step 3. Locate the correct test point contacts using a trusted repair diagram for Moto G Fast XT2041-4.
Step 4. Use metal tweezers to connect the two test points.
Step 5. While holding the connection, plug the phone into a PC with a USB cable.
Step 6. Confirm that the computer detects the phone in Qualcomm HS-USB QDLoader 9008 mode.
Step 7. Use compatible repair software only if you understand the process and risks.
For most users, this method is not worth the hardware risk. Try software methods or contact a professional repair service first.
What to Do After Bypassing FRP Lock
After the FRP lock is removed, complete setup carefully to prevent the same issue from happening again.
Step 1. Go through the initial setup screens, including language, region, and Wi-Fi.
Step 2. Sign in with your own Google account.
Step 3. Choose whether to restore from a cloud backup or set up the phone as new.
Step 4. After reaching the home screen, open Settings and confirm that your Google account is correctly added.
Step 5. Before selling, giving away, or resetting the phone again, remove your Google account from Settings first.
Moto G Fast FRP Bypass FAQs
How can I tell if my locked Moto G Fast is on Android 10 or Android 11?
Enter recovery mode and check the software version string at the top of the screen. If it contains 10, your phone is on Android 10. If it contains 11, your phone is on Android 11.
Can I bypass Moto G Fast FRP without a PC?
Sometimes. The Android 11 TalkBack method and Android 10 APK method may work on older patches, but they often fail on updated devices. If both methods are blocked, a PC-based tool may be needed.
Why did the TalkBack or accessibility method fail?
These methods rely on setup loopholes. Motorola and Android security updates can patch those routes, which prevents TalkBack from opening Assistant or Settings during setup.
Is the Android 10 APK method safe?
It depends on the APK source. Unknown APK files can contain malware or fail to install. Use the APK method only if you understand the risk and can verify the files.
Does Moto G Fast FRP bypass work after 2026 security patches?
It depends on the patch level. Many older manual methods may no longer work after newer updates. In that case, try a guided PC-based option or a professional service.
Is the Moto G Fast test point method recommended?
No, not for normal users. The test point method requires opening the phone and touching motherboard contacts. It should be handled only by experienced repair technicians.
Conclusion: Best Path for Moto G Fast FRP Bypass
The best Moto G Fast FRP bypass method depends on your Android version and security patch. If your XT2041-4 is on Android 11, try the TalkBack route first. If it is on Android 10, the APK method may be the right manual path, but it carries more risk.
If TalkBack does not open Assistant, APK installation is blocked, or the phone remains stuck on Google verification, stop repeating the same failed steps. A guided PC-based tool is usually the more practical fallback.
For other Motorola models, return to the full Motorola FRP bypass guide.
More Related Articles

Jeremy Feron is a writer for iMobie with a deep passion for Android. He specializes in creating clear guides on Android tips and the latest updates, helping users navigate their devices and get the most out of new features.
Product-related questions? Contact Our Support Team to Get Quick Solution >
