How to Move iTunes Library to External Hard Drive
Run out of storage on your computer? Thinking about removing iTunes library and sending it to the external hard drive? Well, this article can help you out with two simple solutions on how to move iTunes library to external hard drive.
Common iTunes Tips
iTunes Music Management
iTunes Library Transferring
Fix iTunes Issues
When we get a large collection of music in our iTunes library, it would be not easy for us to delete certain songs from the whole collection. However, when you are confronting that there is not enough space on your computer, it would be a better option for you to move it to an external hard drive. Besides, for these beloved songs, you may just like the question above want to transfer your iTunes library from one device to another.
Then here comes the problem: how to move iTunes library to external hard drive? This post can render you two possible ways to achieve it. Read on to learn more.
How to Move iTunes Library to External Hard Drive with iTunes
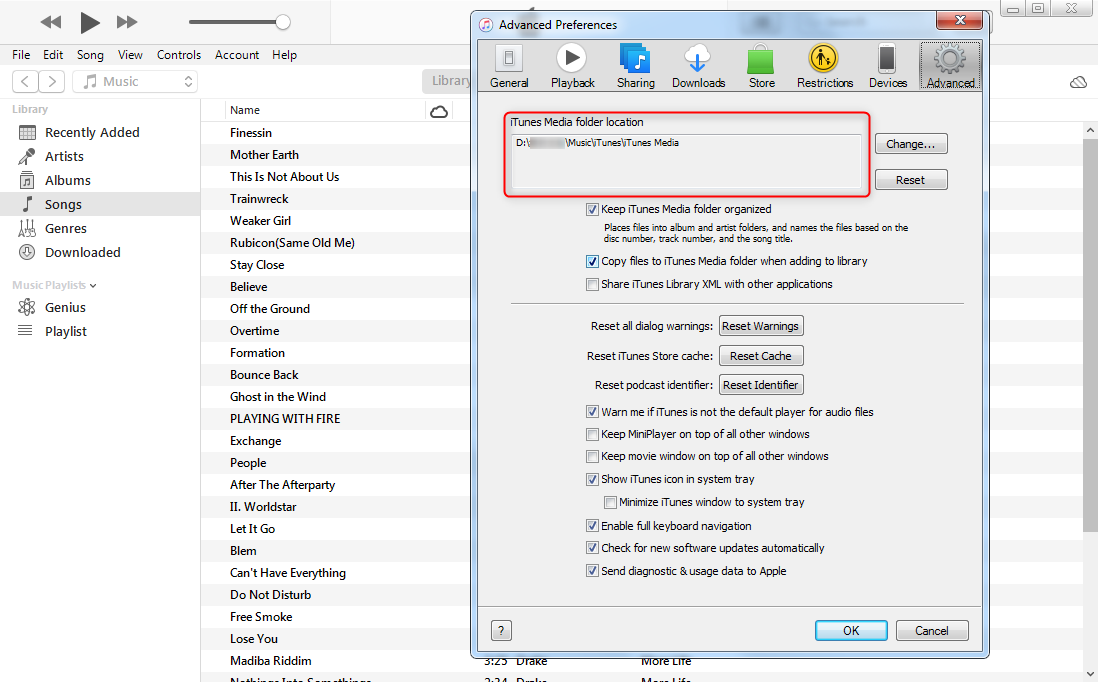
Step 1. To find the location of your iTunes media folder, launch iTunes on your computer > Then click “Edit” (PC) or “iTunes”(Mac) on the menu bar > Preferences > Advanced > Here you will see the “iTunes Media folder location” in your computer.

How to Move iTunes Library to External Hard Drive with iTunes – Step 1
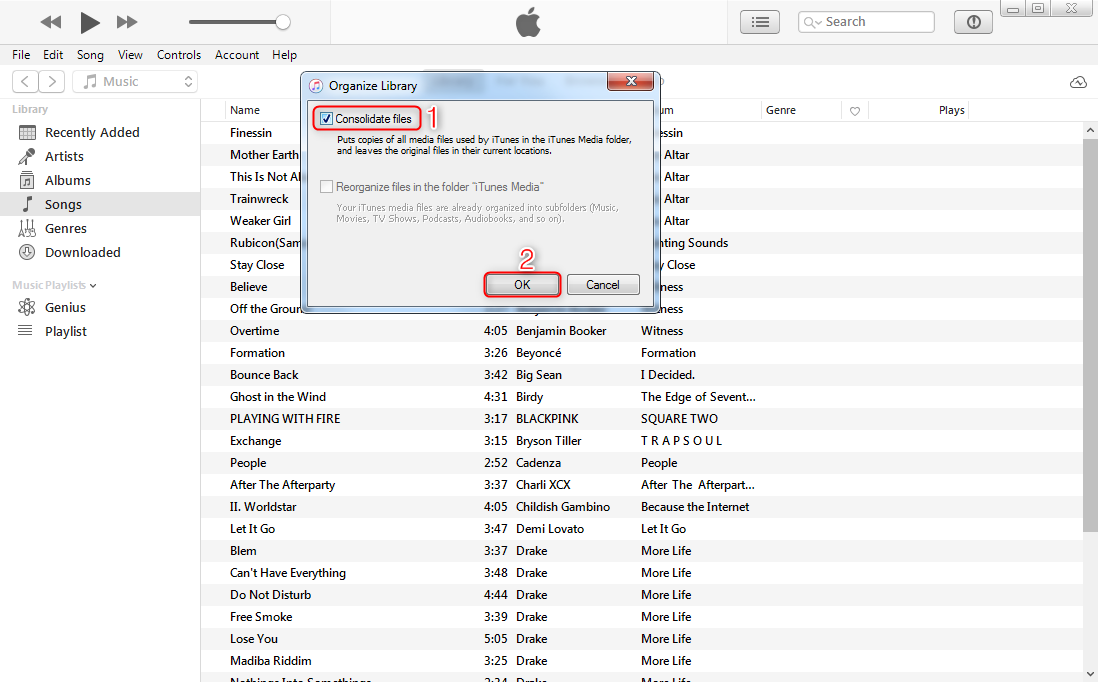
Step 2. Then click File > Library > Organize Library > Check the box named as “Consolidate files” > Click OK.

How to Move iTunes Library to External Drive with iTunes – Step 2
Step 3. Quit iTunes > Connect your external hard drive to the computer > Open the iTunes media folder from the location in step 1 > Drag the folder to the external hard drive.
If you intend to delete the original iTunes media content on your computer, to make iTunes still work with this iTunes library, you have to open iTunes > then click “Choose Library” in the pop-up window > select the iTunes library folder in your external hard drive.
Remember you have to connect your external hard drive to your computer every time you want to use iTunes with this iTunes library.
How to Move iTunes Library to External Hard Drive with AnyTrans
Besides using iTunes to move the music from your iTunes library to an external hard drive, there is an easier way for you to achieve it – AnyTrans. It is a professional iOS data manager that allows you to simply transfer your iOS data from one device to another.
- Transfer music directly from iTunes to your hard drive or another iDevice without hassle.
- Transferring music speedily. AnyTrans supports you to transfer more than 1000 songs in minutes.
- Manage and transfer almost all your iOS data like contacts, photos, ringtones, music, calendar, from one iDevice to another or from iDevice to computer and vice versa.
- No leak or loss of data. AnyTrans assures that all the data in the process of transferring would not be leaked or lost.
AnyTrans – iTunes Library Manager
Thinking about a good way to transfer your iTunes library to an external hard drive? AnyTrans can be your perfect helper. You can easily move iTunes Library to external hard drive or computer or another iDevice without any trouble.
Download AnyTrans now on your PC/Mac and follow the below steps to know how to move iTunes library to the external hard drive.
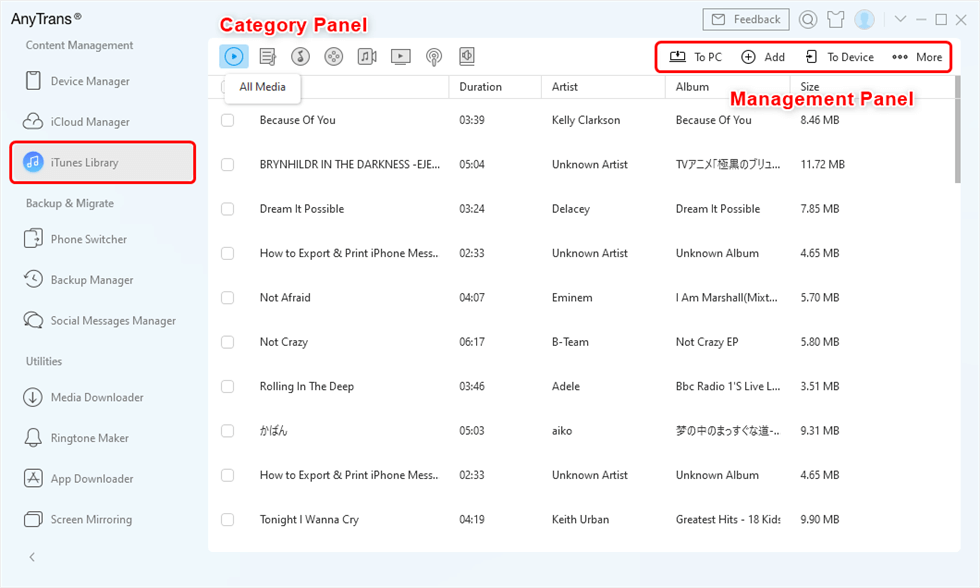
Step 1. Launch AnyTrans > Tap on iTunes Library from the menu > Choose files you want to transfer or select all > Click Send to PC button to transfer.

Manage iTunes Library with AnyTrans
Step 2. Click “view files” to find the exported files on your computer.
Now, you can view iTunes library files as below > Then connect your external hard drive to the computer > Drag the folder to your external hard drive.
The Bottom Line
That’s the two methods on how to move iTunes library to external hard drive. As you can see, with the help of AnyTrans, you can manage your iTunes library or iPhone data easier than ever. You can also back up your iOS app and restore them to your iDevices at any time. Download it now and enjoy your free trial!
Product-related questions? Contact Our Support Team to Get Quick Solution >

