How to Transfer Entire iTunes Library to iPhone
If you have your favorite content stored in your iTunes library, you may want to learn how to transfer an iTunes library to an iPhone. There are several methods to help you do it and here we have picked some of the best ones you can use to transfer your library to your iPhone.
Common iTunes Tips
iTunes Music Management
iTunes Library Transferring
Fix iTunes Issues
AnyTrans – Smart iTunes Library Extractor
AnyTrans is an iTunes library extractor that allows you to transfer the entire iTunes library to iPhone without erasing data. Have a try on it before we start this guide.
Your iTunes library can contain many types of files. It has your favorite music collection, your video files, and even your playlists. Due to all the great features, iTunes has to offer, it has quickly become everyone’s favorite media management app. Sometimes, you may want to export your iTunes library content to your iPhone. There are methods to do it and here we discuss some of those methods for you.
Syncing an iTunes library to an iPhone is fairly easy and you can do it using one of the following four methods. All these methods will fetch the current content of your library and transfer it over to your iOS-based device. Once that is done, you will find your iPhone now has all of your music and video files that were available in your iTunes library. Feel free to use any of the following methods to get your library moving.
Sync iTunes Library to iPhone with iTunes Library Manager
When it comes to syncing your iTunes library with your iPhone, you may want to find the best and the quickest method to do the task. Often most methods that help you transfer your libraries are not easy to do and they have many complications. However, that is until you start using a third-party app.
Enter AnyTrans, an application that allows you to transfer content including an iTunes library from your computer over to your iPhone. You can use it to quickly and easily get your library copied over to your iOS-based device. The great thing about the app is that it lets you customize what you want to transfer.
Unlike the iTunes sync feature, the app lets you selectively transfer content from your library to your iPhone. You can view and choose the files that you want to copy and only those will be made available on your iPhone. It is fairly easy to use the app and the following are the steps on how to sync the iTunes library with your iPhone with this app.
Step 1. Launch the AnyTrans site and download and install the app to your computer. It works on both Windows and Mac machines.
Free Download * 100% Clean & Safe
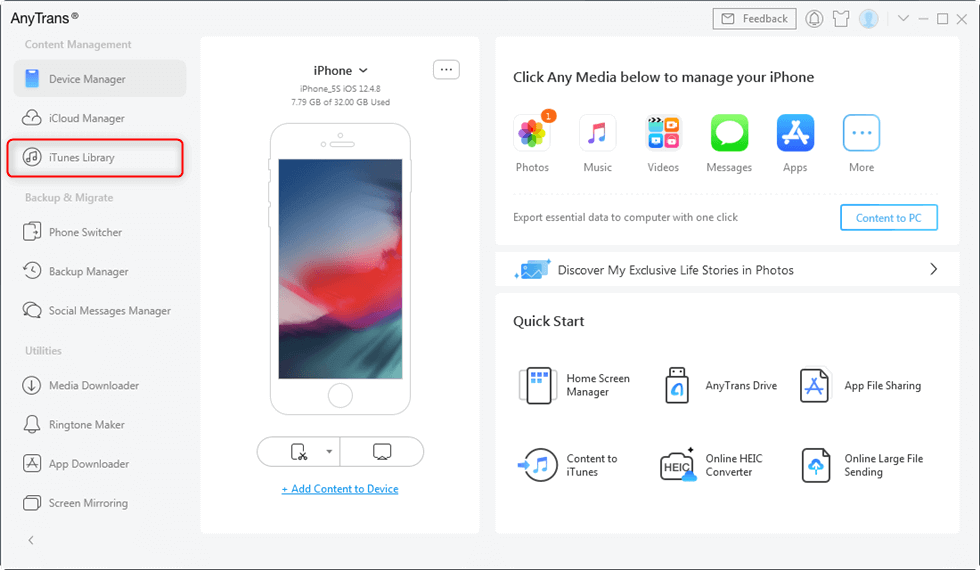
Step 2. Connect your iPhone to your computer using a USB cable and open the AnyTrans. You will see several options in the left sidebar of the app. Find the option that says iTunes Library on the left panel and click on it. It will let you view the contents of your library.
Click on iTunes Library
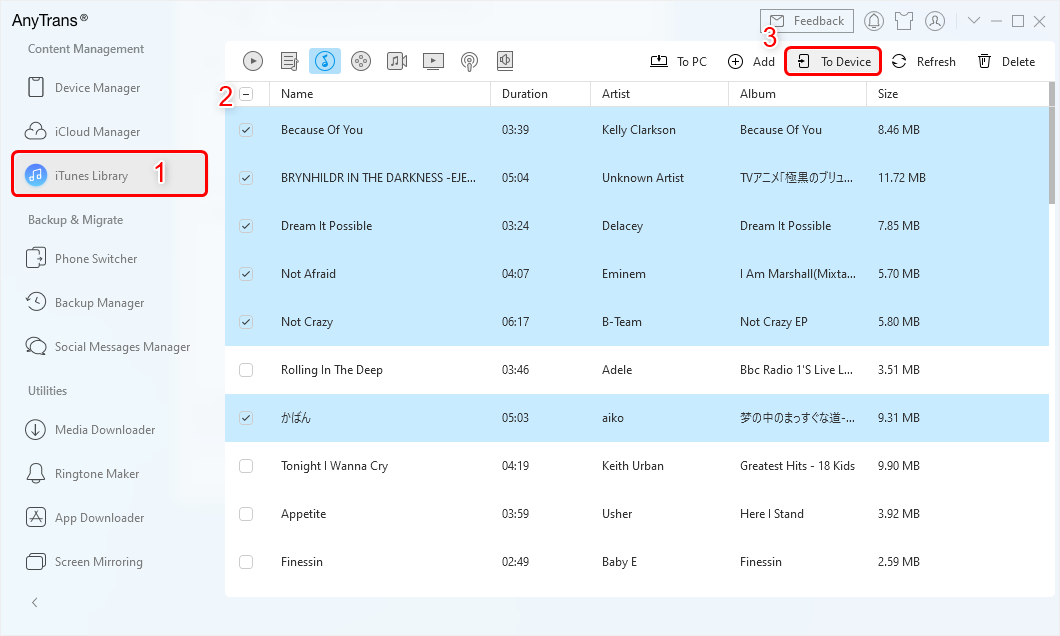
Step 3. On the following screen, your entire iTunes library will be shown. Go through the files that you want to copy to your iPhone and select them. Once you have made a selection, click on the To Device button at the top of your screen to start transferring your content to your iPhone.
Sync iTunes to iPhone with AnyTrans
You are all set. Your chosen iTunes library content will be successfully transferred to your iPhone.
Find iTunes Media Folder and Transfer it to iPhone
One of the ways to transfer an iTunes library to an iPhone is to find the iTunes media folder on your computer and copy it over to your iPhone. This would be a manual way to copy files but it should get the job done for you. You will be able to copy your entire library from your computer over to your device.
The tricky part here is to find where the iTunes library is located on your computer. This library is not located in any of the common locations, such as the Downloads folder or Desktop on your computer. You are going to have to use the iTunes app itself to find your library folder.
Once you have found the folder, you can have it copied over to your iPhone using the iTunes app itself. The following are the steps you need to follow to do it. This procedure has been performed with iTunes for Mac but the steps are similar for Windows.
Step 1. Launch the iTunes app on your computer.
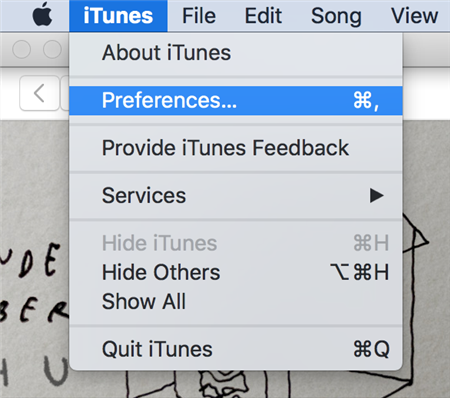
Step 2. Click on the option that says iTunes at the top and select the Preferences option.
Access the iTunes Settings Menu
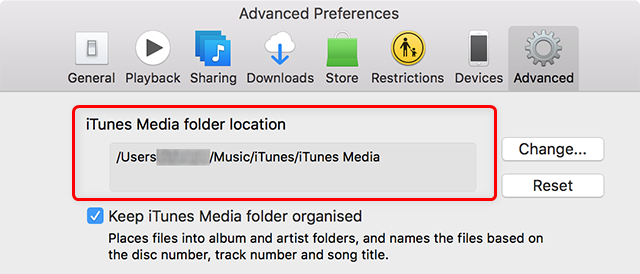
Step 3. When the preferences panel opens, click on the last tab that says Advanced.
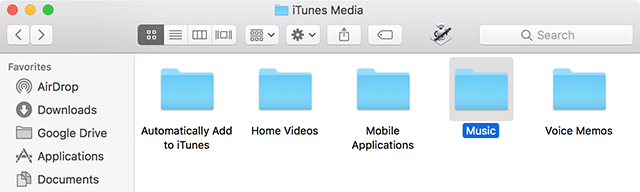
Step 4. On the following screen, under the iTunes Media folder location section, you will find the path where iTunes saves your library files. Note it down as you are going to be using it.
Find iTunes Library Location
Step 5. Open a file manager window and head over to that path. Copy the library files to your clipboard.
Copy iTunes Library
Step 6. Connect your iPhone to your computer, click on it in iTunes, select the Music option in the left sidebar, and drag and drop your copied files onto the screen.
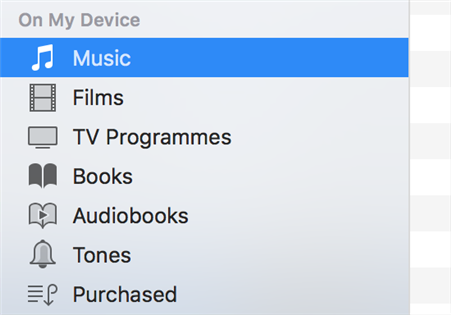
Paste iTunes Library on iPhone
It will get your library files copied over to your iPhone. Your iPhone now has your entire iTunes library available on it.
Transfer iTunes Library to iPhone Using Apple’s Home Sharing
Home Sharing is a feature that comes pre-loaded with iTunes and it allows you to share the contents of your library with other chosen devices. In order to use it with the app, you need to first enable Home Sharing in iTunes and it will make your libraries shareable.
Then, on your other devices, you need to follow certain steps to access the shared library. For example, you need to launch the Music app on your iPhone to access your shared libraries. The great thing about this feature is that you can share your entire library without actually having to copy it to your iPhone. All you basically need to do is enable the sharing option and you can access your libraries from all of your compatible devices. The following shows how to do it.
Step 1. Launch the iTunes app using your preferred way on your computer.
Step 2. Click on the File menu at the top and select Home Sharing followed by Turn On Home Sharing.
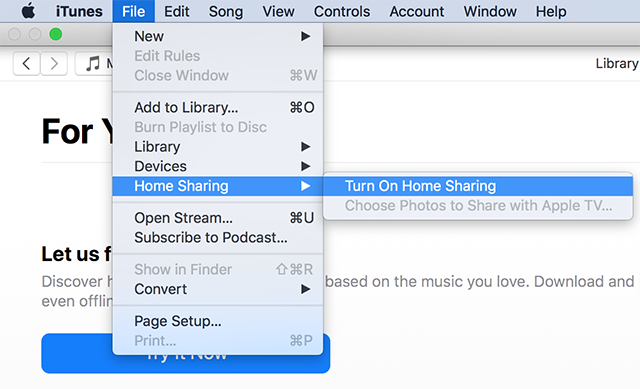
Enable Home Sharing in iTunes
Step 3. It will prompt you to enter your Apple account username and password. Enter the required details and click on Turn On Home Sharing to enable the feature on your computer.
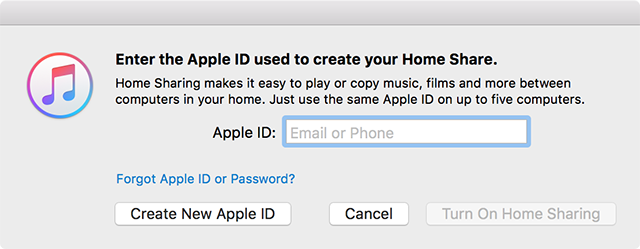
Sign in with an Apple Account
Step 4. Connect your iPhone to the same WiFi network as your computer does. Also, make sure you are signed-in with the same Apple account on your iPhone as you are on your computer.
Step 5. Launch the Music app on your iPhone and tap on the Home Sharing option. You will then see all of the available libraries on your screen.
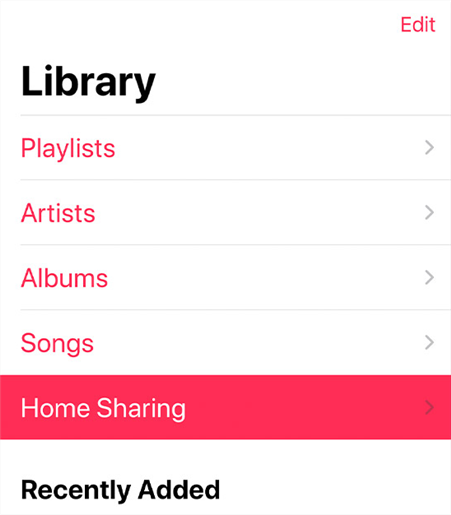
Access Shared Library on iPhone
This way you can access your iTunes library on your iPhone without having to copy any files at all.
Further Reading: How to Fix: iTunes Home Sharing Not Working >
Re-download iTunes Library on iTunes to iPhone
If you are looking to transfer your purchased content from iTunes over to your iPhone, then you can simply re-download the content on your computer and then sync it to your iOS device. It only takes a few clicks but the downloading process might take some time.
You can then transfer the library to your iPhone by syncing iTunes with your device. This will delete the existing content on your device and replace it with the new content you are loading.
The following are the steps on how to sync the iTunes library with your iPhone.
Step 1. Open the iTunes app on your computer and click on the Store option at the top.

Access iTunes Store
Step 2. Click on Purchased in the right-sidebar to view the content that you have purchased in your account.
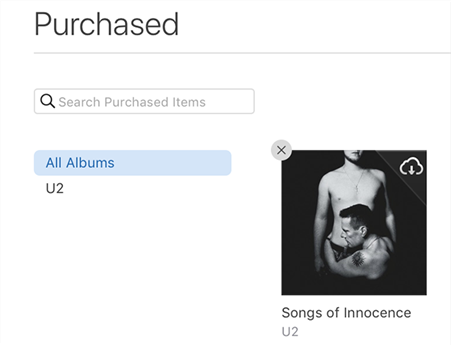
Step 3. On the following screen, click on the Not in My Library tab at the top to view the content that is not already downloaded to your computer.

Not in Library Content
Step 4. Click on the cloud icon for the content you want to download and it will start downloading to your computer.
Download Content
Step 5. Connect your iPhone to your computer and let it sync.
When the sync is finished, your iTunes library will be available on your iPhone.
Sync the Entire iTunes Library to iPhone with One Click
The mentioned methods mainly help you to transfer the entire iTunes library selectively. But you may also want to know how to transfer the entire iTunes Library to iPhone with 1 simple click. Here we highly recommend you use PhoneTrans to sync the entire iTunes library to iPhone/iPad in minutes. With PhoneTrans, you can transfer iTunes/iCloud/Google to either your iPhone or your Android devices. To transfer music, video, ringtones, podcasts, and other contents in your iTunes Library, you can download the latest version of PhoneTrans and take the following instructions to get your entire iTunes Library to iPhone with one click.
Free Download * 100% Clean & Safe
Step 1. Once you have downloaded and installed PhoneTrans on your computer, launch PhoneTrans and select the iTunes Library under the Phone Restore mode.

Click on the iTunes Library
Step 2. Click on the Transfer button to transfer iTunes Library to your iOS device once you have connected your iPhone to the computer.
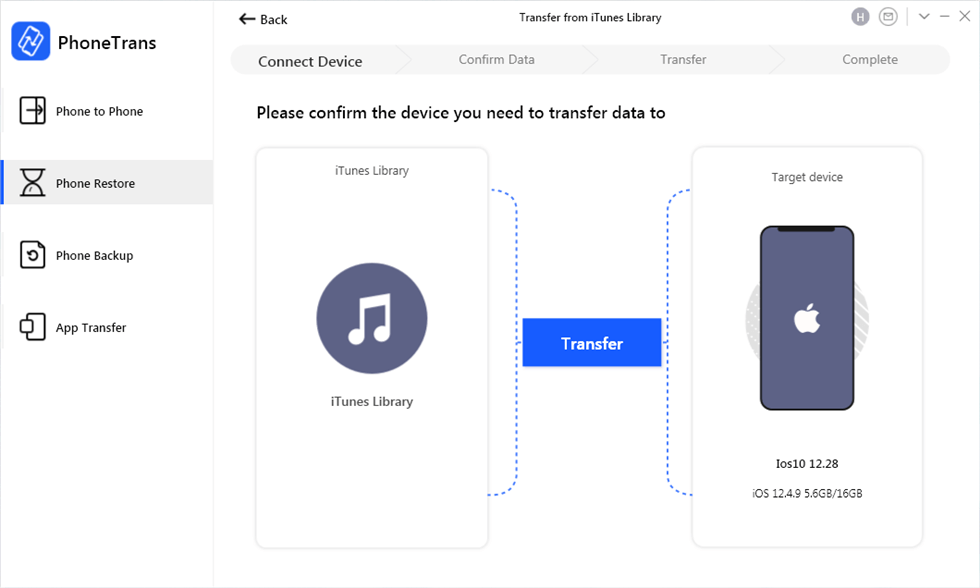
Start to Transfer from iTunes Library to iPhone
Step 3. Select the types of data and click on the Transfer Now button to transfer contents from iTunes Library to your iPhone.
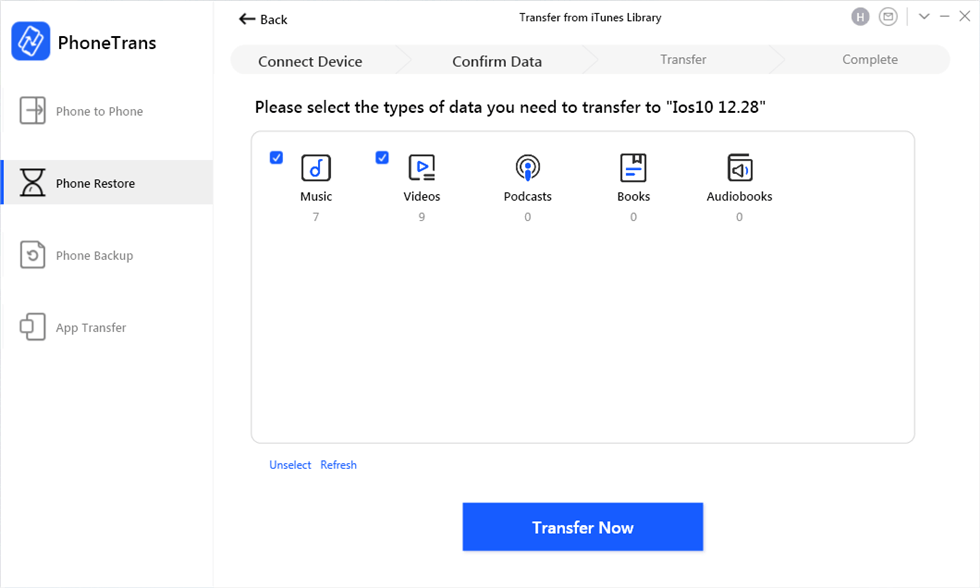
Select the Types of Data
The Bottom Line
If you use iTunes as your primary library management app, you are in luck. You can easily transfer your iTunes library with all its contents to your iPhone with AnyTrans. There are a number of methods for you to achieve it on your device.
More Related Articles

Senior writer of the iMobie team as well as an Apple fan, love to help more users solve various types of iOS & Android-related issues.
Product-related questions? Contact Our Support Team to Get Quick Solution >
