Top Five Ways to Fix iTunes Error 21
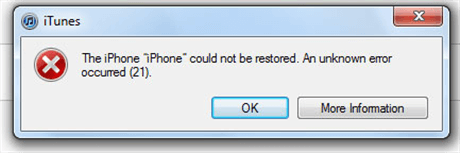
Have you ever received a message that iTunes displayed the ‘iPhone’ could not be restored? This post provides you with the top 5 methods to fix iTunes error 21.
iTunes & iCloud Issues
iTunes Errors
iTunes Issues & Tips
Updating or restoring an iPhone with iTunes is one of the easiest ways to get your device up to date or restore it to factory settings. A number of errors can occur during these processes that are either caused by software or hardware malfunction.
The iTunes error 21 is just one out of numerous errors that can be displayed by the app while you are restoring an iDevice. Although this error may catch you by surprise, you shouldn’t worry because in most cases you will be able to resolve it in just a few clicks.
In this article we are going to show you five different ways to fix the iTunes error 21, so let’s get started.
What Causes iTunes Error 21?
A number of issues can be the reason why iTunes displayed the ‘iPhone’ could not be restored. An unknown error occurred (21) message. Moreover, your computer may start lagging or crash immediately after this message showed up on the screen.
What Causes iTunes Error 21
Even though this may seem worrying, there is no reason for concern since the error occurred for one of the following reasons:
- iTunes was not installed properly or the download of the app’s installation file went wrong
- An antivirus is preventing iTunes from retrieving files it needs to restore an iPhone from the servers
- The computer’s operating system is infected with a virus
- One or more files iTunes needs to function normally were deleted by a third-party app
- The USB connection between an iPhone and the computer wasn’t established
Whether error 21 is caused by one or all of the above issues, you will be able to resolve it without anyone’s assistance. However, if the error is related to a hardware problem, it is advisable to take your iPhone or any other iDevice to an authorized Apple repair shop.
You don’t need extensive technical knowledge to fix the iTunes error 21 quickly, since most solutions to this problem require just a few basic actions that can be completed by anyone regardless of how tech-savvy they are.
In case you are suspecting that error 21 was caused by the sensor cable, you should have your iPhone serviced instead of trying to repair it on your own. Let’s take a closer look at the 5 best ways to fix iTunes error 21.
Restart or Update iTunes
The error 21 may be caused by a bug that occurred while iTunes was restoring or updating your iPhone. To check if this is the reason why iTunes couldn’t restore your device, you should simply disconnect the device from the computer and exit iTunes.
Optionally, you can also restart your computer before launching iTunes again and connecting the iPhone to the computer via a USB cable. You should also try updating to the latest version of iTunes if the error 21 still keeps popping up on the screen when you attempt to restore or update an iPhone.
Update to the Latest Version of iTunes
To do this, you should launch iTunes, then head over to the Help tab. Click on the Check for Updates option and then proceed to update the app. Alternatively, you can uninstall iTunes, and download the latest version of the app from Apple’s website.
Disconnect USB devices
The devices that are connected to your computer via USB ports may impact the connection between your iPhone and iTunes. That is why unplugging all devices you are not using from the USB ports while restoring the device with iTunes can help you get rid of the error 21.
Disable the Antivirus Software Temporarily
A firewall set by the antivirus software may be preventing iTunes from acquiring the components it needs to restore your iPhone from Apple’s servers. Disabling the antivirus can be risky, and you should activate it as soon as you manage to fix the error 21.
Determine whether or not the antivirus software has a firewall and then remove iTunes from the list of firewalled apps. If this doesn’t do the trick, you should disable the antivirus and try to restore or update your iPhone with iTunes. Turn the antivirus back on once you’re done.
Fix the iTunes Error 21 From the iPhone’s DFU Mode
Entering the DFU mode will enable you to restore your iPhone back to the factory settings. Keep in mind that all data you had stored on your iPhone are going to be deleted so make sure you’ve created a backup to avoid losing photos, videos, and other documents.
In addition, you should ensure that your iPhone is connected to a charger or a laptop to eliminate the chances of the device shutting down in the middle of the process.
Here’s what you have to do to enter the iPhone’s DFU mode:
Step 1. Turn off the iPhone, by holding the Power button. Once the device is switched off, you should press the Power button for three seconds and then press the Home or Volume up button depending on the iPhone model you have while still pushing the Power button.
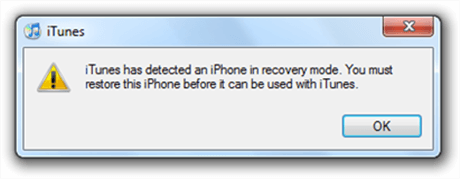
Step 2. Keep holding both buttons for ten seconds, and then release the Power button. Hold the Home or Volume up button for additional five seconds. In case you didn’t see the Apple logo and the iPhone’s screen is black that means you are in the DFU mode.
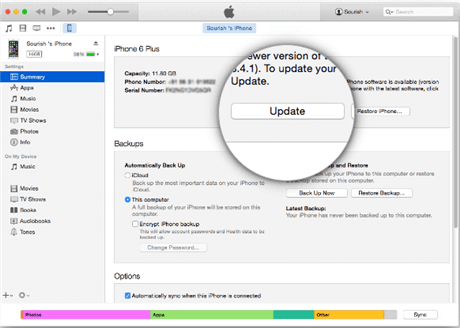
Step 3. Open iTunes and connect the iPhone to the computer via a USB cable. Go to the Summary tab, and click on the Restore option.
Restore Your iPhone with iTunes
Your device will restart and iTunes will restore it to the factory settings. You will also have to set up your iPhone before you can continue using it normally.
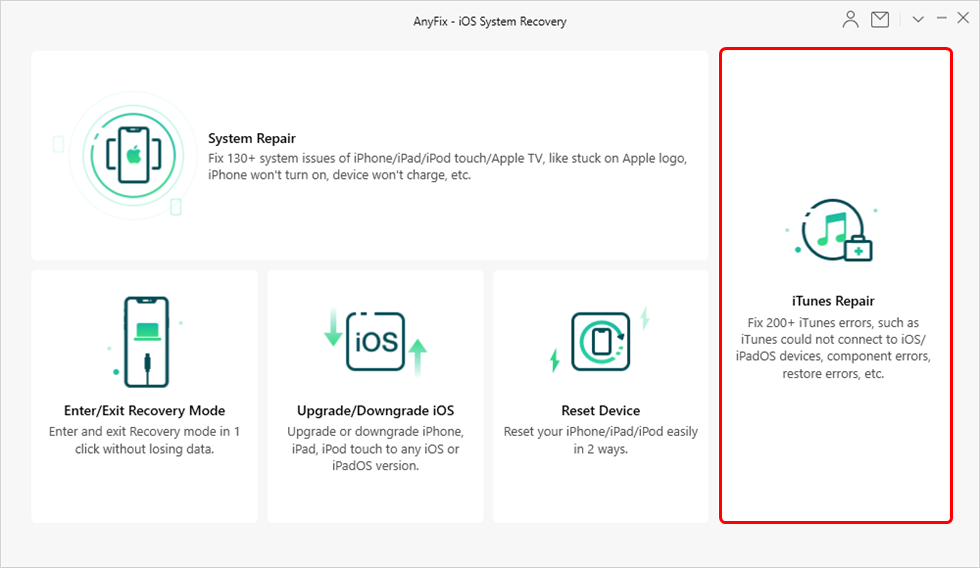
Repair iTunes with AnyFix
A third-party app like AnyFix – iOS System Recovery can help you repair all of the corrupted components that are preventing iTunes from restoring your iPhone successfully. This process is straightforward and it won’t take more than a few moments of your time.
Free Download * 100% Clean & Safe
Step 1. Download and install AnyFix – iOS System Recovery on your computer > Choose the iTunes Repair option from AnyFix’s welcome window.
Click on iTunes Repair
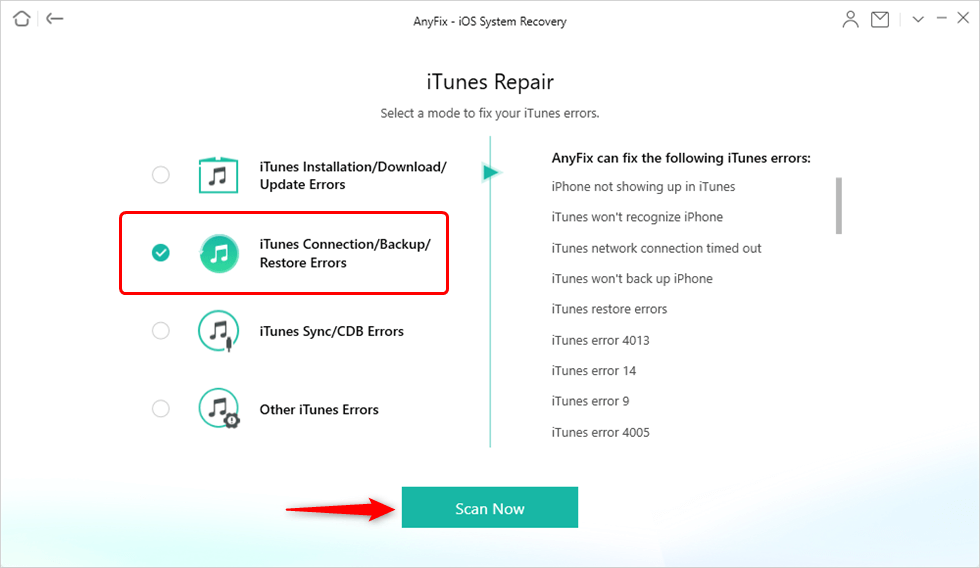
Step 2. Then select the iTunes Connection/Backup/Restore Errors to feature and click on the Scan Now button.
Select the Error Type to Fix
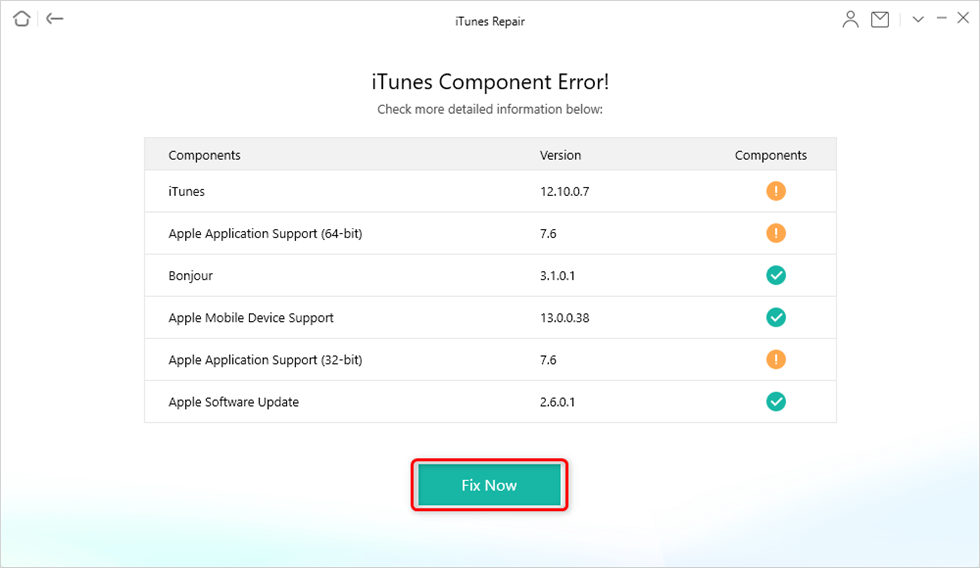
Step 3. AnyFix will analyze all of the iTunes’ components and it will show you the list of all corrupted components after the analysis is completed. You should click on the Fix Now button below this list and give the app the administrator rights by clicking OK in the “User Account Control” window.
Resolve iTunes Errors
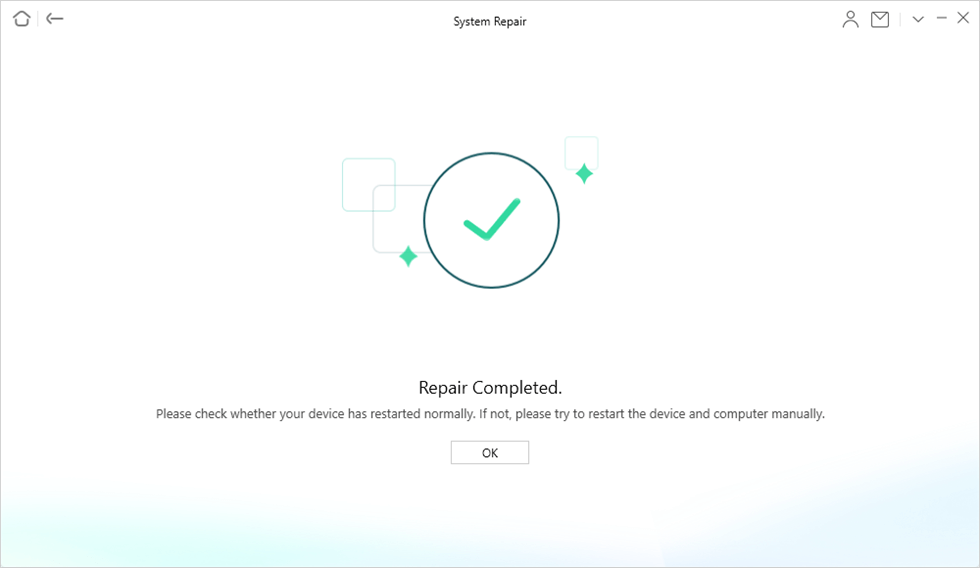
Step 4. It may take a while until all iTunes components are repaired, so wait patiently until AnyFix completes this process, and afterward go to iTunes to check if the error 21 still shows up when you attempt to restore an iPhone with iTunes.
Repair Completed
The Bottom Line
Fixing the iTunes error 21 shouldn’t be too difficult, since you just have to determine what caused the issue and use one or more methods we described in this article to resolve the problem. Keep in mind that updating iTunes regularly is going to reduce your chances of ever encountering this error because using an outdated version of this app to restore or update an iPhone is usually the reason why error 21 shows.

Joy Taylor is a seasoned technical writer with over a decade of experience in mobile technology. At iMobie, she specializes in producing in-depth content on iOS data recovery, iPhone unlocking solutions, and iOS troubleshooting.
Product-related questions? Contact Our Support Team to Get Quick Solution >
