How to Remove Yourself from A Group Text on iPhone
Don’t know how to remove yourself from a group text on the iOS operating system? Read this post, which will guide you to leave group text step by step.
iPhone Messages Tips & Tricks
View iPhone Messages
Transfer iPhone Messages
Fix iPhone Messages Problems
iPhone Group Messaging Tips
More iPhone Messages Tricks
Group text seems an efficient way that lets us talk and discuss all together in one place one time. It saves us a lot of trouble for we don’t waste time texting people one by one. However it’s also can be an annoying thing, sometimes the messages keep bothering you and won’t let you get a moment peaceful.
If you want to remove yourself from a group text but you don’t know how to do it, just read this post and you’ll find the answer. Applied to all the iPhone iPad models, including iPhone 12.
Part 1. How to Remove Yourself from a Group Text in iOS 14/13/12
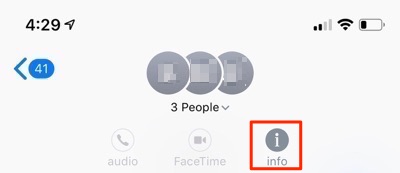
Step 1: Open the Messages App on your iPhone > Open the group text you want to leave.
Step 2: Tap the top of the conversation > Select the ![]() button.
button.
How to Leave a Group Text iOS 14/13/12
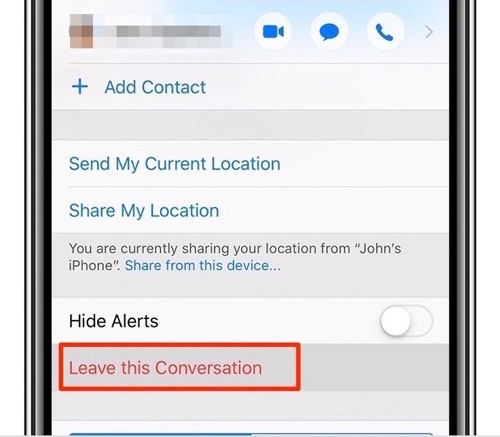
Step 3: Tap on the “Leave this Conversation” option at the bottom of the screen, and you will be removed from the group text.
How to Remove Yourself from Group Text
- The “Leave this Conversation” option only works for the group text with four or more people, so if you happen to be in the group with just two other people, the leave option will be grayed out.
- To leave a group text from iPhone, all participants need to be using the iMessage feature. If one or more of the participants isn’t using a device with iMessage, then you may fail to remove yourself from the group text.
Part 2. Remove Yourself from Group Text in iOS 11/10
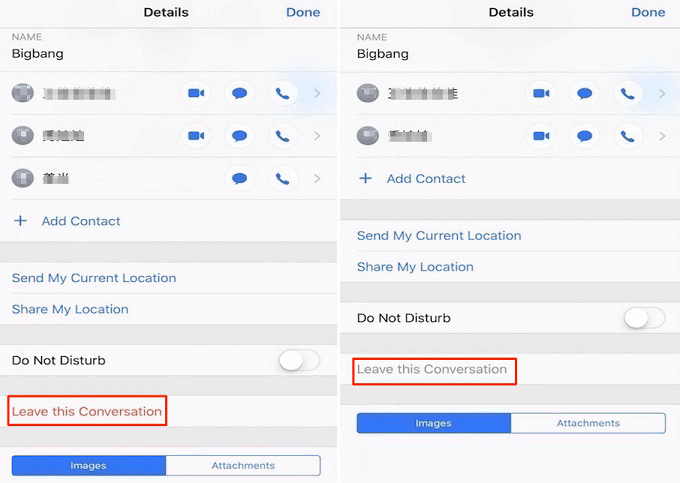
Step 1: Open your Messages app > Select a group text you want to leave.
Step 2: Tap Details > Scroll down > Tap Leave this Conversation.
How to Leave Group Text iOS 11/10
Part 3. How to Mute Group Text/Messages Notifications on iPhone
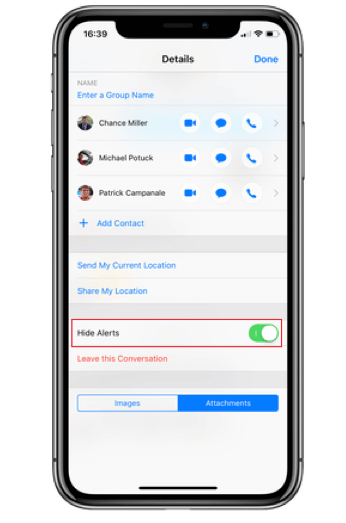
If you are in a group text of 3 people and don’t have the way to leave the group text, you can turn on the Do Not Disturb button to block group messages.
Step 1: Open the “Message” app on your iPhone > Select the message conversation for which you want to mute the notifications of the messages.
Step 2: For iPhone model running iOS 11 or earlier, tap on the “i” info icon or models running iOS 12 or later, or click on the avatars option which is on the top.
Step 3: When you navigated to the “Details” page, enable the “Hide Alerts” option.
Mute Group Text/Messages Notifications on iPhone
Bonus Tip: How to Backup Messages/iMessages on iPhone
Keeping a complete and up-to-date backup is the best way to protect you from important message loss. Many iPhone users complained about the limits of iTunes and iCloud while backing up, like can’t backup messages only, cause data loss, time-consuming, etc.
Here we would like to share you an alternative way – AnyTrans. It allows you to backup only the messages to computer/another iDevice in just 1 click. You can export all text messages from iPhone, or selectively choose some of them to download. Also, your iPhone text messages can be saved to computer in readable formats of .txt, .html, and .pdf. Now, let’s see how to backup messages with AnyTrans.
Step 1: Free Download AnyTrans on your computer > Connect your iPhone to the computer with USB cable > Click on “Device Manager” > Choose “Messages” tab.
Free Download * 100% Clean & Safe
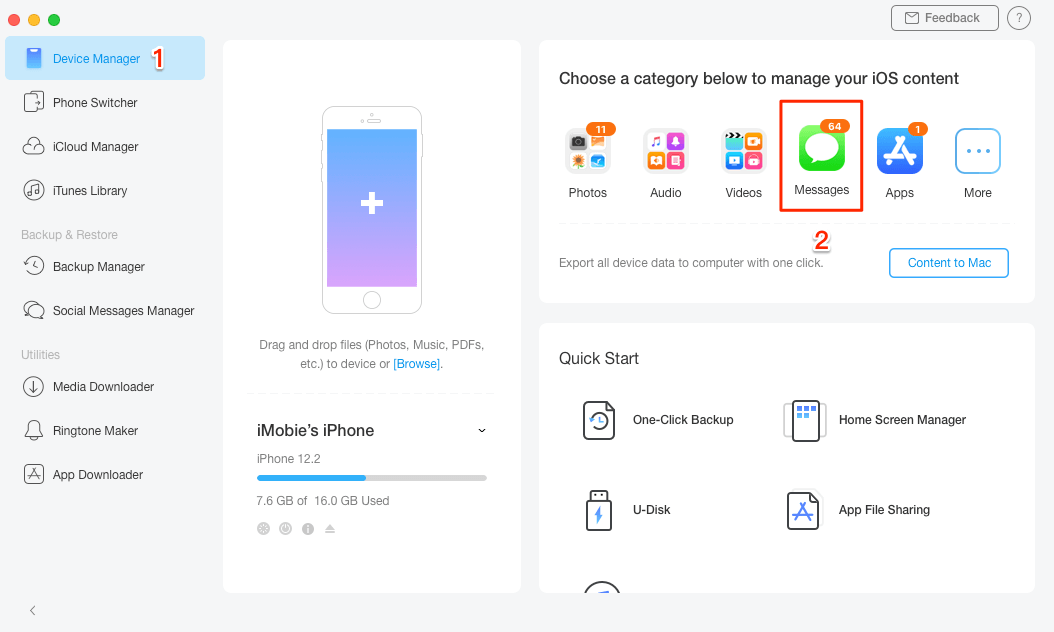
Backup Messages/iMessages on iPhone – Step 1
Step 2: Click on the Settings button at the top-right corner > Choose the output format of the messages (.text/.pdf/.html) > Click on “Save” button to continue.
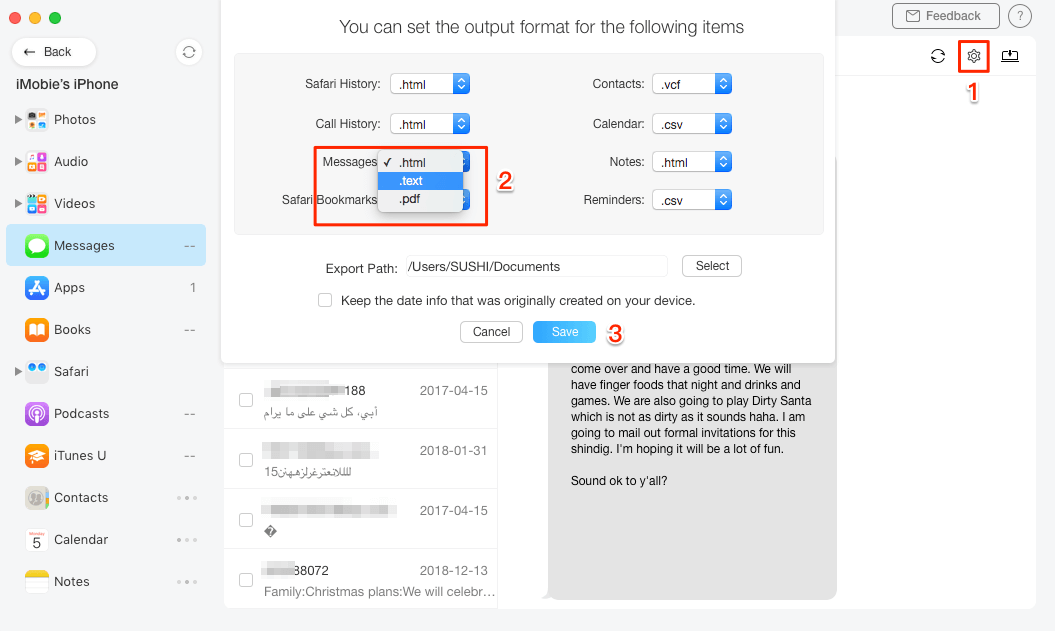
Backup Messages/iMessages on iPhone – Step 2
Step 3: Select the messages you want to backup > Click on “Send to Computer” button > Choose the folder on your computer to save the messages > Click on “Open” button to start backing up the selected messages.
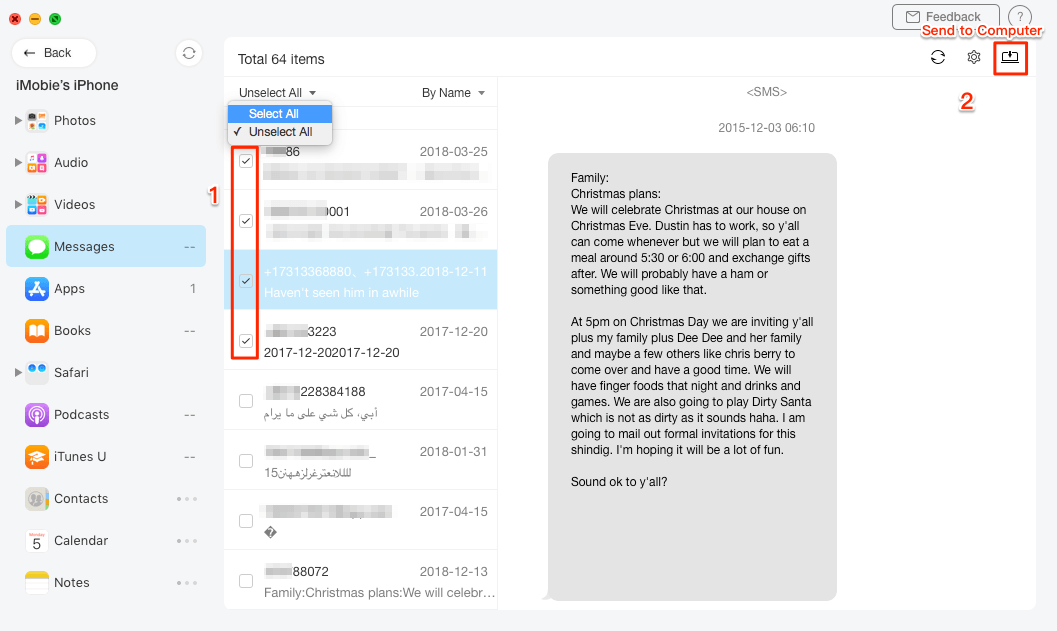
Backup Messages/iMessages on iPhone – Step 3
AnyTrans can also help you back up messages and other important files on iPhone automatically, wirelessly and silently as scheduled – daily, weekly, monthly… It provides 3 backup solutions to meet your different demands: Back up iPhone, Restore Backup, Backup History.
The Bottom Line
Hope you can get the simple method to remove yourself from a group text or backup important message after reading this post. If you have any question, welcome to let us know in the comments below.
More Related Articles

Member of iMobie team as well as an Apple fan, love to help more users solve various types of iOS & Android related issues.
Product-related questions? Contact Our Support Team to Get Quick Solution >
