How to Convert AAC to MP3 in iTunes
If you want to convert AAC files to MP3 in iTunes, the following guide will show you how you can do it using the most easiest way. It also tells you about a few other things you need to know while performing the conversion process so your songs are converted exactly the way you want. Read on to find out how.
Common iTunes Tips
iTunes Music Management
iTunes Library Transferring
Fix iTunes Issues
If you have ever purchased music tracks from iTunes or the Apple Music service, you would know that their file formats are always AAC. Apple uses this file format intentionally as it is a compressed format allowing you to store entire songs but only occupying a small space on your memory. The most popular audio format, on the other hand, though is MP3. There are many media players that may not support the AAC format and you will have to convert AAC to MP3 in iTunes before you can play your songs in those players.
Fortunately, the iTunes app on your computer has a built-in option that allows users to convert their songs from the AAC format to the MP3 format without any hassle. The following is how to convert from AAC to MP3 using iTunes.
Let’s check it out:
How to Convert AAC to MP3 in iTunes
Before you start the actual conversion process, there are a few things you will need to do to ensure the quality of your songs does not suffer any losses.
Let’s check out all the parts one by one:
Part 1. Find the Bitrate of the Song You Wish to Convert
When you configure the iTunes app to convert your music files to MP3, it asks you to specify the bitrate your resulting songs should have. If you do not already know the bitrate of your songs, this section will tell you how to find that out.
The bitrate is really very important as it directly affects the quality of the song. If you set it too low than what it should be, you will produce a really low-quality MP3 version of your song. Therefore, the rate should be exactly the same as the AAC format. This section will help you find it out so you can enter it in the next section in which you get iTunes ready to convert files to MP3.
Here’s how to find the bitrate of a song in the iTunes app on your computer:
Step 1. Launch the iTunes app on your computer. Windows users can launch from their desktop and Mac users can launch from the Launchpad.
Open iTunes on your computer
Step 2. When the iTunes app launches on your computer, you will see several options in the left sidebar of your screen. The option that you need to click on is called Songs under the Library section.
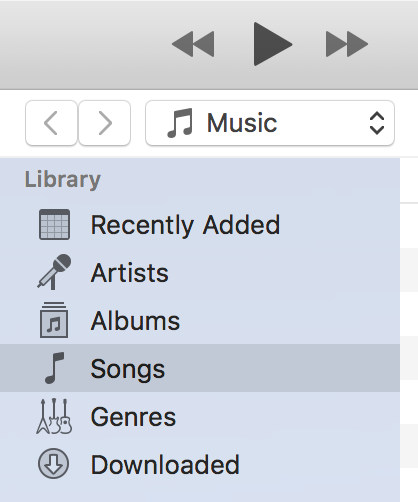
View songs list in iTunes on your computer
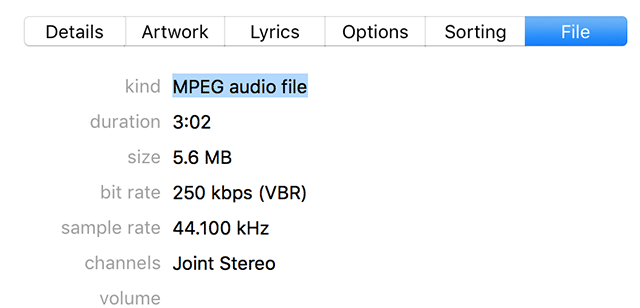
Step 3. When your songs library opens in the app, you will need to find the song that you want to know the bitrate for. Right-click on the song and select the Song Info option.
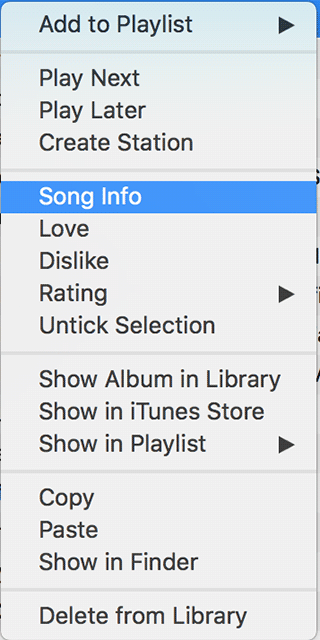
View song information in iTunes
Step 4. A panel will open letting you view the metadata of the song. Click on the File tab in the panel and find out the bitrate of the song from the bit rate field. It is 250 kbps in the below example.
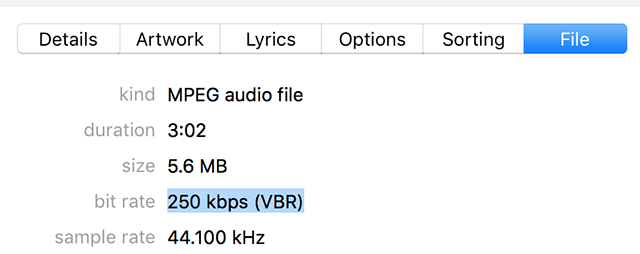
Find out the bitrate of your song
Note down the bitrate of your selected song as you will be entering it in the configuration panel in the iTunes app.
You may close the information panel now.
Part 2. Modify the iTunes Settings So It Produces MP3
Now that you are aware of the bitrate of the song that you want to convert from AAC to MP3, you can start to configure the iTunes app for the MP3 conversion process. It is pretty easy to configure the app as all you need to do is change a few options here and there, enter the bitrate, and you are good to go.
The reason you need to configure the app is that the app can convert your files to various other formats and you must make sure it is set to MP3 or your files will be converted to another format.
Here is how you can get iTunes to convert your files only in the MP3 format. The procedure should work for both iTunes for Windows and iTunes for Mac.
Step 1. Launch the iTunes app on your computer using your preferred way.
Step 2. When the app launches on your computer, you need to access the preferences panel.
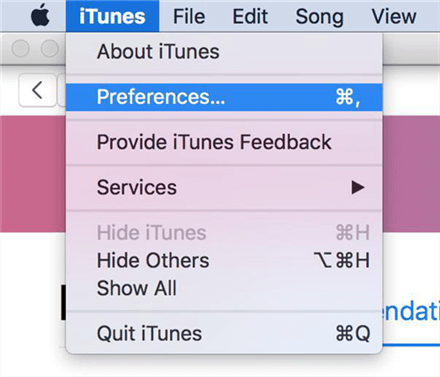
Open Preferences Panel in iTunes on the Computer
If you are a Windows user, you will need to click on the option that says Edit at the top and then choose the Preferences option. It will launch the preferences panel for you.
If you are a Mac user, you will need to click on the iTunes menu at the top and then choose the Preferences option. It should open the preferences panel for the app.
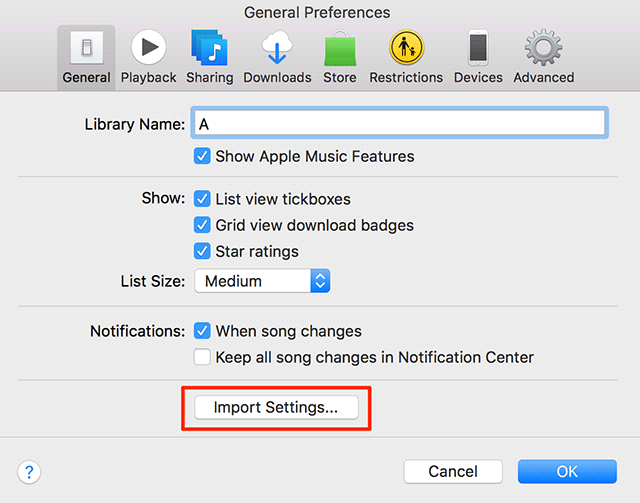
Step 3. When the preferences panel opens, you will land in the General tab by default. Click on the Import Settings button in this tab.
Select Import Settings in preferences
Step 4. A screen will open letting you change the import settings in the iTunes app. On this screen, you will find two dropdown menus. You are going to be using both the menus to configure the MP3 conversion process.
Change import settings in iTunes
From the first dropdown menu that says Import Using, choose the MP3 Encoder option so your music files are converted to the MP3 format and not to any other music format.
The second dropdown menu called Setting lets you specify the quality of the output file. Since you are already aware of the bitrate of your song, select the Custom option.
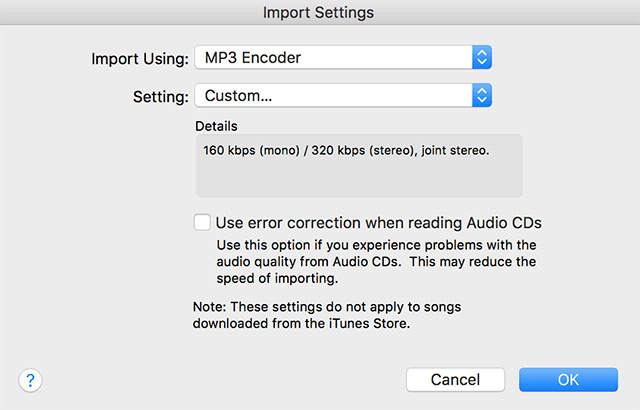
Step 5. A new dialog box will open allowing you to set custom values for the quality of the song you want to convert to MP3. Select the bitrate of your song from the first dropdown menu that says Stereo Bit Rate. Then, click on OK.
Set a bitrate for imported music files
Step 6. The dialog box will close. Click on the OK in all the dialog boxes you opened so they get closed as well.
You may also close the preferences panel by clicking on OK.
Part 3. Convert AAC to MP3 Using iTunes
The iTunes app on your computer has been successfully configured to produce MP3 results out of your AAC music files. It has also been configured to use your custom bitrate so that you do not suffer any losses in the quality of your original songs. After all, an audio file is known by its quality and not by how it looks.
In this part, you will learn how you can perform the actual conversion process so your AAC file gets converted to the MP3 format. The below is what you need to do to make it happen.
Step 1. Open the iTunes app on your computer using the way you prefer.
Step 2. When the app launches, click on Songs in the Library section as you did before so you can view all of the songs you have in iTunes.

Access your songs in iTunes
Step 3. Now find the song you want to convert from AAC to MP3 in the list of the songs. You can select multiple songs if you want. Then, click on the File menu at the top and select the Convert option.
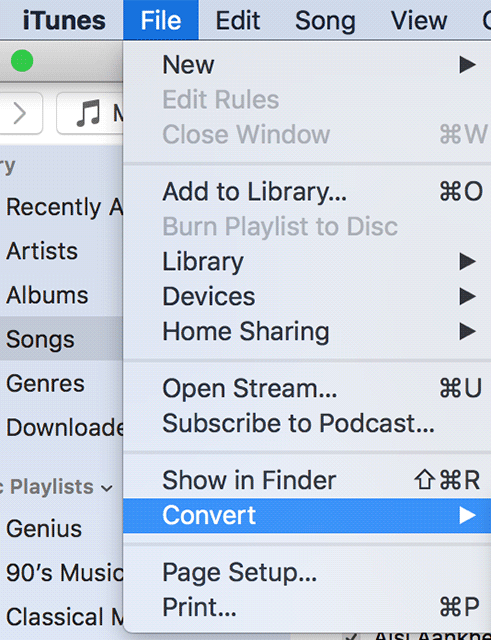
Choose the Convert option in iTunes
Step 4. When the Convert menu expands into another submenu, you will find an option that says Create MP3 Version. Click on it to begin the MP3 conversion process.

Produce MP3 files using iTunes
iTunes will start converting your song from AAC to the MP3 format. Depending on how many songs you have selected, it will take its time accordingly. When the conversion process has finished and your songs have all been converted, the app will add the converted songs to your library just next to the original songs.
Part 4. Delete the Existing AAC Copy of the Song
When you convert an AAC song to the MP3 format, iTunes retains a copy of the original AAC version and does not delete it from your computer. The following is how you can delete that exact same copy of the song in iTunes.
Step 1. Launch iTunes and find the song that you converted from AAC to MP3. Right-click on any version of the song and select Song Info.

Open the song info panel
Step 2. What opens on your screen next is the information panel of the song giving you every detail of your song. Click on the File tab to view the music file format.
Step 3. Once you are inside the File tab, find out the song format by looking at the kind field. If it is AAC, delete the song. Otherwise, delete the other copy of the song.
Check the format of the song
You can then delete the desired file from the library as you would normally do.
The Bottom Line
AAC is the default audio format for Apple devices and our guide above should help you convert AAC to MP3 in iTunes so your songs can be played on most media players as they always support the MP3 format.

Senior writer of the iMobie team as well as an Apple fan, love to help more users solve various types of iOS & Android-related issues.
Product-related questions? Contact Our Support Team to Get Quick Solution >
