How to Fix iTunes Error 3014 When Update to iOS 15
You are caught into trouble because of iTunes error 3014 when you want iOS update or restore. Maybe you are ignorant of what it is and how to deal with. Then this post is going to tell you everything about it. More importantly, you will be given 6 ways to fix iTunes error 3014 after reading this article.
iTunes Error
iTunes Sync Error
iTunes Connect Error
iTunes Update & Restore Error
iTunes Purchase Error
AnyFix – iOS iTunes Troubleshooter
AnyFix is your one-stop solution to fix various iOS/iPadOS/tvOS/iTunes issues in minutes and bring your Apple devices back to normal without data loss.
When you try to update or restore your iOS device with iTunes, a notification popping up says that an unknown error occurred (3014). Your mind may go blank because you know nothing about iTunes errors. So the first thing you probably want to know is what iTunes errors are. In the case of iPhone error 3014, it is one of the restore/update error codes when iTunes cannot access Apple’s iOS software update server. So what can you do to fix iTunes error 3014, or, iPhone restore error 3014? Before then it’s important to figure out the causes of it.
Why does iPhone Error 3014 Occur?
- The computer is set the wrong date and time;
- Download corrupted, incomplete, or out-of-date installation of iTunes;
- The files of Windows system or iTunes-related files are infected by virus or malware;
- iTunes-related files are corrupted in the Windows registry;
- iTunes-related files are maliciously or mistakenly deleted by other programs.
Fix iTunes 3014 via Professional iTunes Troubleshooter
This is the best while the other 5 solutions are also working on the iTunes 3014 issue which tells there is an unknown error while you update the iOS system to the newest version. We recommend this tool to you as it will save your time and help you get out of this problem within a few clicks while the rest will need you to understand the most and operate with caution and lots of effort. AnyFix – iOS System Recovery, a professional iTunes troubleshooter, can fix over 200 iTunes issues.
AnyFix – iTunes System Recovery
- Fix iTunes 3014 with four simple steps.
- Fix 130+ system issues for iPhone/iPad/iPod touch/Apple TV.
- Solve all the problems you may come into after the iOS (15) update.
- No need for professional skills, simple and easy.
Free Download100% Clean & Safe
Free Download100% Clean & Safe
Free Download * 100% Clean & Safe
Now, follow the detailed steps which will lead to a clear tutorial to fix iPhone 3014 issue.
Step 1. Download AnyFix and run it on your computer > connect your iPhone to the computer > choose the iTunes Repair on the right.
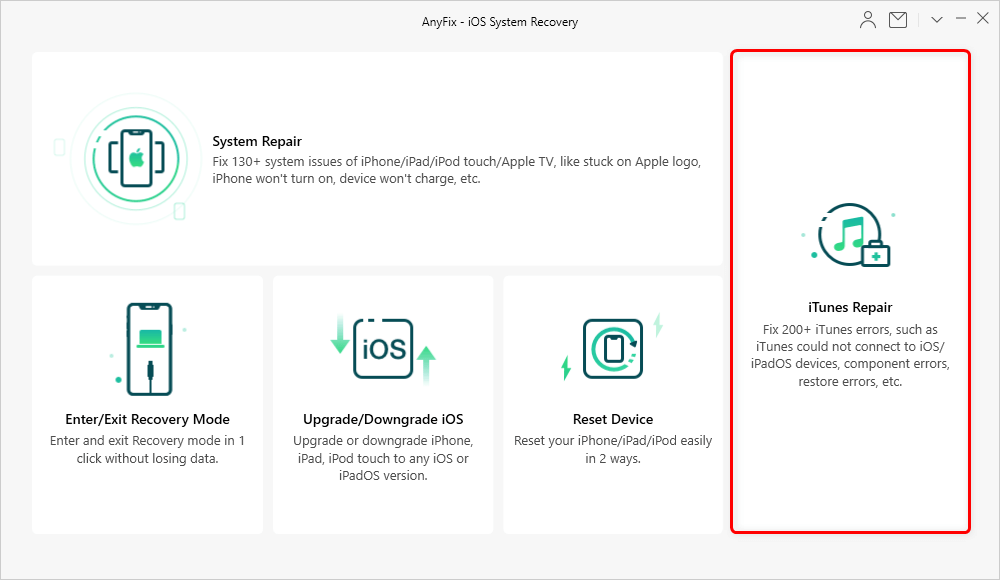
Tap on iTunes Repair from Homepage
Step 2. In this part, choose the iTunes Installation/Download/Update Errors and then tap on the Fix Now to go on.
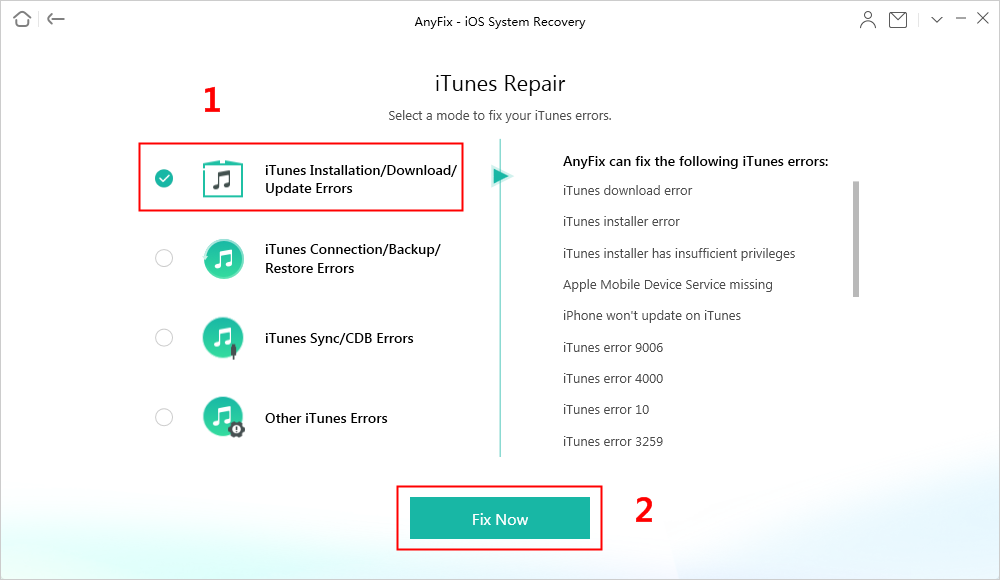
Choose iTunes Installation/Download/Update Errors to Fix
Step 3. Along with the clicks, AnyFix will repair the iTunes components on your computer. Here, you have to authorize the administrator’s rights to AnyFix to repair the iTunes. Click on the Yes and OK button to continue.
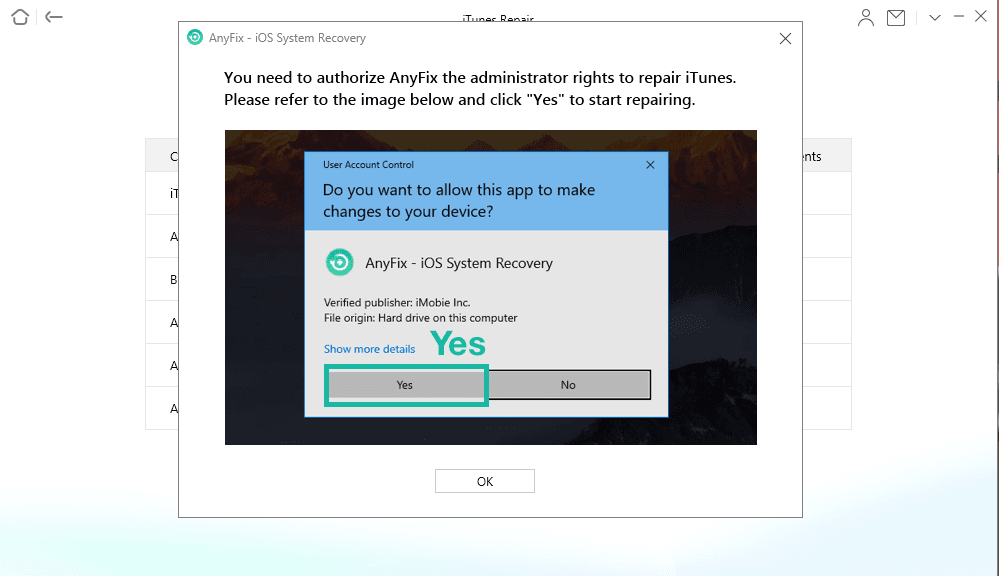
Give AnyFix Permission on your Computer
Step 4. It will take some time to repair. Once it finished, you can choose Go Back or go to iTunes via clicking on open iTunes.
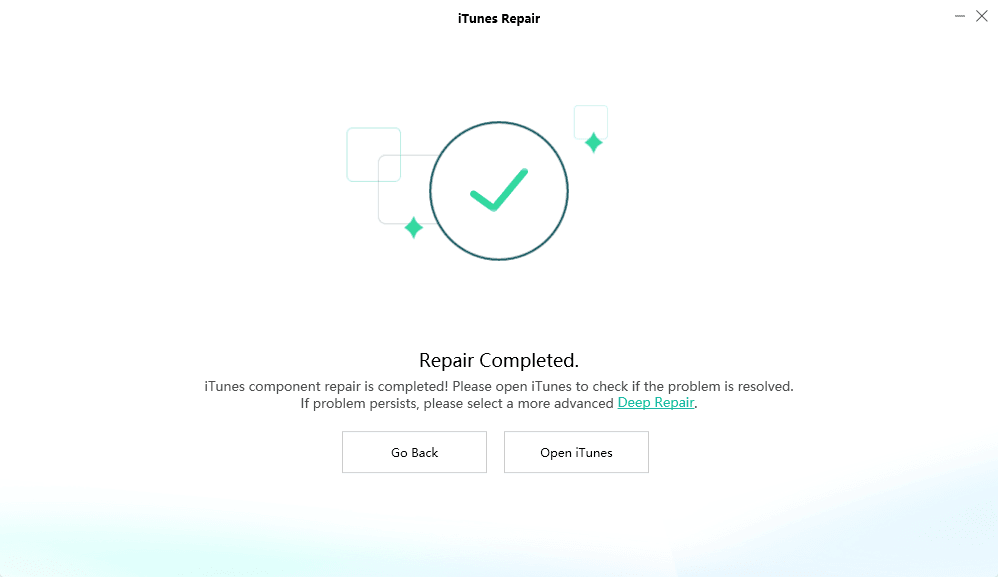
iTunes Repair Completed and Open to Check
Check the Version of iTunes
It’s a good way to update the latest version of iTunes to get rid of this error. Although it’s very easy to operate, it does work in many cases.
Check Computer’s Date and Time
Sometimes, iTunes error may be caused by wrong Date and Time settings on your computer which would lead to a confusion zone as well as a negative impact on communication with the Apple server. So you’d better set the correct time, date, and time zone to solve this error.
On Windows PC
Step 1. Go to Start > Control Panel > Date and Time.
Step 2. Choose Change date and time to reset; Choose Change time zone to reset.
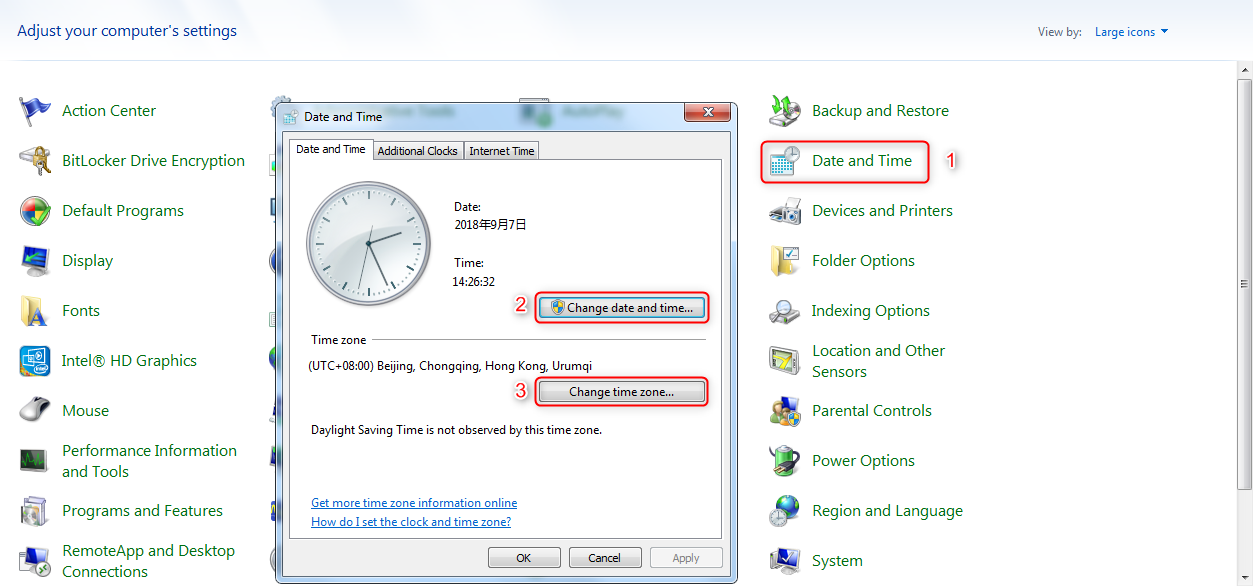
Fix iTunes Error 3014 – Reset Time & Date on Windows
On Mac
Step 1. Go to the Apple Menu > System Preference > Date & Time.
Step 2. Choose Date & Time to reset; choose Time Zone to reset.
Check TCP/IP Filtering, Firewall, or Security Software
If you have TCP/IP filtering, firewall, or security software installed on your computer, you’d better try the following steps:
Step 1. Turn off or temporarily uninstall your security software.
Step 2. Make sure you have a working internet connection then visit www.apple.com or contact your Internet service provider for more help.
Step 3. Bypass your Internet router. Some routers might block iTunes from accessing the update server.
- If you’re using a router that isn’t manufactured by Apple, disconnect from your wired or wireless router, and use an Ethernet cable to connect your computer directly to your modem.
- Once you do that, restart your computer and modem. If you have problems using your modem, contact your internet provider for instructions.
Once you confirm your Internet connection is working, try to update or restore your iOS device again.
Update the Operating System on Your Computer
Updating your computer’s operating system is a great help in solving issues like iTunes Error 3014 because older versions of Windows or Mac are not fully compatible with the newer versions of iTunes.
To update Windows
Step 1. Click Start button > Control Panel > Windows Update.
Step 2. Click on Windows Update > Check for updates.
Step 3. Wait for a while, click on Install updates if there is any available software update.
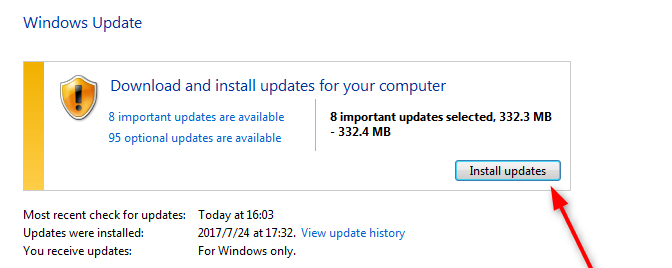
Update Windows Operating System
To update Mac OS X
Step 1. Open App Store on your Mac computer.
Step 2. Click Updates from the toolbar.
Step 3. If there is an available update, click Update to download and install it on your system.
Reset the Hosts Files
This step is highly technical and we don’t recommend that you do this alone if you are unfamiliar with it. It is your last choice among the basic solutions of the above steps fail.
If you’re using a Windows computer, following the steps from the Microsoft support site.
Step 1. Click on Start and search Notepad. And then open Notepad.
Step 2. Copy the following text, and then paste the text into the file:
For Windows 10
# Copyright (c) 1993-2006 Microsoft Corp.
#
# This is a sample HOSTS file used by Microsoft TCP/IP for Windows.
#
# This file contains the mappings of IP addresses to host names. Each
# entry should be kept on an individual line. The IP address should
# be placed in the first column followed by the corresponding host name.
# The IP address and the host name should be separated by at least one
# space.
#
# Additionally, comments (such as these) may be inserted on individual
# lines or following the machine name denoted by a '#' symbol.
#
# For example:
#
#      102.54.94.97     rhino.acme.com          # source server
#       38.25.63.10     x.acme.com              # x client host
# localhost name resolution is handle within DNS itself.
#       127.0.0.1       localhost
#       ::1             localhost
For Windows 7
# Copyright (c) 1993-2006 Microsoft Corp.
#
# This is a sample HOSTS file used by Microsoft TCP/IP for Windows.
#
# This file contains the mappings of IP addresses to host names. Each
# entry should be kept on an individual line. The IP address should
# be placed in the first column followed by the corresponding host name.
# The IP address and the host name should be separated by at least one
# space.
#
# Additionally, comments (such as these) may be inserted on individual
# lines or following the machine name denoted by a '#' symbol.
#
# For example:
#
#      102.54.94.97     rhino.acme.com          # source server
#       38.25.63.10     x.acme.com              # x client host

# localhost name resolution is handle within DNS itself.
#       127.0.0.1       localhost
#       ::1             localhost
Step 3. On the File menu, select Save as, type “hosts” in the File name box as the following screenshot shows, then save the file to the desktop.
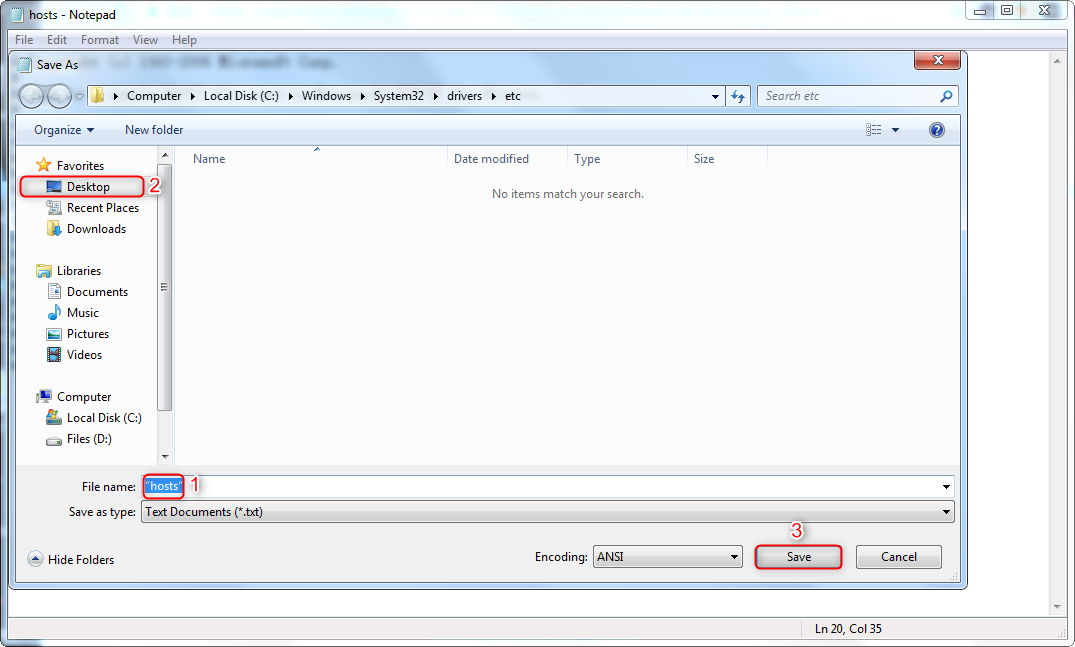
Fix iTunes Error 3014 – Reset Hosts Files on Windows
Step 4. Close Notepad. Then go to Computer > Local Disk (C) > Windows > System32 > drivers > etc. In the Etc folder, tap and host or right-click the Hosts file, and rename the files as “Hosts.old”.
Step 5. Copy or move the Hosts file that you created in step 3 from the desktop to the Etc folder. If you are prompted to enter an administrator password, select Continue.
If you’re using a Mac, follow the steps from the Apple Support Site.
Step 1. In the Finder, click on Terminal and open it.
Step 2. Type “Sudo nano /private/etc/hosts” command and then press Return.
Step 3. Enter the password of your Mac and press Return. You won’t see text appear in the Terminal window when you type your password.
Step 4. The terminal displays the host’s file as a window below shows. Then Navigate to entries in front of gs.apple and add a # symbol in front of the entry.
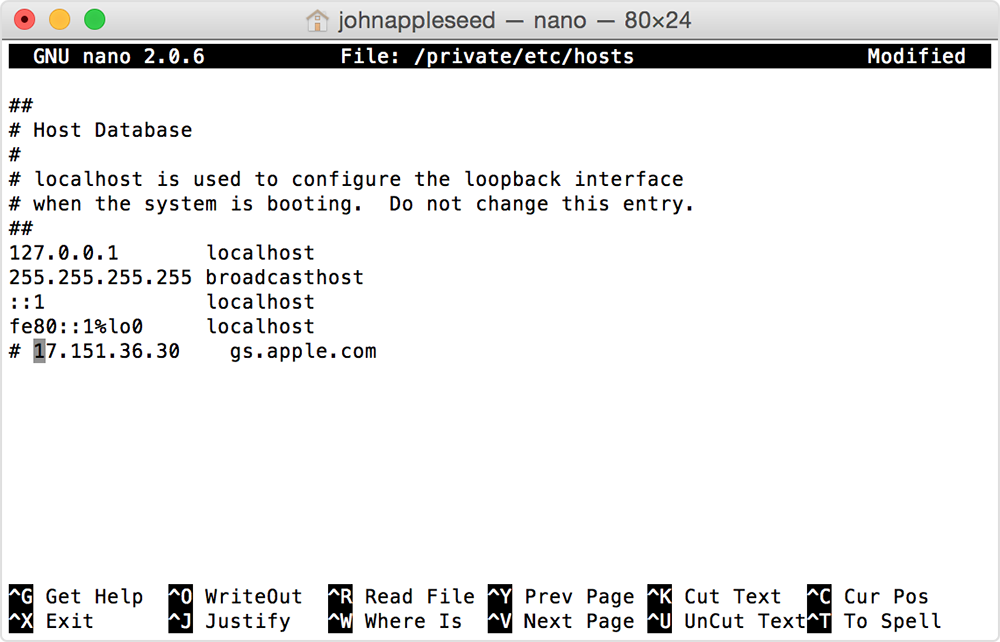
Fix iTunes Error 3014 – Reset Hosts Files on Mac
Step 5. Press Control-O to save the file; Press Return when asked for the filename; Press Control-X to exit the editor.
Step 6. Restart your Mac.
After your computer is finished restarting, try to update or restore your iOS device again.
The Bottom Line
After reading this article, you’ve been learned about information about iTunes error 3014, including its definition, its causes, and its solutions. You can follow the solutions step by step to fix iTunes error 3014 with AnyFix. If you have further questions about this error code or its solutions, please leave your comments. We’ll get rid of your problems as soon as we can.
Free Download * 100% Clean & Safe

Member of iMobie team as well as an Apple fan, love to help more users solve various types of iOS & Android related issues.
Product-related questions? Contact Our Support Team to Get Quick Solution >
