How to Fix iPhone Keeps Searching or Says no Service
If your iPhone is stuck on searching, it is probably because it has not been able to find the coverage for your network provider. This guide lists the reasons why your iPhone gets stuck on searching for service and how you can fix it.
iPhone System Issues
iPhone Screen of Death
iPhone Stuck Issues
- iPhone Stuck On Charging Screen
- iPhone Stuck On Searching Screen
- iPhone Stuck in Boot Loop
- Stuck On Update Requested iPhone
- iPhone Stuck On Loading Screen
- iPhone Stuck On Preparing Update
- iPhone Keeps Flashing Apple Logo
- iPhone Stuck On Emergency SOS Mode
- iPhone Stuck in Headphone Mode
- iPhone Stuck On Mute
- iPhone Screen Zoomed in Stuck
- Verifying Restore Stuck iPhone
I have an iPhone 13. It’s stuck at searching for a signal. My temporary fix is that I turn off my phone. When I turn on the phone everything is normal for a while and then it goes back to searching state again. What can I do to fix it permanently? Do you have any ideas?
Sometimes when you turn on your iPhone, it will keep on saying searching or no service. This usually happens when your phone is unable to find the signals just as the above user said. If you have recently switched to a new SIM card, this is more likely to happen.
This error could be the result of other issues as well. If you know you are using the right cellular carrier and you should be getting the network signals, the following post will tell you why then your iPhone is stuck on searching for a network and what you can do about it.
Further Reading: How to Fix Sim Card Inserted but no Service Android >
Meaning of No Service, Searching, or SOS on your iPhone/iPad
If you see No Service or Searching in the status bar on your iPhone or iPad, it means your iPhone/iPad isn’t connected to a cellular network. If you see SOS or “SOS only” in the status bar, your iPhone/iPad can still make emergency calls.
Why Does My iPhone Keep Saying Searching?
This part of the guide tells you why your iPhone keeps saying searching.
Reason 1. No Coverage
One of the obvious reasons why your iPhone is looking for network signals is because it does not have any signals. If you are not in the range of your cellular carrier, that may be why your iPhone keeps saying searching.
Reason 2. Minor Software Glitch
There could be a glitch in the software of your iPhone and it can lead to issues like the one you are facing.
Reason 3. Issues with Carrier Settings
Carriers have their settings saved on their iPhones to ensure proper connectivity. If there are any issues with these carrier settings, you may find that your iPhone keeps on looking for a network.
Reason 4. Operating System Issue
It may be that the operating system of your iPhone, known as iOS, has some issues in it. This is sometimes the root cause of many issues on your device. Fixing the operating system can fix all those issues for you.
How to Fix iPhone Stuck on Searching
You now know some of the possible reasons why your iPhone is always searching for a network. You might want to learn how you can get your iPhone to stop searching and that is what you are going to do in this part of the guide.
Method 1. Repair Your iOS System with AnyFix
One of the easiest ways to get rid of many issues from your iPhone at once is to use a third-party repair tool. A tool like that can resolve a lot of issues on your device by fixing the underlying iOS operating system. This way you can fix the issue where your iPhone keeps on searching for a network.
AnyFix is an excellent iOS system repair tool that you can use to get around many issues on your iOS-based devices. This app is capable of resolving almost all sorts of software issues on your iPhone. You can use it to repair iOS which in turn will fix the searching issue on your device.
Step 1. Download and install the AnyFix app on your Windows or Mac computer.
Free Download * 100% Clean & Safe
Step 2. Connect your iPhone to your computer and launch AnyFix. Then, choose the option that says System Repair.
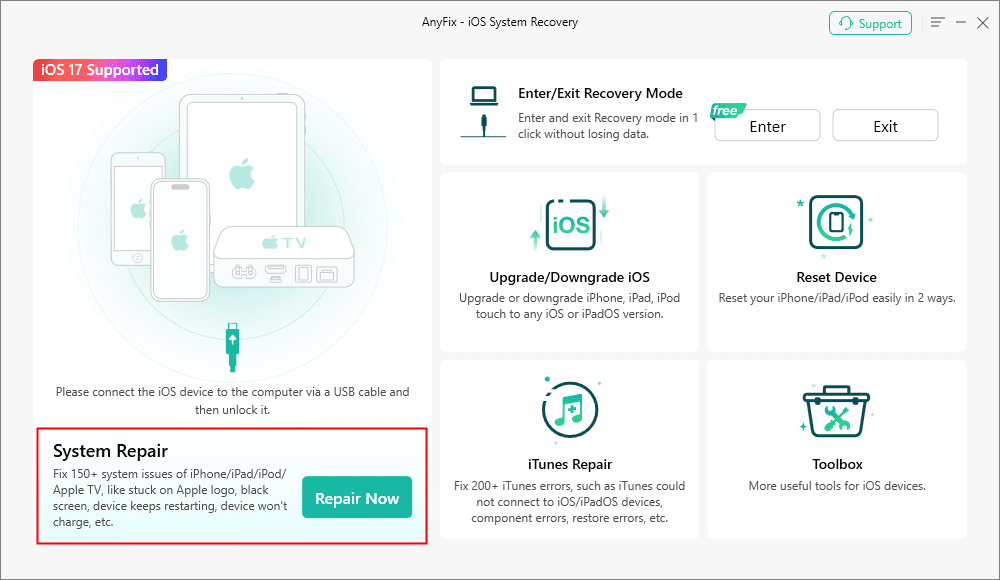
AnyFix System Repair Option
Step 3. Click on Start Now on the following screen to start repairing your iPhone.

AnyFix System Repair Screen Stuck
Step 4. Choose one of the repair modes, download the firmware for your iPhone, and hit Fix Now (You need to put your iPhone into Recovery Mode or DFU Mode if you didn’t do so before).
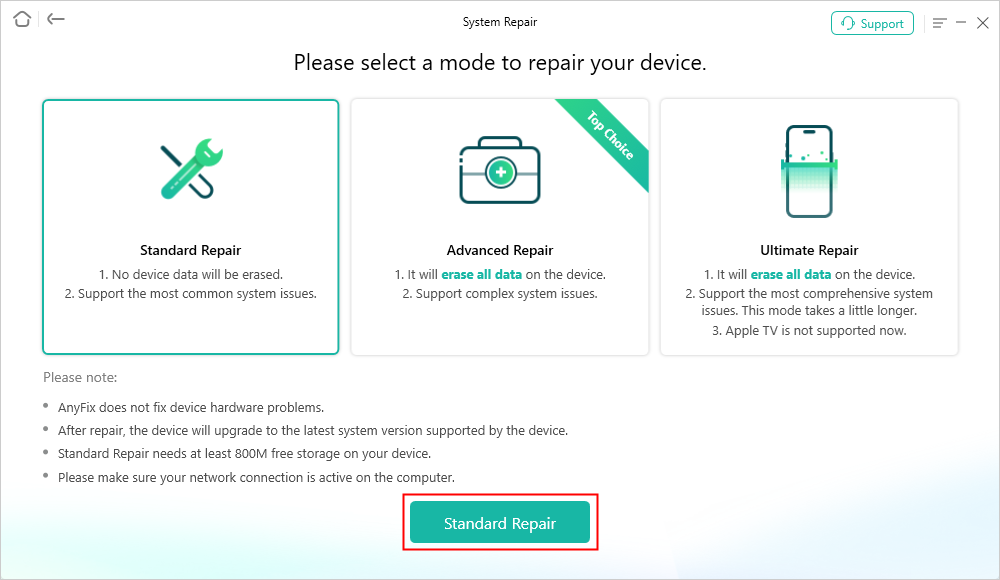
AnyFix Standard Repair
Step 5. When your iPhone is fixed and is free of any errors, you will see the following on your screen.
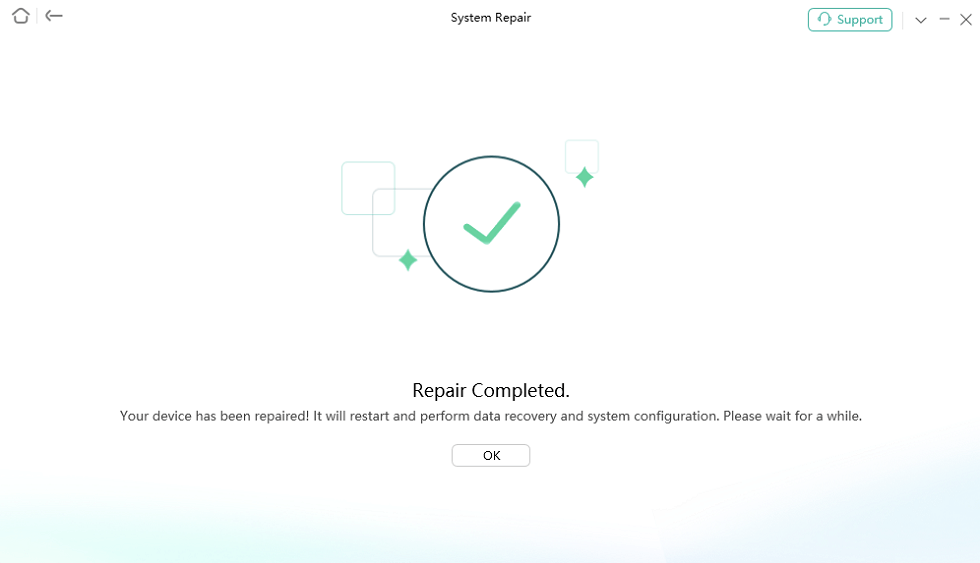
Repair Is Completed
Your iPhone will no longer keep looking for a network.
Method 2. Turn Your iPhone Off And Back On Again
If there is a minor glitch in the software of your iPhone, you can fix that by rebooting your iPhone. Rebooting means turning off your device and then turning it back on. This often helps fix many minor issues on the phone.
Step 1. Press and hold down the Power button.
Step 2. Drag the slider to turn off your iPhone.

Slide to Power Off to Restart the iPhone
Step 3. Press and hold down the Power button to turn on your iPhone.
Method 3. Update Your Carrier Settings
If your carrier has updated its infrastructure or system, you need to accept the new settings and install them on your iPhone. This will help fix the issue where your iPhone keeps on searching and will get your iPhone connected to the correct carrier.
Step 1. Connect your iPhone to a WiFi network. And head to Settings > General > About.
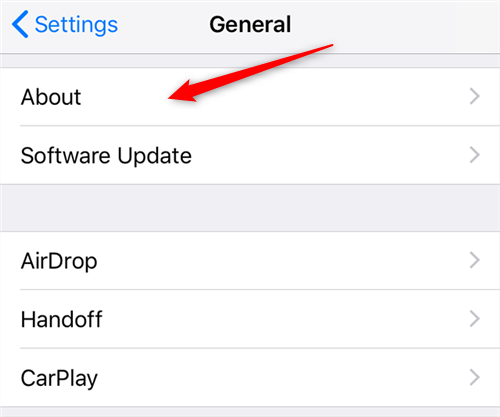
Go to About to Check Carrier Settings Update
Step 2. You will be able to install new carrier settings if they are available.
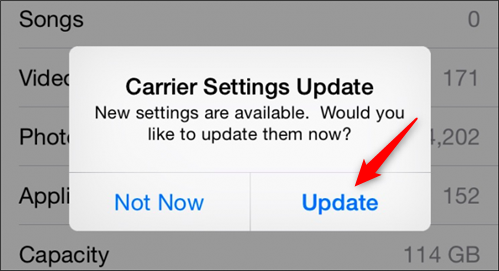
Update Available Carrier Settings
Your iPhone will then connect to the right network provider.
Method 4. Unplug the SIM card and Reinsert It
If your SIM card is not properly inserted into your iPhone, it can cause your iPhone not to recognize the SIM card. This results in your iPhone showing the search message.
You can fix it by reinserting your SIM card into your phone.
Step 1. Pull the SIM card tray out of your iPhone.
Step 2. Take the SIM card out of the tray.
Step 3. Put the SIM back onto the tray ensuring it has slid properly.
Step 4. Put the tray back into your iPhone.
Your iPhone will search for networks for a few seconds and it will then connect to your carrier.
Method 5. Turn on Cellular Data and Data Roaming or Turn off and on
Sometimes enabling cellular data and roaming options can get your iPhone to connect to your network provider. Certain carriers also require you to always keep the cellular data on.
Step 1. Launch Settings on your iPhone and select Mobile Data.
Step 2. Turn on the toggle for Mobile Data.
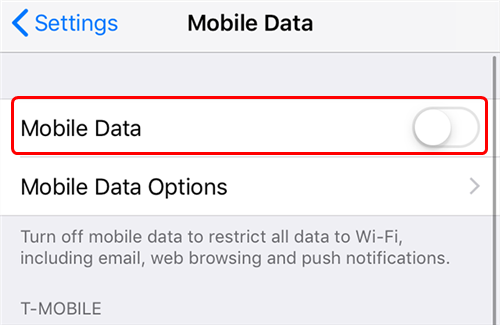
Enable Mobile Data on iPhone
Step 3. Tap on Mobile Data Options and enable the Data Roaming option.
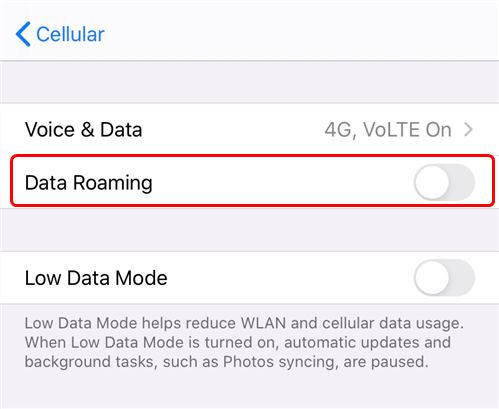
Enable the Data Roaming Option
Your iPhone should now successfully connect to your carrier.
Method 6. Enable and Disable Airplane Mode
Airplane mode disconnects your iPhone from everything it is connected to. This includes your WiFi and cellular networks as well. You can toggle this option on and then off to see if that helps your iPhone connect to your carrier.
Step 1. Open Settings and enable the Airplane Mode toggle.

Toggle the Airplane Mode
Step 2. Wait for a minute and then disable the Airplane Mode toggle.
Your iPhone will no longer be stuck on searching and it should have some signals by now.
Method 7. Reset the Network Settings
Your iPhone’s network settings define how your phone connects to your carrier. Improper settings can cause many issues, and if that is why your iPhone is stuck on searching for a network, resetting the network settings could fix your issue.
Step 1. Go to Settings > General > Reset on your iPhone.
Step 2. Tap on the Reset Network Settings option to reset your settings.
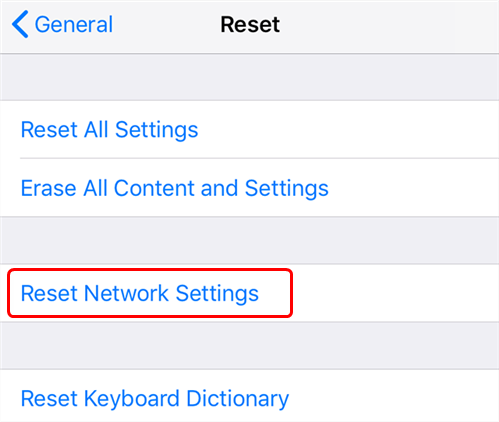
Reset the Network Settings
Restart your iPhone and your issue should be fixed.
Method 8. Contact the Carrier Provider
If your iPhone is still stuck on searching for service, it may be a good idea to talk to your carrier provider. They should know why the error occurs and what you can do to fix it.
You can find the contact number of your carrier from their website.
Method 9. Restore Your iPhone
If there is a serious issue with your iPhone’s software, restoring your iPhone could fix it as this installs a clean version of the iOS operating system on your device.
You can use either Finder or iTunes to restore your iPhone.
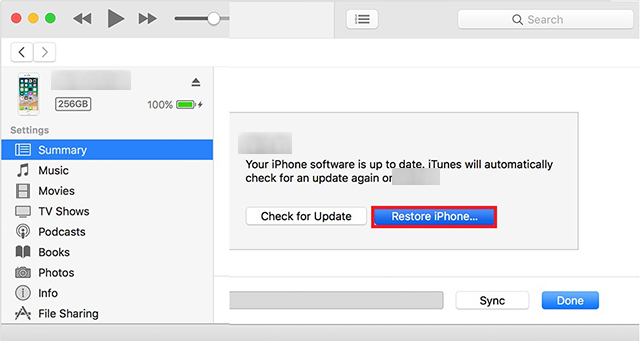
Step 1. Open the Finder or iTunes app on your computer.
Step 2. Connect your iPhone to your computer via a USB cable.
Step 3. Find your iPhone in the Finder or iTunes and click on the Restore iPhone button.
Restore iPhone using iTunes
When your iPhone is restored, it should not be stuck on the search screen.
Method 10. Update iPhone
Lastly, you need to ensure your iPhone is running the latest version of iOS. Older versions often cause issues and you can fix this by updating your iPhone to the latest version.
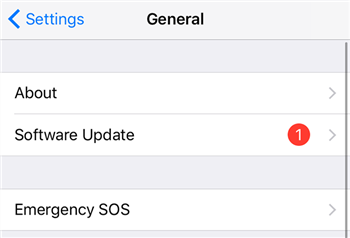
Step 1. Head to Settings > General > Software Update on your iPhone.
Step 2. If an update is available, tap on Download and Install to download and install the update on your device.
Navigate to the Software Update option on iPhone
That should fix the issue where your iPhone is stuck on searching for a network.
Further Reading: Unable to Check for iOS or iPadOS Update? How to Fix >
The Bottom Line
If you are annoyed by your iPhone that keeps on searching for a network, the above guide shows how you can get your iPhone to stop searching and to get it to connect to the right network provider.
More Related Articles

Joy Taylor is a seasoned technical writer with over a decade of experience in mobile technology. At iMobie, she specializes in producing in-depth content on iOS data recovery, iPhone unlocking solutions, and iOS troubleshooting.
Product-related questions? Contact Our Support Team to Get Quick Solution >
