Fix iPhone Stuck on iOS 26/27 Update Requested
Why is my iOS 26/27 stuck on update requested? If you also got this problem and will not move that, read this guide to get several methods to fix iOS 26/27 update issue and get the update installed on your iPhone.
iPhone System Issues
iPhone Screen of Death
iPhone Stuck Issues
- iPhone Stuck On Searching Screen
- iPhone Stuck in Boot Loop
- Stuck On Update Requested iPhone
- iPhone Stuck On Loading Screen
- iPhone Stuck On Preparing Update
- iPhone Keeps Flashing Apple Logo
- iPhone Stuck On Emergency SOS Mode
- iPhone Stuck in Headphone Mode
- iPhone Stuck On Mute
- iPhone Screen Zoomed in Stuck
- Verifying Restore Stuck iPhone
Fix iPhone Stuck on Update Requested [iOS 26/27]
Download AnyFix to solve the iPhone stuck on update requested when updating to iOS 26/27. With just a few minutes, your iPhone will be updated to iOS 26/27 easily. Try it now and say goodbye to any iOS update issues on iPhone.

iOS 26/27 update was available in mid-September, your iPhone goes through a few processes before it installs the update. The first thing your iPhone does is send a request to Apple to download the update to your phone. For some users, the iPhone update requested screen just stays stuck there and will not let you move forward with installing the update.
There are many reasons why your iPhone is stuck on the iOS 26/27 update requested screen. It may be that you have a faulty WiFi network and your iPhone is unable to fully send an update request, or, maybe there is a minor software glitch on your phone that is causing the process to fail, etc.
You can read the following methods to realize why is iPhone software update is taking so long and stuck on the update requested. Also, you can use several ways to fix the issue and successfully update iPhone firmware on your iOS-based device.
What Does Update Requested Mean?
When you go to General and click Software Update, your iPhone will check for the update immediately. And when there is an available software update, you can click the Download button to start updating.
Then iPhone will show you it is estimating the time remaining, which is updated requested. This step means your device is requesting an update from the server to get the firmware downloaded. However, many users waited here and found that the iPhone software update was stuck there. The result is your iPhone will not show you the downloading progress bar and go further as usual.
So, how do you update to iOS 26/27 when it says update requested? Keep reading, you can get some basic fixes to carry on and the software helps you update to a certain iOS or iPadOS version with 1 click.
Tip 1. Check Wi-Fi Network and iPhone Battery
As you may already know, your iPhone uses your Internet connection via your WiFi network to send a request for an iOS 26/27 update. For this process to succeed, your iPhone should be able to fully send the request. If your Internet connection or your WiFi connection is not working as it should, your iPhone fails to send the request and will remain stuck on the screen.
Therefore, the first thing you need to do is make sure you have a stable Wi-Fi network. Secondly, you may need to plug your iPhone into the charging port to ensure there is enough charge left on it to install the update. The following shows how to do that one by one.
Step 1. Launch the Settings app on your iPhone.
Step 2. Tap on Wi-Fi and then connect to the WiFi network that works.

Step 3. Plug your iPhone into charging even if it is charged. Then head to Settings > General > Software Update to update your device.
Tip 2. Reboot Your iPhone
Sometimes, the reason why your iPhone gets stuck on the iOS update requested screen when updating iOS 26/27 is that there is a minor issue with your device. Your iPhone runs day and night and you install a lot of apps and configure various options on it. This sometimes causes some issues on the device which can hinder the ability to install updates.
Fortunately, fixing these minor issues on an iPhone is extremely easy. All you need to do is turn off your device and then turn it back on. Doing so resets many temporary files and settings on your phone. This should fix any problematic items on your phone and let you continue with your iOS updates.
Although rebooting an iPhone is easy, the following steps will make the process even easier.
Reboot an iPhone X or Later
Step 1. Press and hold down either the Volume Up or Volume Down and Side buttons at the same time.
Step 2. Drag the slider and your iPhone should turn off.
Step 3. Press and hold down the Side button to turn on your iPhone.

Reboot an iPhone SE, 8, or Earlier
Step 1. Press and hold down the Side/Top button.
Step 2. Drag the slider to turn off your device.
Step 3. Press and hold down the Side/Top button to turn on your iPhone.

Tip 3. Fix iPhone Stuck on Update Requested with iOS System Repair Tool
While there are some essential solutions to help you fix the update requested issue on your iPhone, there is no guarantee that those methods will work. If you are looking for a nuclear option that works for sure and helps you fix update requested stuck screen on your phone, look no further than AnyFix.
It is a fantastic app that allows you to fix various issues on your iPhone/iPad, like stuck on any updates pages, your iPhone keeps flashing the Apple logo, being unable to activate, or being stuck on the Restore screen, etc. After repairing, your iPhone will be updated to the latest iOS version. Besides, PhoneRescue helps you to recover lost data from your iPhone or iPhone backups.
To fix iOS update issues, like iPhone update requested, iPhone stuck on preparing update, iPhone stuck on verifying update, etc., check the steps below:
Step 1. Download AnyFix and install it on your computer.
Free Download * 100% Clean & Safe
Step 2. Connect your iPhone to your computer. Go to Device Rescuer and select System Repair.
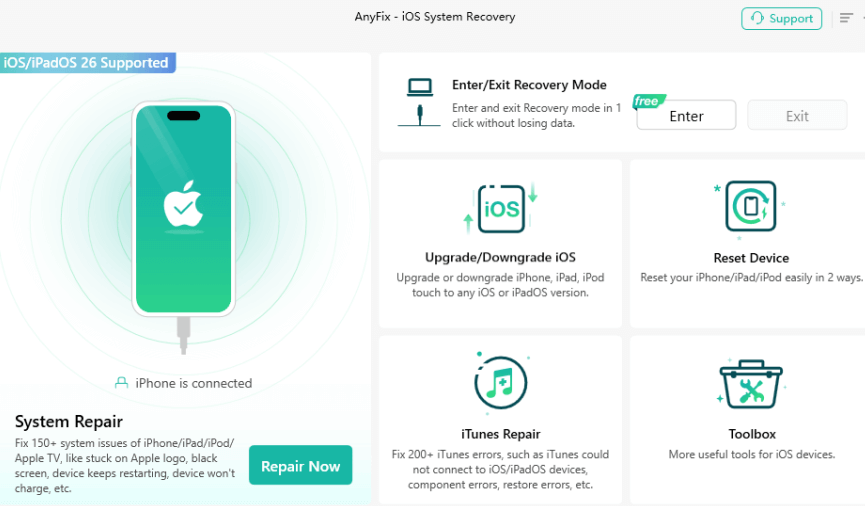
Step 3. Choose Update Issues from the problems list and click Start Now.

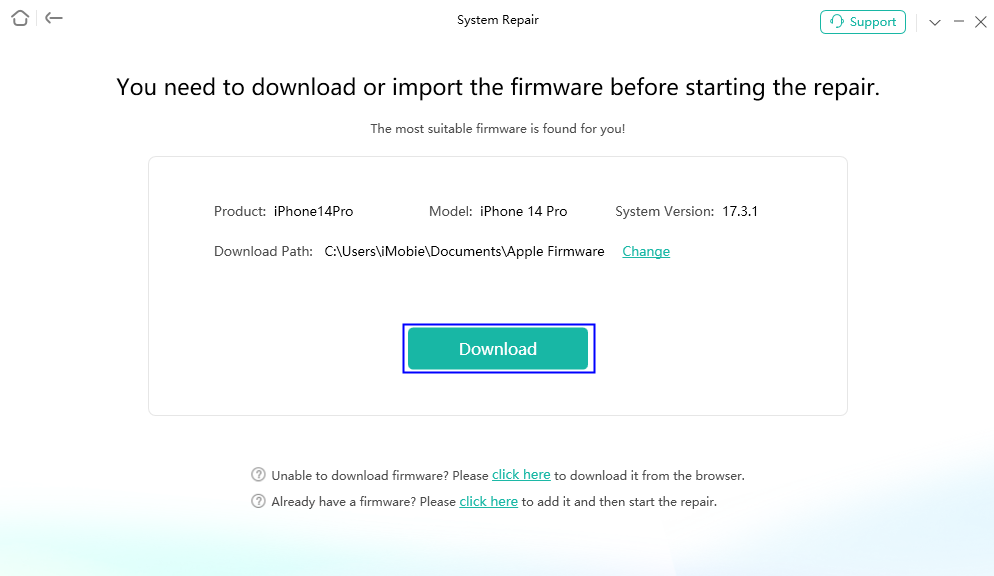
Step 4. Follow the on-screen instructions to enter recovery mode and get the matching firmware downloaded. After that,AnyFix will start repairing as below.
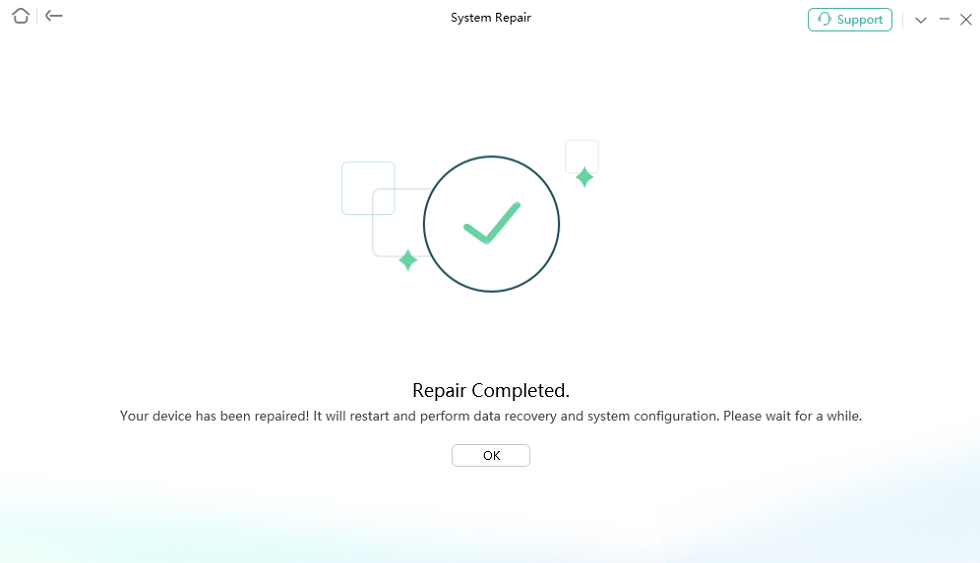
Step 5. Wait for a while, you will get the completed page and your iPhone will be restarted with the latest iOS version.
Tip 4. Reset Network Settings
What helps connect your iPhone to your networks are the network settings on your phone. These settings define how your phone should connect to various networks. If there are any issues with these settings or if you or someone else has modified these settings, resetting them should fix the update requested on your device.
Your iPhone has a built-in option to reset network settings with a single tap and you can do that as follows.
Step 1. Launch the Settings app from the home screen on your iPhone.
Step 2. Tap on the option that says General and select Reset on the following screen.
Step 3. Select the Reset Network Settings option to reset your settings.

Your iPhone should be able to successfully send update requests.
Tip 5. Update iOS 26/27 Using an Updating Tool
Update iPhone with AnyFix
AnyFix supports you to upgrade to the latest iOS 26/27, you can download AnyFix and follow the steps below:
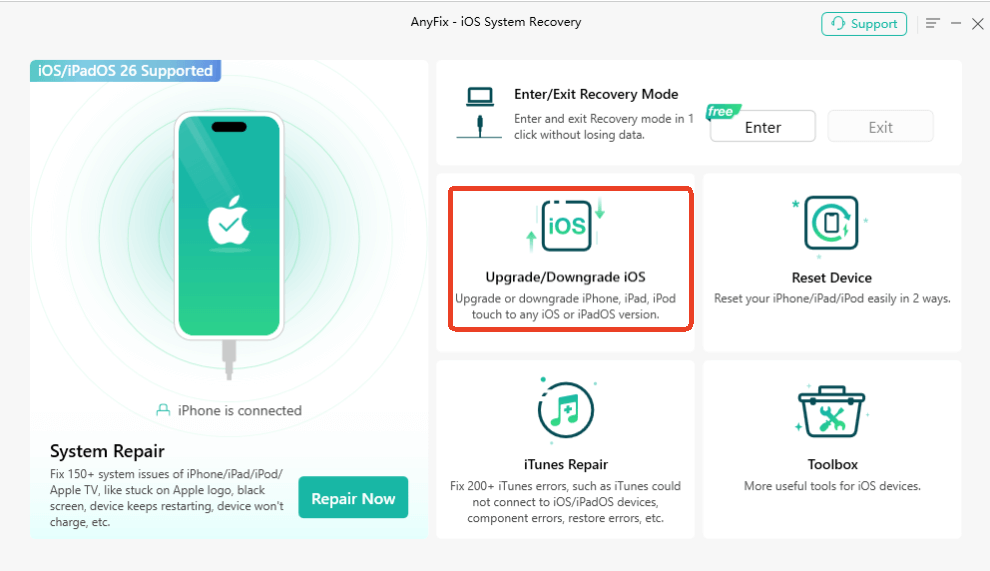
Step 1. Launch the software on your computer > Choose Upgrade/Downgrade iOS.
Step 2. Connect your iPhone to the computer using a USB cable, the device model information will be displayed on the interface once it has been detected > Select 1 click to upgrade iOS/iPadOS and Start Now.

Step 3. AnyFix will show you all the supported firmware packages which is higher than the current one for the device will be displayed on the page. Please download the desired firmware package.

Step 4. Once the upgrade is completed, you will get the page as below.

Update iPhone with iTunes
Apple provides you with various ways to update your iOS-based devices. While you can always update your phone from the Settings app, there is another way to update your device if you are facing issues with the first method.
The other method uses the iTunes or Finder app on your computer to update the iOS version on your iPhone. This method works pretty much the same way as your phone’s method but offers you the option to first download the update to your computer.
Since sending an update request is where you have issues, you can use this method to update your iOS version without using the update feature on your iPhone. The following is how it works.
Step 1. Connect your iPhone to your computer and launch Finder or iTunes.
Step 2. Click on the Check for Update button to check available updates for your device.

Step 3. Select the Download and Update option to download and install the update on your phone.
Your iPhone should be updated.
Tip 6. Free Up iPhone Space
Another possible reason that may cause iPhone stuck on update requested screen is your iPhone space is full. Therefore, iPhone can not request to download the firmware file. To free up your iPhone space to get more storage for new iOS firmware:
Step 1. Check iPhone Storage.
Open Settings > General > Tap on iPhone Storage. Wait for calculating category sizes and you can see how many GBs are used. Also, what Apps are used will be shown.
Step 2. Choose to Delete Apps, Files, Cache, etc.
After knowing your current space usage, you can make decisions to delete what is unnecessary. There are many methods that you can use to delete.
Bonus Tip: How to Stop iPhone from Requesting to Update
If you are annoyed by your iPhone which is always stuck on the update requested screen, you can fix the issue by turning off the automatic update option altogether. You can do this as follows.
Open the Settings > General > Software Update > Automatic Updates/Customize Automatic Updates. Here you can toggle options off to disable automatic updates.

And if you are a new iPhone user, you can set it at the beginning of setting up a new iPhone. When you enter the screen that says “Keep Your iPhone Up to Date”, choose Install Updates manually.
The Bottom Line
Your iPhone is stuck on the update requested for various reasons. Fortunately, you have relevant ways to get around the issue and to successfully update your device as the above guide shows you. And you can download AnyFix to repair iPhone update problems and other iOS glitches. Also, it allows you to upgrade to iOS 26/27 or another iOS version directly. Get the latest version of AnyFix update now! Hope the post can resolve the problem on your phone.
Free Download * 100% Clean & Safe
More Related Articles

Joy Taylor is a seasoned technical writer with over a decade of experience in mobile technology. At iMobie, she specializes in producing in-depth content on iOS data recovery, iPhone unlocking solutions, and iOS troubleshooting.
Product-related questions? Contact Our Support Team to Get Quick Solution >
