How to Record Twitch Streams [Full Guide]
The article intends to guide you on how to record Twitch streams using various methods. It covers built-in tools, OBS Studio, and third-party software Screenify. You’ll also learn about potential issues and get a bonus tip for saving Twitch streams for later viewing. Perfect for capturing and enjoying your favorite Twitch content.
What makes recording Twitch live broadcasts desirable? You might want to rewatch thrilling moments, games, or tutorials that you find on Twitch streams. But unless a live broadcast is captured, it might be challenging to go back and relive those moments. Therefore, everyone who wishes to preserve and revisit their favorite content must record Twitch streams.
This post will teach you multiple methods for recording live streams on Twitch. Furthermore, we’ll review multiple methods, including using OBS Studio for recording and Twitch’s built-in capabilities like (VOD). We’ll also suggest third-party tools such as Screenify. These techniques will simplify recording and storing Twitch broadcasts, regardless of whether you’re a viewer or a streamer.
Part 1: Can You Record a Stream on Twitch?
Twitch Video on Demand (VOD) helps streamers broadcast live streams on account, which remain there for the next 60 days so that viewers who have missed the live stream can watch it later. However, it must be noted that the VOD remains on the account for 60 days maximum, and recording the live stream is the only option left. Viewers can’t download or record streams straight from Twitch. To capture a Twitch stream while watching, you must use other software or tools like OBS Studio or third-party screen recording tools like Screenify. Using these technologies, you can capture the live stream and save it to watch later.
Part 2: How to Record Twitch Streams with Screenify [No Watermark/HD/Free]
Twitch stream can be fun to watch, but you might miss the live streams of your favorite content creators due to a busy schedule. Worry no more! You can always record Twitch streams using Screenify— a brilliant and completely free screen recording tool.
Screenify is screen recording software that helps Twitch viewers, as well as streamers, record videos in 4K quality at 60 FPS settings. Whether you want to record fast-paced games or ordinary streams, the power of high FPS will smoothen the frame transitions.
In addition, Screenify has a Lock Window Recording feature that guards your private data by shielding it from unintentional exposure while recording Twitch streams. Screenify offers unlimited screen recording time for Windows and Mac, so you don’t miss any details.
Key Features and Advantages
- Screenify offers full-screen and region-specific recording options.
- With Screenify, you can lag-free record fast-paced games in breathtaking 4K quality at 60 frames per second.
- It allows for the simultaneous recording of webcams and desktop screens for a more exciting user experience.
- It offers dual recording modes to capture your screen and webcam for enhanced content creation simultaneously.
- It is free to use and has no watermarks.
Now, let’s explore the simple steps to use this tool for recording:
Step 1. Download and install Screenify on your computer to get started.
Free Download * 100% Clean & Safe
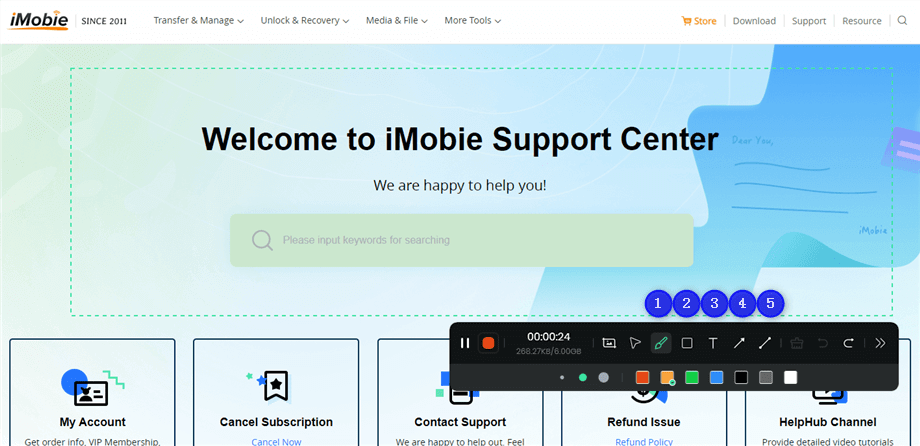
Step 2. Open Screenify and choose the “Record screen” mode.
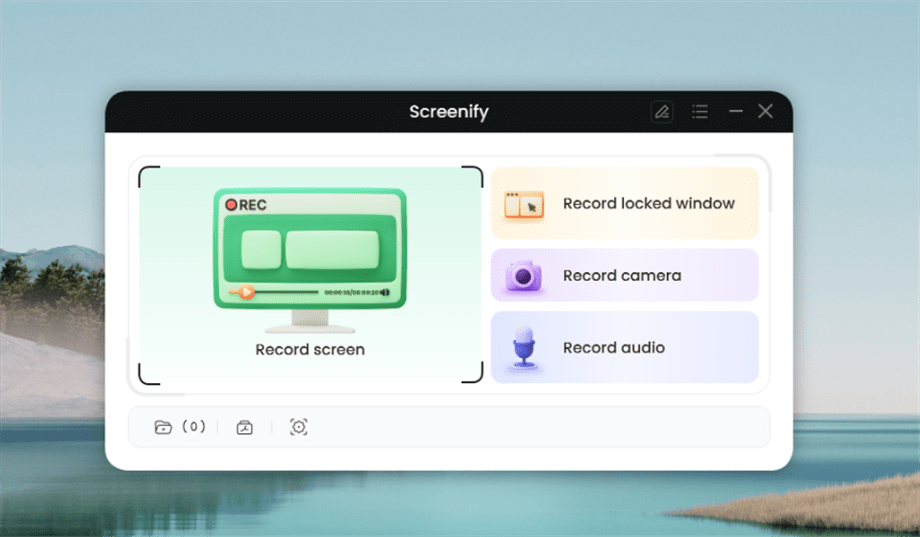
Select Record Screen Mode
Step 3. Adjust your recording settings, such as system audio, before starting.
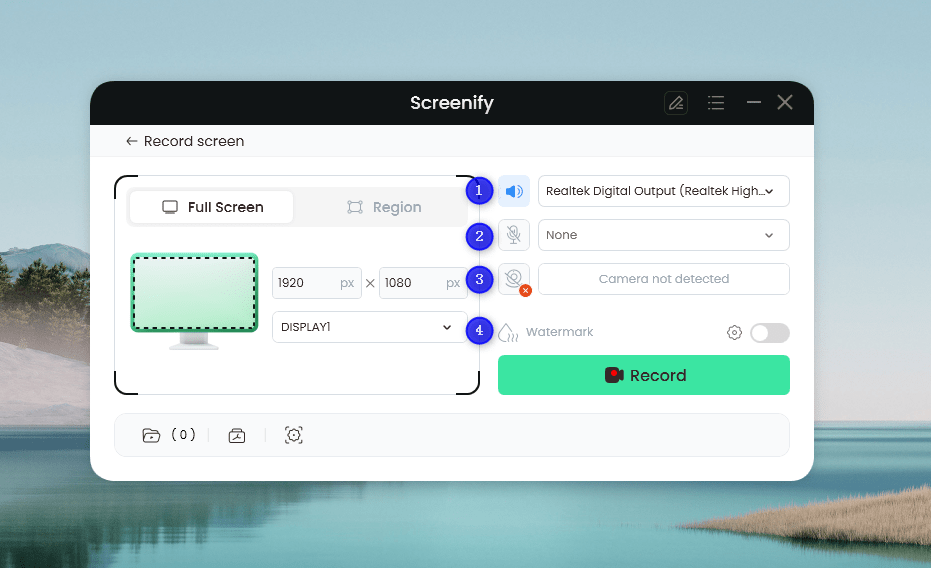
Set Configure Recording Settings
Step 4. Select the area you want to record. Choose “Full Screen” for a full-screen record and click the “Record” button. For a region record, manually select the area you want to capture and adjust it if needed. You can customize the selection to fit standard social media dimensions.
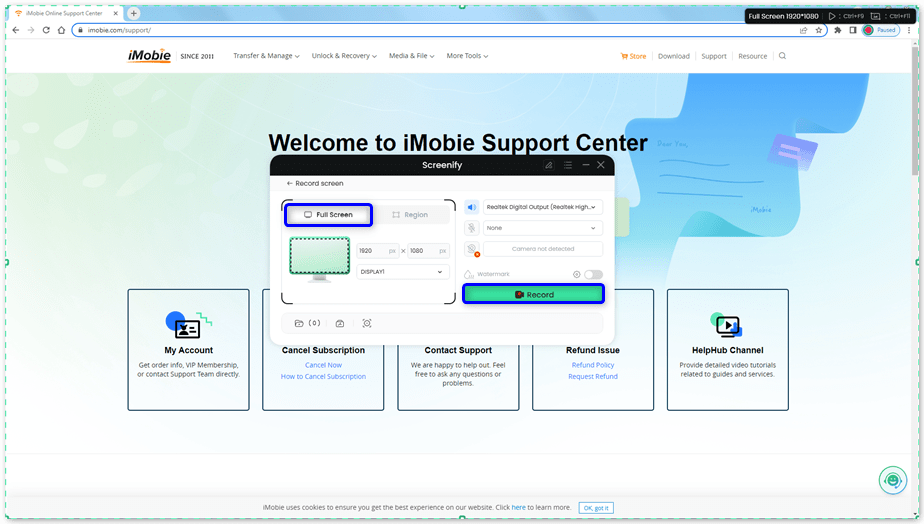
Select Full Screen
Step 5. Wait for the 3-second countdown to prepare for recording.
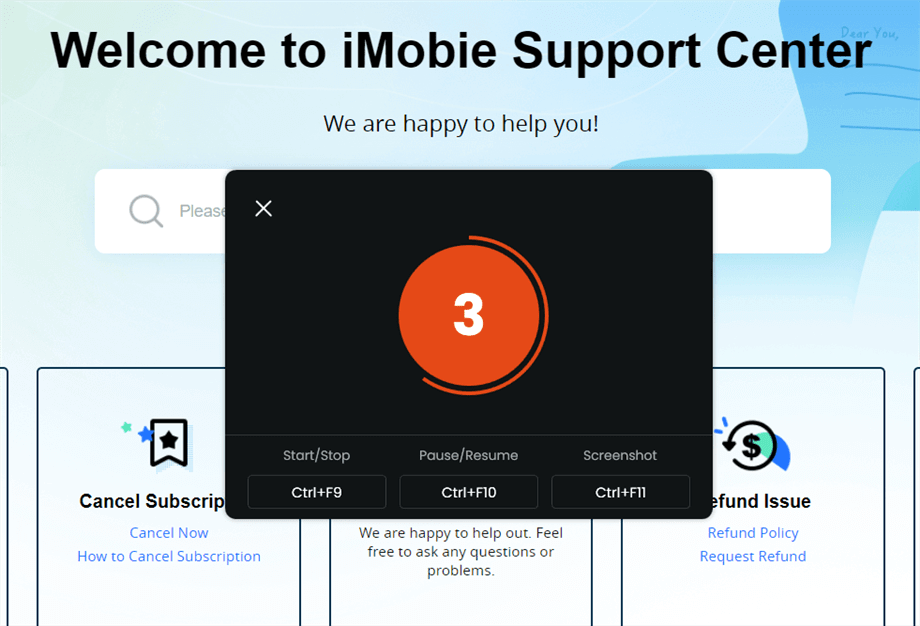
Wait for the Recording Countdown
Step 6. The recording will start after the countdown. You can make annotations on the recording interface if desired.
Annotate the Screen during Recording
Step 7. When finished, click the red “Stop” button to end the recording. You can then preview and manage your recorded files.
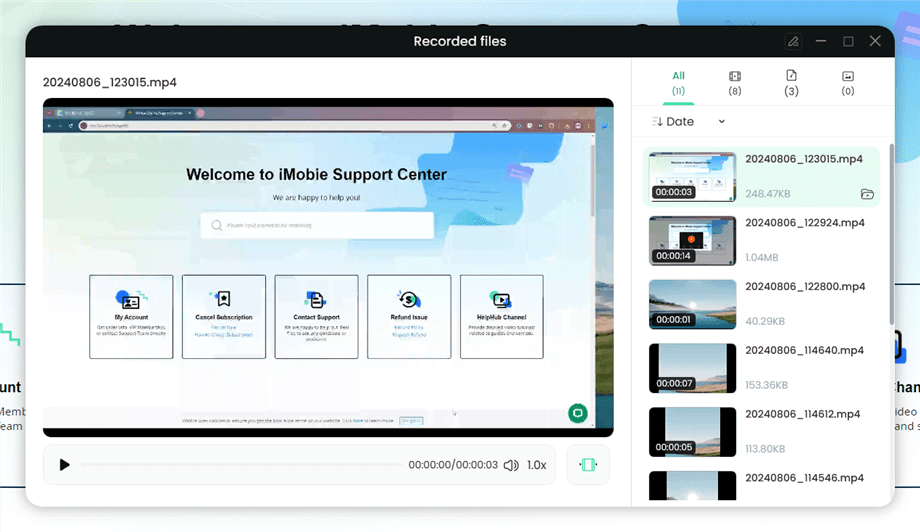
Preview the Recording
Part 3: How to Record Twitch Streams Using Built-in Tools
Recording Twitch streams using built-in tools like VOD is a simple and efficient way to save live broadcasts. Thanks to these tools, you can save and watch your streams anytime.
Twitch VOD (Video on Demand):
Twitch offers a VOD feature, or “Video On Demand,” which keeps live stream rebroadcasts so the streamer can keep the videos. This is, instead, a simple method to keep your streams for your convenience and your audience. VOD enables your streams to be saved on Twitch and even allows viewers to watch something they missed or to watch it again.
Here, we’ll guide you through enabling and using VOD on Twitch so you can effortlessly save your live broadcasts.
Step 1. Go to your “Creator Dashboard” and select “Settings” from the left menu.
Step 2. Click on “Stream” to open your Stream Settings page.
Step 3. Toggle “Store past broadcasts” on from “VOD Settings.”
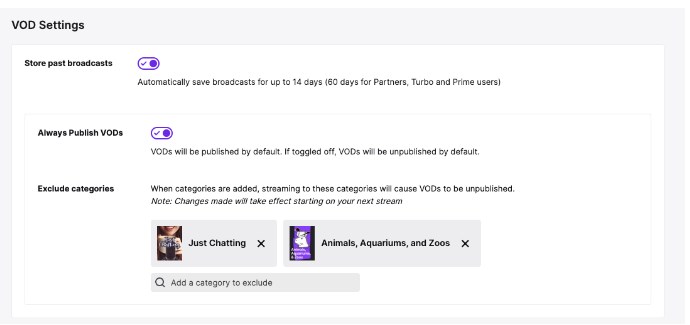
store past broadcasts
Limitations of Twitch VOD:
Despite the advantages of Twitch VOD, this method for saving broadcasts has certain peculiarities that streamers should know about. Understanding these drawbacks can help you decide if VOD is the right option for you:
- Storage Period: The streams in Twitch VOD format are most often available only for a short time – standard users have 14 days, while Twitch Partners, Turbo, and Prime have 60 days.
- Video Quality: The quality of the saved VODs may be slightly lower than that of the original stream, based on your connection and the stream’s settings.
- Limited Editing: VODs have simple editing features but do not include additional options compared to video editing utilities.
Part 4: How to Record Twitch Streams Using OBS Studio
OBS Studio is an excellent option if you want more control over your recordings. OBS Studio allows for high-quality captures and customization. Let’s explore this in detail:
Setting Up OBS for Recording:
Using OBS Studio to record Twitch streams is a practical approach to getting amazing videos. You can alter the recording parameters to fit your requirements with the free and flexible OBS (Open Broadcaster Software). OBS Studio has many settings to ensure your recordings appear good, whether you want to capture games, stream highlights, or tutorials.
You may quickly record your Twitch streams and save them for later watching or sharing by following these instructions.
Step 1. Launch the OBS Studio on your PC and navigate to the “Sources” section. Click the “+” sign and then “Display Capture” from the options.
Note. Adjust the properties for Display Capture, such as “Capture Method” and “Display“.
Step 2. To adjust your recording settings, click “Settings” in the Controls dock or go to “File” and then “Settings” in the top left corner.
Step 3. In the Settings menu, go to the “Output” section, where you can select either “Simple” or “Advanced” mode to configure your recording preferences.
Common Problems with OBS:
Recording the screen using OBS Studio can be considerate, but some inconveniences may occur.
- High CPU Usage: OBS is resource intensive, with high CPU usage, which can cause lagging when performing other computer operations or slowing down the overall system.
- Configuration Challenges: Incorrect settings can cause the video quality to be poor or the recording to be unstable.
- Audio Sync Issues: Thus, it can be inconvenient sometimes, and the audio and the video can be off, and one needs to change it manually.
Part 5: How to Record Twitch Streams Using Browser Extensions
If you’re considering using browser extensions to record your Twitch streams, several handy options are available. However, each extension comes with its own set of limitations that may affect your recording experience.
Screencastify:
This extension allows you to record browser tabs, add voice comments, and even draw on videos using its pen tool. It helps create detailed recordings and download them in MP4, MP3, or GIF formats.
Limitations:
- It can be laggy and glitchy.
- Editing tools sometimes need to be fixed.
- There is no option to customize the capture area size.
Loom:
Known for its team collaboration features, Loom integrates with popular tools like Slack and Gmail. It offers instant sharing, playback speed adjustments, and video transcripts, making it ideal for work-related recordings.
Limitations:
- The free version has many restrictions.
- Does not support screen or webcam recording.
- Frequent crashes during internal audio recording.
Part 6: How to Record Twitch Streams FAQs
1. How do I record a Twitch live stream to watch later?
Enable VOD in Twitch settings to automatically save your streams for later viewing.
2. How do I save my Twitch stream?
You can save your Twitch stream by enabling VOD and then downloading the saved video from the Video Producer.
3. Can I download my Twitch live stream?
Yes, download your Twitch stream by going to Video Producer and selecting the video to download.
Part 7: Bonus Tip: How to save Twitch live streams on VOD
Are you interested in saving your Twitch live streams for future viewing? Besides, using Video on Demand (VOD) is helpful if you want to save your broadcasts and viewers, and you can watch them anytime. This feature enables the archiving of the streams so that you can quickly review them or share them with other people later. Here’s a simple guide to enabling and using VOD to save your Twitch streams effectively.
Step 1. Access your Twitch account and open the “Creator Dashboard.”
Step 2. Click on “Preferences,” then select “Channel” to access the Channel Settings page.
Step 3. Click on your profile icon from the main page to open a menu. Choose “Settings” and then “Channel and Videos.”
Step 4. In the “Stream Key & Preferences” section, find the option to “Store Past Broadcasts” and ensure it’s turned on.
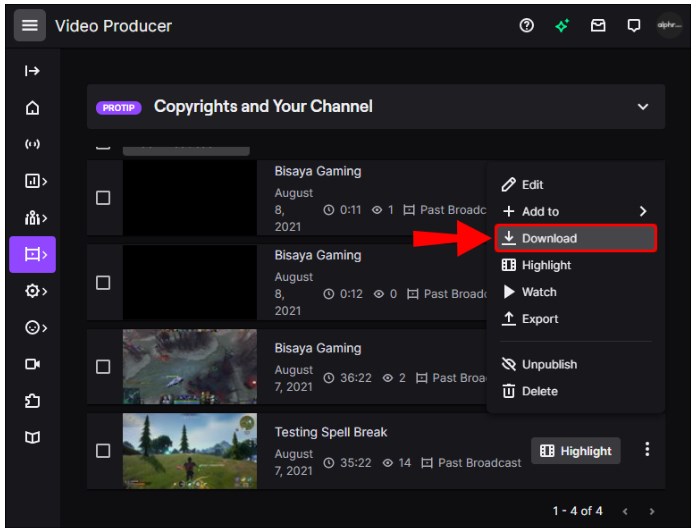
Step 5. Finalize by clicking the three-line button again, go to “Content,” and select “Video Producer.” Finally, click the three-dot icon next to the video you want to save and choose “Download” to save it to your computer.
how to save twitch live streams on vod
Part 8: Conclusion
Wondering how to record Twitch streams? You can utilize Twitch’s VODs, OBS Studio, and third-party screen recorders such as Screenify. Screenify is the best choice due to its simple interface and brilliant features such as 4K quality, no watermarks and adjustable recording modes. Thus, these features will help you have high-quality recordings of your streams to watch them later. Download Screenify to enhance your recording experience and easily capture your Twitch content.
Free Download * 100% Clean & Safe
How to Edit Video Easily
Toplists
- All the Details about Screen Record on iPhone 13 [2026 Updated]
- Best Ways to Record Anything on YouTube TV
- Top 7 Screen Recorders for 1080p Resolution
- Top 9 Audio Recording Software Tools for Mac and Windows
- [Reviews] 7 Best Screen Recorders for Mac
- Top 9 Screen Recorder with Facecam and Audio
- What App Do YouTubers Use to Record Audio
- Best Screen Recorder for Chromebook
- 2026 Best Screen Recorder for Low End PC Review
- 11 Best Screen Recorders for PC with Audio
- Screen Recorder No Watermark: Top 10 Picks [2026 Updated]
- 7 Best Screen Recorders for Windows
- Ways to Fix Screen Recording No Sound on Top Platforms
- All Things to Know About What is Screen Recording
How-to Guide
- How to Play MOV Files on Windows PC
- How to Record Discord Audio on PC or Phone
- How to Record Google Meet on Computer or Phone [Solved]
- Full Guide on How to Record YouTube Videos [PC & Phone]
- How to Record Zoom Meeting without Permisson [Windows/Mac/Phone]
- How to Screenshot Video on PC/iPhone/Android
- How to Stop Screen Record on Mac
- 5 Ways to Record Audio on Mac
- How to Record FaceTime Call with Audio on Mac/iPhone/Android
- How to Record Screen on Mac with Internal Audio
- 4 Ways to Record on Snapchat without Holding the Button
- How to Record Streaming Video on PC
- How to Screen Record on Chromebook
- 10 Ways to Screen Record on HP Laptop
- 3 Easy Ways to Screen Record on Windows with Audio
- How to Screenshot on Samsung Laptop Easily
- How to Stream Netflix on Discord
- How to Record Screen Using VLC

Senior writer of the iMobie team as well as an Apple fan, love to help more users solve various types of iOS & Android-related issues.
Product-related questions? Contact Our Support Team to Get Quick Solution >
