How to Solve Authentication Problem in Wi-Fi Connection in Android
Keep receiving the Wi-Fi authentication error on Android when you are trying to connect your Android device to Wi-Fi? The guide tells how to solve authentication problem in Wi-Fi connection in Android.
Android Issues & Fixes
Android System Issues
Android Apps Issues
DroidKit – Solve Android System Problem
Free download DroidKit to fix all Android system issues, including the “my phone won’t connect to WiFi authentication” problem.
“I recently purchased a new phone. It connected to my home Wi-Fi great, but last night it just stopped working all of the sudden. Every time I type in my password and try to connect. The phone pops up with an Authentication error. Please help.”
Obviously, the user above was stuck in the Android Wi-Fi authentication problem. If you are struggling with the same trouble, the post here can be helpful. Read to find solutions to solve the authentication problem in Wi-Fi connection in Android.
Bonus: Check out this guide on How to Fix the “Not Registered on Network” Error on Android?
What Does Wi-Fi Authentication Problem Mean on Android
Why does my WiFi keep saying authentication problem? Android WiFi authentication error is that every time when you want to connect to a Wi-Fi network by entering the correct password but fail to connect to the network, a message will pop up on your Android phone saying “Android WiFi authentication error”. This is confusing, right? Because you can be sure that you have entered the correct password, and the password has not been changed.
What you need to know is that when you try to connect to a Wi-Fi network, the device will first send the connection request and password to the router in encrypted form. The router will then compare the password. If it matches, it will send a signal and connect the device. If not, you will receive a verification error or sometimes it shows WiFi connected but no internet access Android. Just follow the methods below to learn how to fix the authentication problem:
How to Fix the Android Wi-Fi Authentication Problem
We give you 9 feasible methods to fix the Android Wi-Fi Authentication Problem. Detailed steps are listed. Follow the steps of each method to fix your problem.
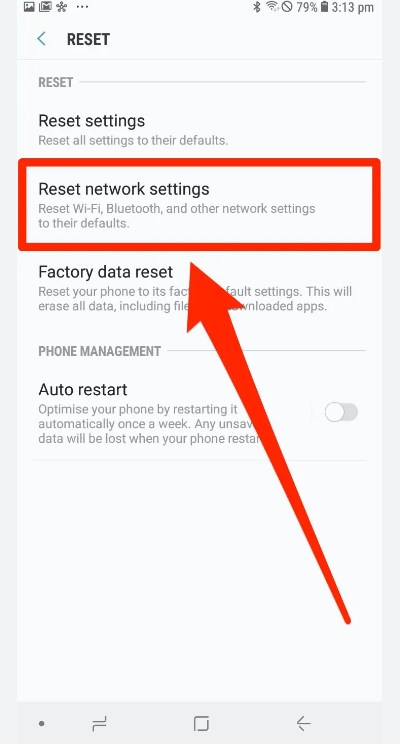
1. Reset Wi-Fi Connection
- On your Android device, go to Settings.
- Find Wireless and Network, tap on Wi-Fi option.
- A list of nearby Wi-Fi will be displayed here. Hit the Wi-Fi that you want.
- On the popping up menu, choose Forget network.
- Try to reconnect to the Wi-Fi by entering the password.
Reset WiFi Connection
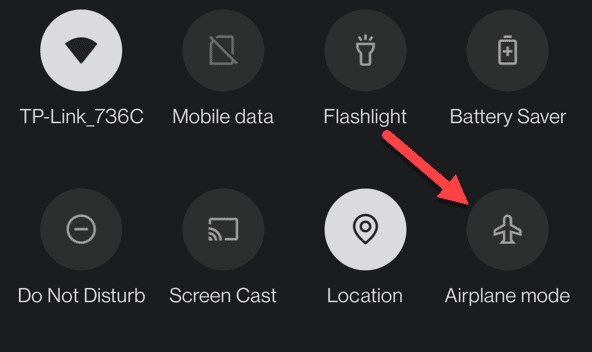
2. Turn on Airplane Mode and Turn It off
- On the quick settings menu, turn on the Airplane mode.
- With the Airplane mode still active, turn on the Wi-Fi and connect to the network by heading over to the Settings.
- If your Wi-Fi connection is OK, turn the Airplane mode off.
Turn Android Airplane Mode on And off
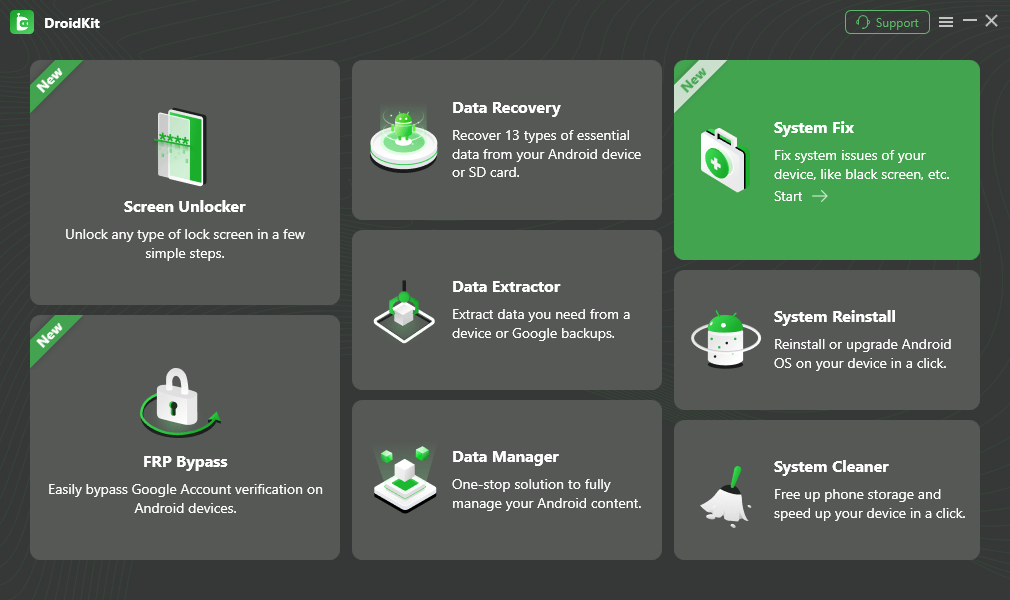
3. Fix the Android Wi-Fi Authentication Problem with DroidKit
Sometimes, it is the Android system problem that causes the Wi-Fi authentication to fail on your Android phone. So, you can try an Android solution called DroidKit – Android Phone Toolkit, which can help you solve Android phone problems with ease like your Samsung phone is on but the screen is black. Check the features of DroidKit as below:
DroidKit – All-round Android Phone Toolkit
- Fix various Android OS problems like wifi authentication problems.
- With original size with no loss of picture quality and no compression.
- All models of Samsung phones and tablets are supported.
- Provide solutions on Android data recovery, lock screen removal, etc.
Free Download100% Clean & Safe
Free Download100% Clean & Safe
Free Download * 100% Clean & Safe
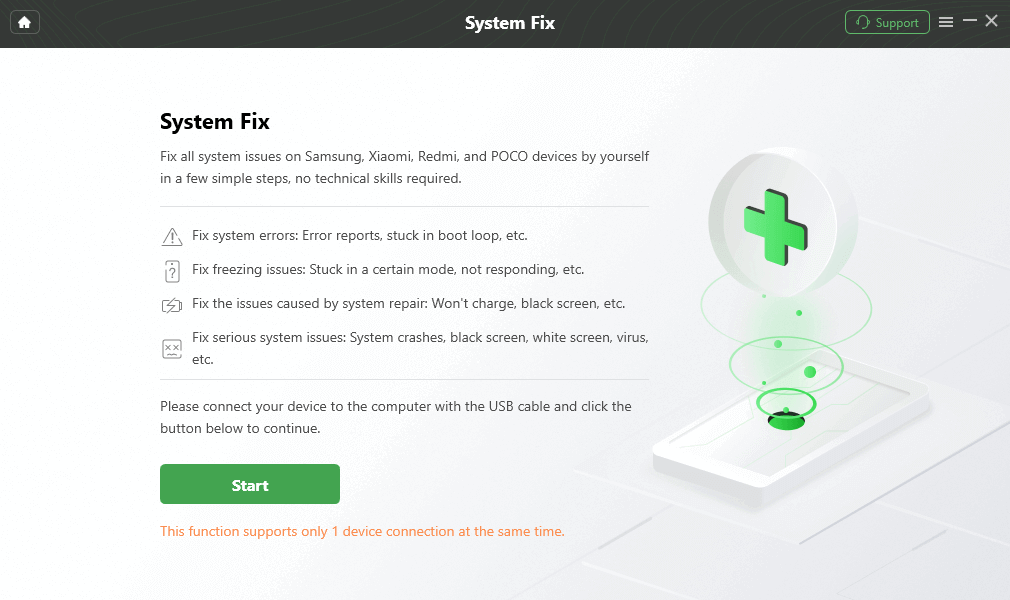
Now, follow the steps below to fix your phone’s issue in a few simple steps:
Step 1. Get DroidKit on your computer. Launch DroidKit > Connect your Android device and tap on the System Fix panel.
Click System Fix Function
Step 2. Once DroidKit detected your device, click the Start button to continue.
Start to Repair Samsung Phone
Step 3. DroidKit will match the PDA code of your Samsung Device Automatically > Then click Download Now to download the firmware.
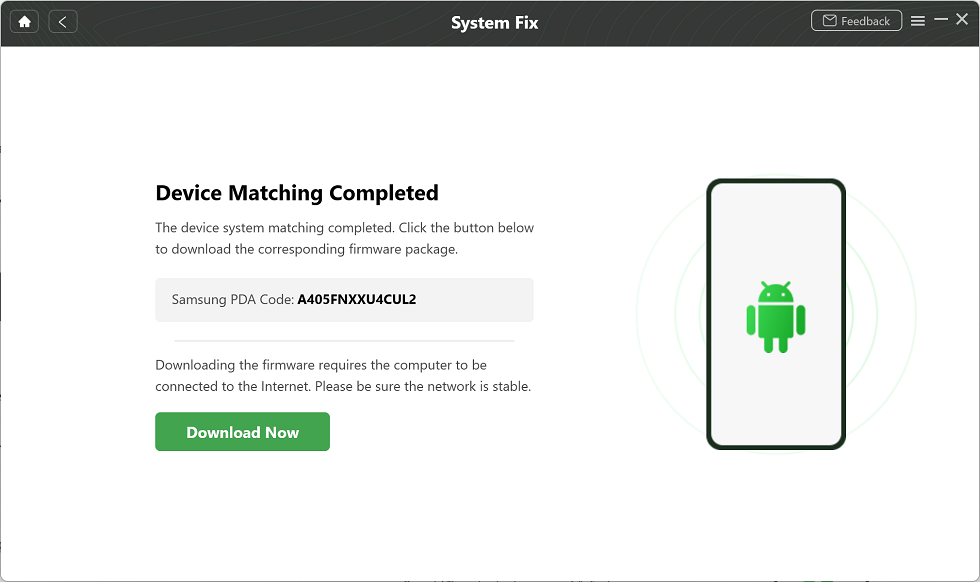
PDA Code Matched
If there is no matching PAD code, you need to put your device into recovery mode and get PDA code.
Step 4. After firmware downloaded, click Fix Now button. Then, follow the instructions below to put your device into download mode.
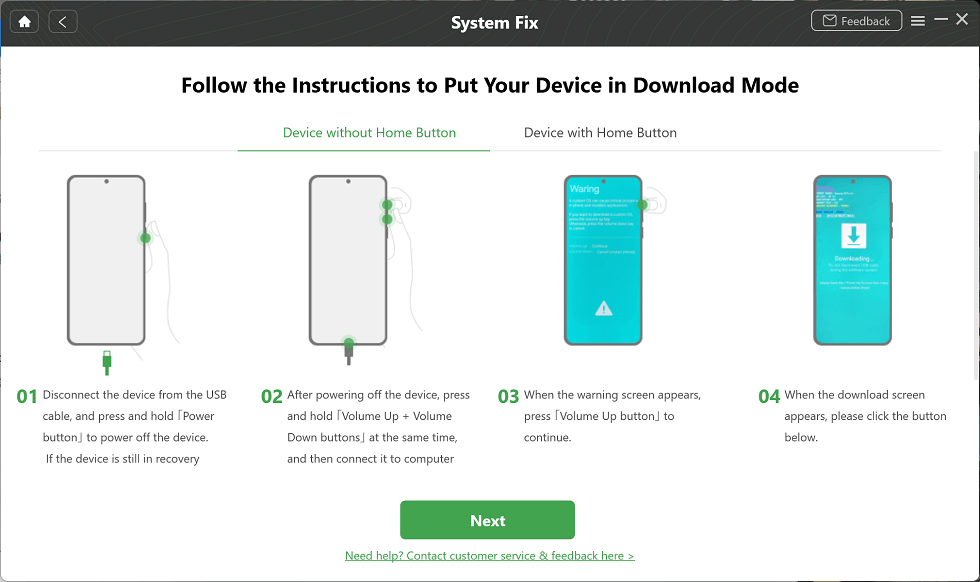
Put Samsung into Download Mode
Step 5. Once finished, it will automatically start repairing your Android system. After completing the repair process, you will get system fixed successfully page as below. All the system issues fixed and your Android device will be restarted.
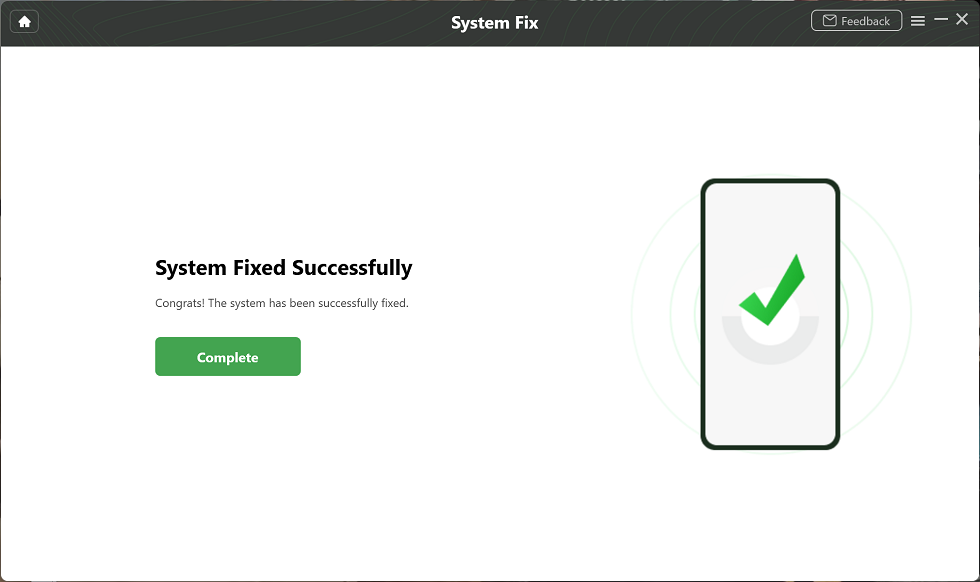
Completing the Repair Process
4. Change from DHCP to Static
- On your Android device, go to Settings > Wireless and Networks > Wi-Fi.
- Tap the Wi-Fi name you want to connect to, and a popping-up box will appear.
- Hit the Modify Network option or any related option depending on the model.
- Check the box beside Show advance options.
- Under the IP settings, change it from DHCP to Static. An IP Address field will appear below.
- Write down the information included in the static IP address fields then delete it from the device, re-enter it again, and save.
5. Restart the Router
If the problem is not on the phone, there may be a problem with the router. If you are unable to determine what the problem is, try to restart the router first, the problem may be solved.
- Turn off the wireless router. Wait a few minutes, and then turn on the router.
- Any device needs time to connect to the router. Then, connect your device and check if the connection is established.
6. Use WPS Push Button
WPS means Wi-Fi Protected Setup, which is a network security standard to create a secure wireless home network without entering your password.
- On an Android device, go to Settings > Wireless and Networks > Advance settings.
- There will be many different WPS options there depending on your model. Once you see the WPS connection or WPS Push Button, press it. Then a WPS setup will appear on the screen waiting for the configuration from the router.
- Go to your router and press the WPS button and wait for the connection to be successful on your android device.
Also Read: Where are Passwords Stored on Android Phone >
7. Change Security Protocol
If you know the username and password of your router, try to change the security protocol. If the security protocol is WPA2, change it to WPA and vice versa. Then, go to your Android device, use the Forget network feature mentioned above, and reconnect it to the Wi-Fi.
8. Check the Maximum Devices Supported
Some wireless modems can only support a certain amount of devices’ connection. Have a check through your manufacturer or service provider. And go to the wireless router settings and check what are the maximum devices there. Change that setting to a higher number and save the settings.
9. Update the Software on the Android Phone
Sometimes, if you do not update the operating system to the latest version in time, then some small bugs may appear on your Android phone, which may cause a certain function to not work normally. You can fix them by updating the software to the latest version. Following the steps below:
Find Settings on your phone > Scroll down and tap on Software update > Download updates manually.
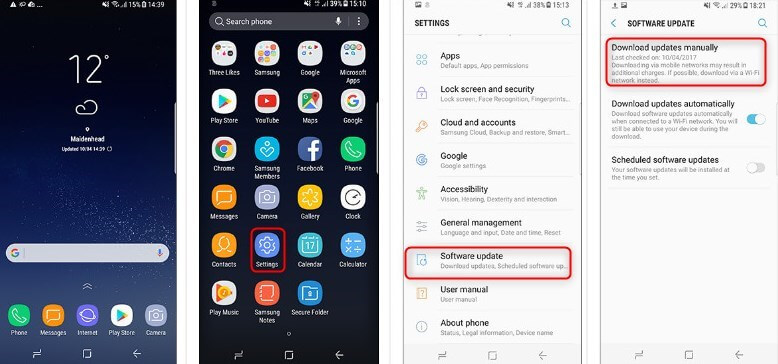
Update Software on Android Phone
You May Like: Fix Android Process System Isn’t Responding Error >
Bonus Tip. How to Transfer Files From Android to Andriod
If you want to transfer files between your Android devices, or between devices and computers, AnyDroid, an Android data manager, is your good helper, which enables you to achieve to move data from Android to Android phone without a Wi-Fi network. The 100% safety of your Android data as promised. No data leakage risks exist.
Free Download * 100% Clean & Safe
Step 1. Free download AnyDroid and launch it on your PC > Connect your two Android devices to the computer.
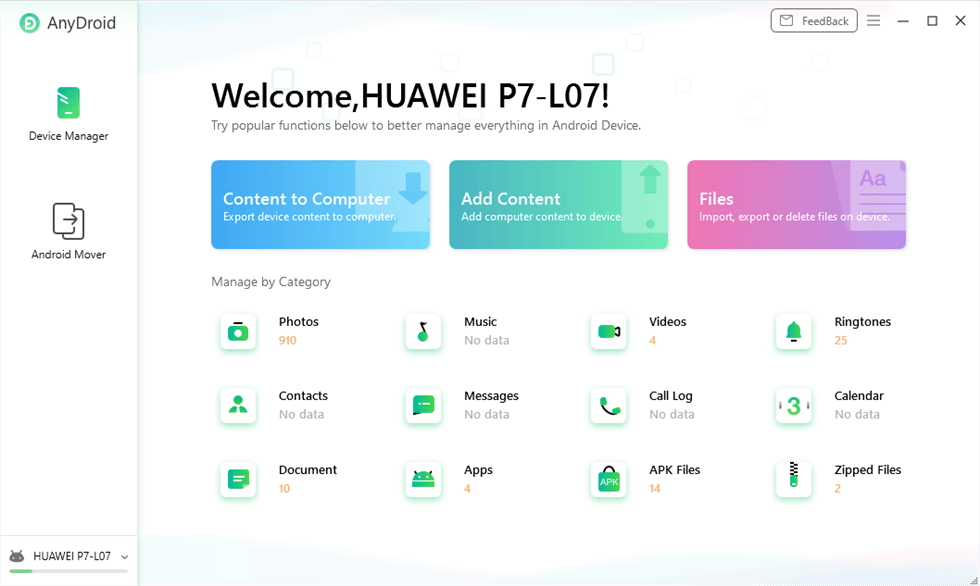
Connect Your Phone to Computer
Step 2. Tap on Android Mover at the left control panel and then choose the Android to Android option.
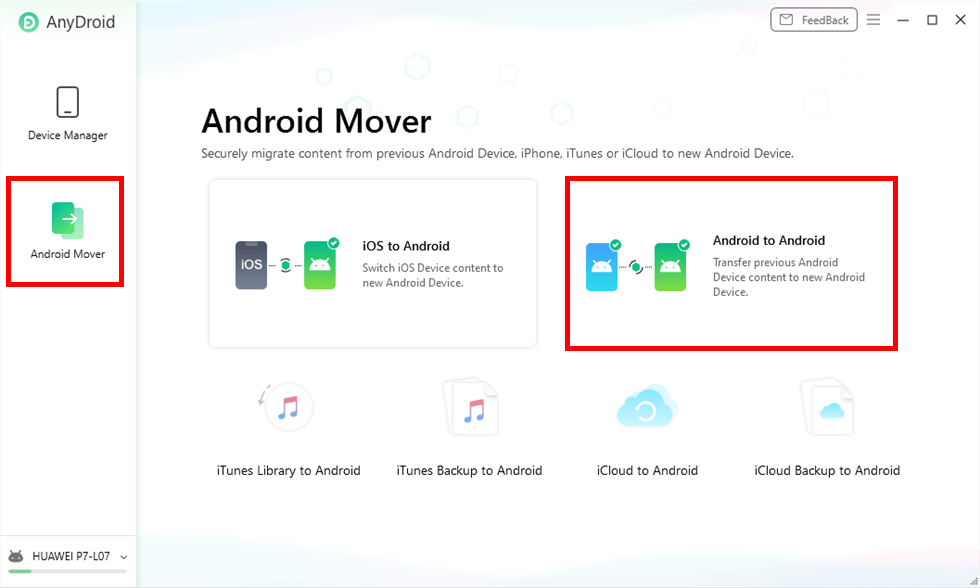
Choose Android to Android Mode
Step 3. Choose the types of data that you want to transfer and click on the Next button to start the transferring process.
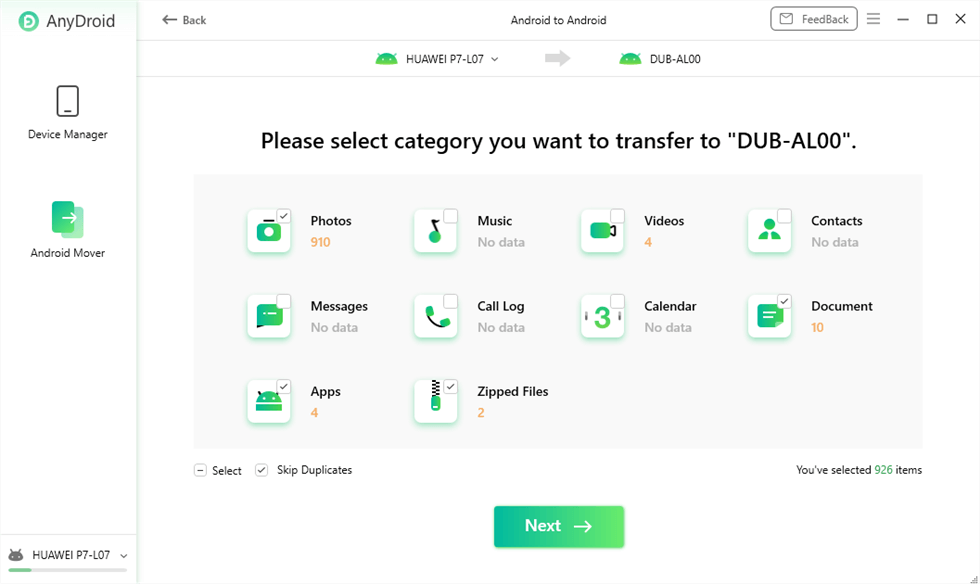
Select Data Types You Need
The Bottom Line
If you find any other useful solutions to solve the Android Wi-Fi authentication problem, welcome to share with us in the comments below. For better to fix the system problem of your Android devices, get DroidKit to have a try >
Free Download * 100% Clean & Safe
More Related Articles

Senior writer of the iMobie team as well as an Apple fan, love to help more users solve various types of iOS & Android-related issues.
Product-related questions? Contact Our Support Team to Get Quick Solution >
