How to Record on Spectrum With/Without DVR
This article explains how to record on Spectrum in 2025, with or without a DVR. It covers easy methods to record your favorite shows using a DVR and alternative ways to do it without one. Discover the choices you have to make the most out of your Spectrum service and guarantee you never miss a show.
Screenify – All-in-One Screen Recorder
Try Screenify for free to record screen on Windows or Mac. Whether full-screen or partial-screen recording, recording with sound or with camera, Screenify can do it with ease.
100% Clean & Safe
Can’t figure out how to record your favorite TV series on Spectrum? Spectrum offers many channels, but recording shows can be tricky if you don’t have a DVR or aren’t familiar with the process.
Thankfully, it also offers simple fixes for this issue. It’s still possible to record your preferred shows with and without a DVR. We will go through and understand how to use the Spectrum TV app, set up recording with a DVR, and present you with another impeccable screen recording tool, Screenify. By following these steps, you can ensure you never miss a show again. So, let’s begin to learn how to record on Spectrum!
Part 1: How to Record on Spectrum TV with DVR
Are you wondering if the Spectrum TV app allows you to record shows? Yes, you can because Cloud DVR is a helpful function that Spectrum TV has featured. Using the Cloud DVR service app, it is easy to record and save your favorite programs. Recording a single episode or the entire series is relatively easy with Spectrum.
In addition, Cloud DVR allows you to schedule recordings at a specific time for programs you wish to watch, so you don’t always need to tune in on time. Thereby, the Spectrum TV app makes it convenient and straightforward to record your favorite shows. The entire procedure for recording on Spectrum TV is as follows:
Step 1. Access your Spectrum account. Using the DVR settings, you can begin recording while watching live TV on Spectrum. Choose whether to record the complete series or just a single episode.
Note: If you’re watching a program for about 30 minutes and the Time Shift Buffer has previous 30 minutes saved, it will also become the part of recording.
Step 2. Choose your recording option:
- To schedule a recording: Find the show you want to record, go to its information page, and select “Record.” Then, set the start and stop time for scheduling.
- To record a series: Search for the series you want. On its information page, select “Record Series.” Choose to record all or just new episodes, and set the start and end times. Click “Confirm” or “Record.”
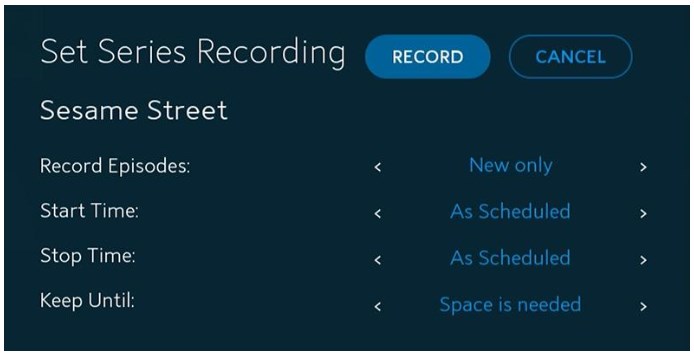
To record a series
Step 3. Once recorded, you can watch or delete your recordings. To watch, go to “DVR” > “My Recordings” and press “Play” on the show you want to watch. To free up space, click “Delete Recording” if you no longer need it.
Part 2: How to Record Shows on Spectrum Without DVR
Recording shows on Spectrum without a DVR is still possible with a few simple steps. Let’s explore the options available to help you save your favorite programs.
1. Using Screenify
Are you struggling with recording limits or low quality when using Spectrum’s Cloud DVR? It’s not only you; many customers find the DVR’s limitations inconvenient. Several customers complain about poor recording quality, limited functionality, and a short recording time.
Screenify—an all-in-one screen recorder—is what you need! This software allows you to record your screen without being limited by traditional DVR methods. Screenify lets you record high-quality visuals in 4K resolution at 60 FPS. Enjoy your favorite TV shows, movies, and more from the Spectrum without compromising quality.
Additionally, you can record audio notes in real time and even set up unique watermarks. Whether you need to record shows or other on-screen activities, Screenify provides a flexible and high-quality alternative, giving you a seamless and unlimited recording experience.
Key Features and Advantages
- Capture as much content as you need without any time limits.
- Record in 4K resolution at 60fps for precise and smooth videos.
- Choose to record full screens, specific windows, or selected areas.
- Record audio from your mic and include webcam footage for a complete recording experience.
- Add notes or highlights while recording to emphasize key points.
Now, let’s explore the simple steps to use this tool for recording:
Step 1. Begin by downloading and installing Screenify on your computer.
Free Download * 100% Clean & Safe
Step 2. Launch Screenify and select the “Record screen” option.
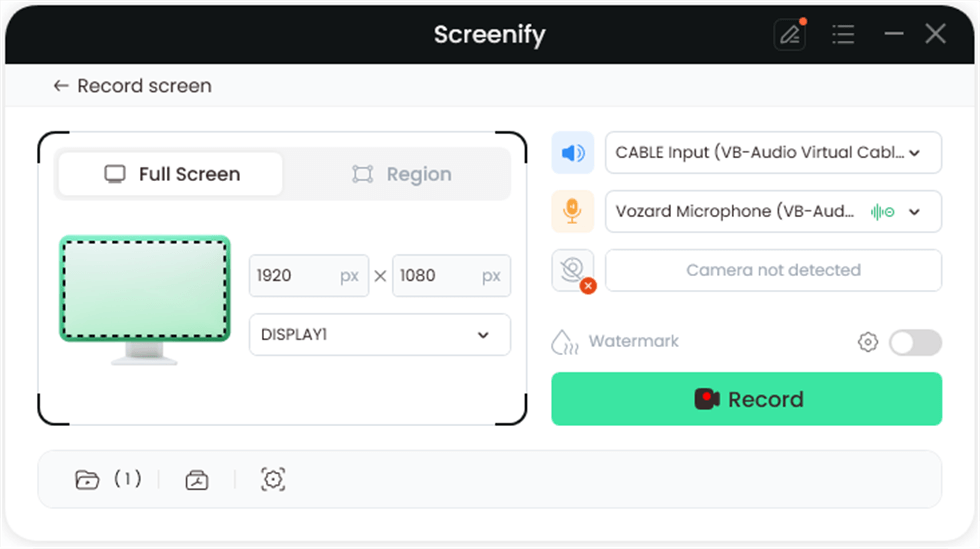
Select Record Screen Mode
Step 3. Set up your recording preferences, including system audio, before you start.
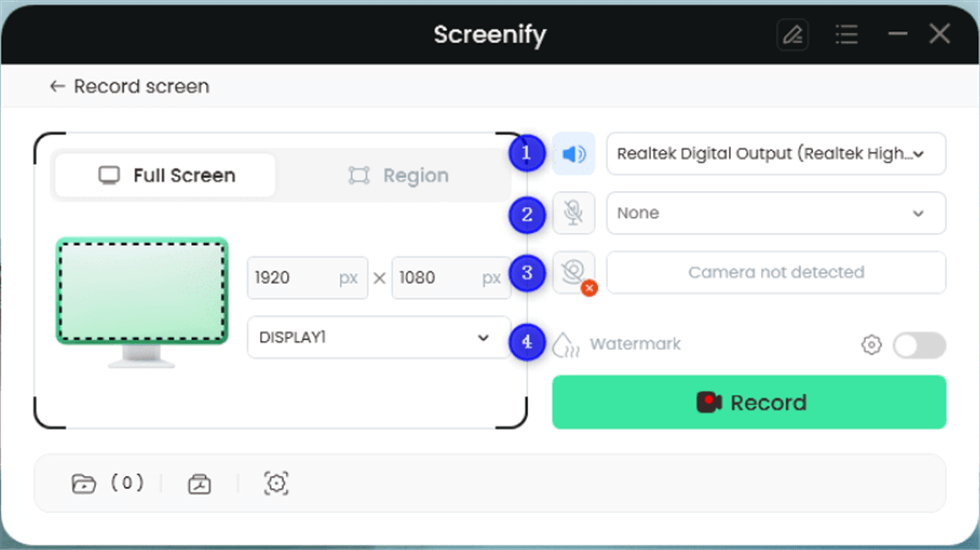
Record Setting
In this setting menu, you can:
1 Choose the System audio.
2 Choose the Microphone you want to record.
3 Choose the Camera you want to use.
4 Choose whether to add a watermark.
Step 4. Choose the recording area. Click “Full Screen” for a complete screen capture, or manually select a specific region. After that, click “Record.” You can adjust the selection to match social media sizes if needed.
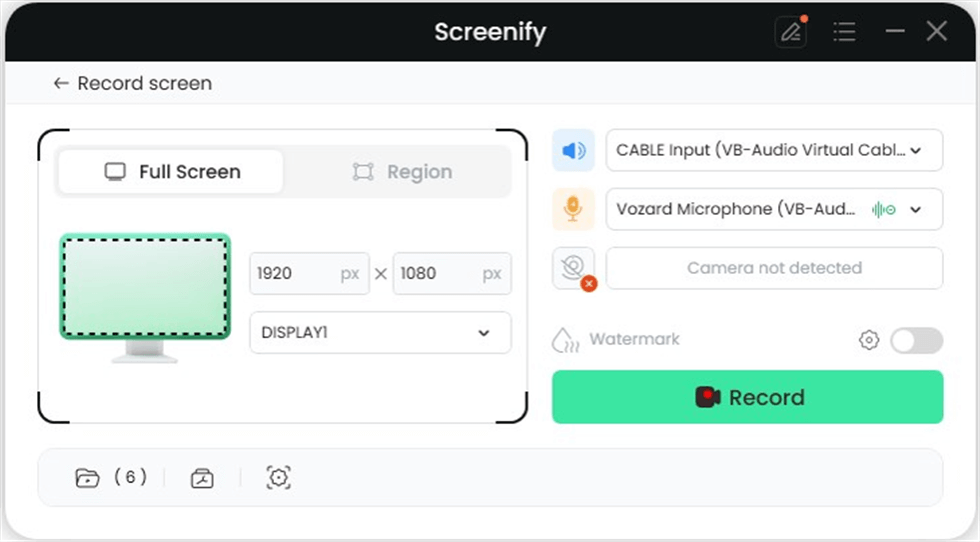
Full Screen
Step 5. Wait for the 3-second countdown to prepare for recording.
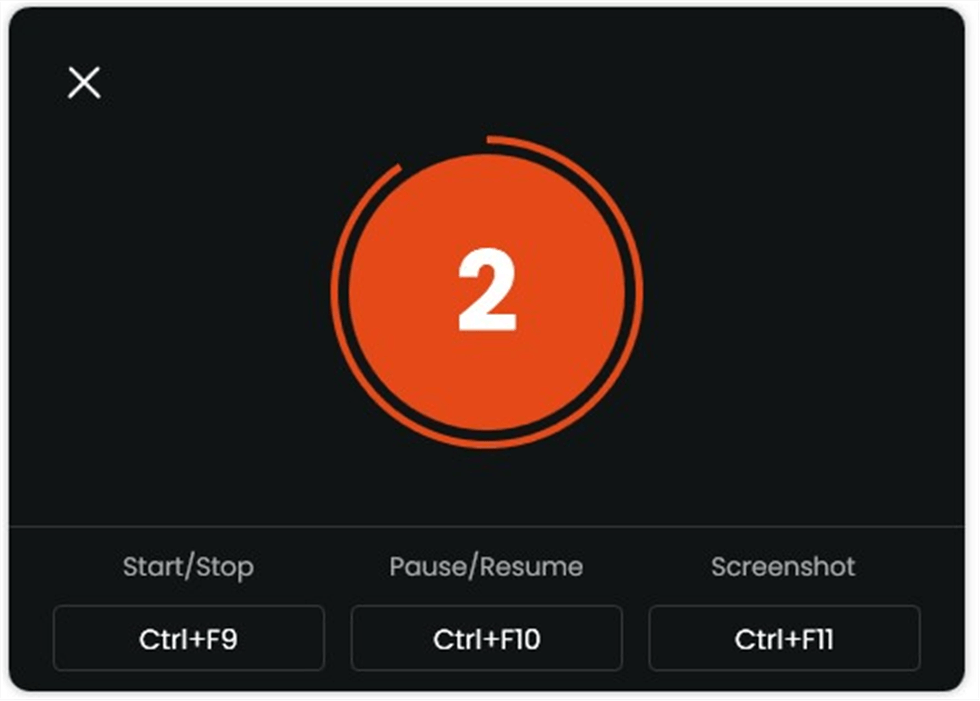
Start recording countdown
Step 6. Recording will begin after the countdown. You can add annotations during the recording if you like.
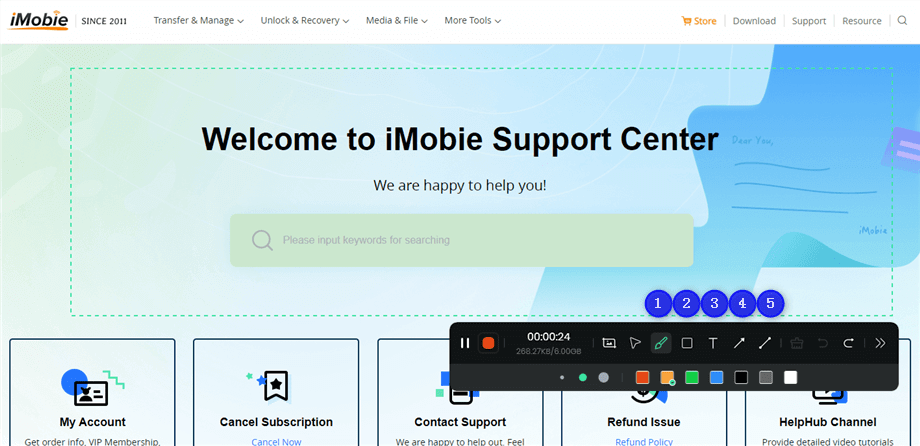
Annotate the Screen during Recording
With the toolbar, you can add the annotation in the screen:
1 Brush: Draw freehand on the screen recording interface to highlight or illustrate specific areas during the recording.
2 Rectangle: Draw rectangular shapes on the screen recording interface.
3 Text: Add written notes or labels directly onto the screen recording interface.
4 Arrow: Draw arrows on the screen recording interface to point out and emphasize specific areas.
5 Line: Draw straight lines on the screen recording interface to underline or connect specific points.
Step 7. Click the red “Stop” button to end the recording. You can then preview and manage your saved videos.
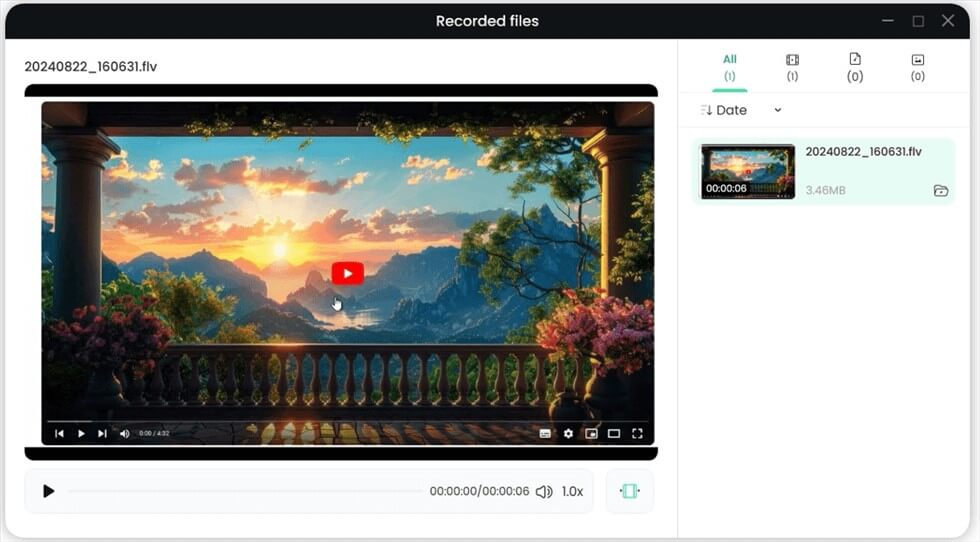
Record Screen Process Completed
2. Using OBS Studio
OBS Studio can be used as a DVR alternative. It lets you capture high-quality TV shows directly from your screen. After setting up OBS to record shows, you need to stream them in the Spectrum app or your web browser to keep them without disruptions.
You can record with OBS Studio in various ways, including full screen, in a single window, or even on a tab within your browser. The software allows you to select which audio sources to capture and alter a significant number of other parameters to refine the features of the recordings. OBS also makes it easier to share your recordings by supporting a wide range of video formats.
Key Features
- Customizable controls, transitions, hotkeys, and pre-set filters add convenience while recording on Spectrum.
- The scene selection allows for easy switching between scenes to eliminate lags.
- OBS has an intuitive interface and multiple advanced-level functionalities to improve movie recording quality.
The easy steps to utilize OBS Studio are as follows:
Step 1. Open OBS Studio. Select “Sources,” then the “+” icon. Pick “Display Capture” for the Spectrum TV app or “Browser” for the website.
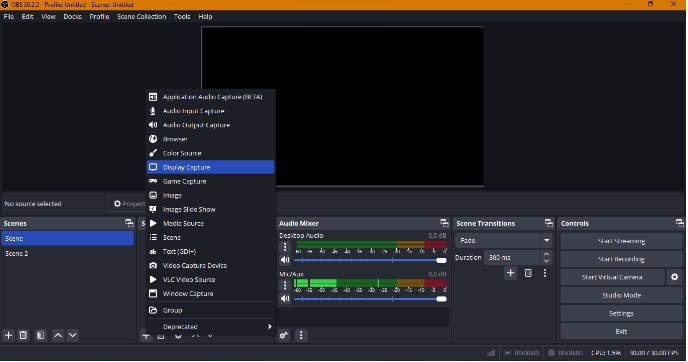
Open OBS Studio
- For Display Capture: Name your project, select the Spectrum TV app from the drop-down menu, and click “OK.”
- For Browser: Name your project, copy the URL of the Spectrum TV show, paste it into the highlighted box, and click “OK.”
Step 2. Set up your recording audio by going to “Audio Mixer” and adjusting the settings. Then click “Start Recording.”
Step 3. To stop recording, click the small “Pause” icon to pause temporarily or the “Stop Recording” button to finish and save your video.
While you are recording with Spectrum, you may also be interested in how to record screen content on other devices. For example, this article How to screen record on ThinkPad will teach you how to screen record on ThinkPad, helping you better record what you need.
If you are recording a video tutorial, you may consider using a professional tool. We recommend reading Screen recorder for tutorials to learn which tools are best for making high-quality tutorials.
For those who want to record the screen on Instagram, it is important to understand whether a notification will be triggered. Please check out this article Instagram screen record notification to avoid unnecessary misunderstandings.
Part 3: Bonus: How Do I Get Spectrum Cloud DVR
Spectrum provides Cloud DVR and Cloud DVR Plus services for users using the Spectrum TV App. Videos are safely saved and accessible online through the app. The Spectrum TV App lets you watch your recorded shows whenever you want. Plus, you can access your recordings from a computer, tablet, or smartphone. Starting with Spectrum Cloud DVR is simple. Here’s how:
Step 1. Log in to Spectrum’s website to access your account dashboard.
Step 2. In your account dashboard, find the option to modify or add services. Look for Cloud DVR and choose to add it to your current Spectrum plan.
Step 3. After adding Cloud DVR, follow the on-screen steps to set it up. You’ll then be able to start recording your favorite shows and watch them whenever you want.
Part 4: How to Record on Spectrum With/Without DVR Faqs
1. Can You Record a Show on Spectrum TV?
Yes, you can record shows on Spectrum TV. Use the Cloud DVR feature to capture live TV and save your favorite programs for later viewing using the Spectrum TV app or your DVR device.
2. Why Can’t I Record Series on Spectrum?
You probably ran out of space in your DVR if you can’t record new episodes. Look in your storage and clean any old recordings to create space for new ones if that is what the app requires.
3. Why Can’t You Record with Spectrum Cloud DVR?
It might be due to a technical issue or a problem with your subscription. Ensure your Cloud DVR is appropriately set up and your plan includes recording features.
4. How Can I Schedule a Spectrum Series Recording?
The program requires you to press the ‘DVR’ button on the remote to schedule a series recording. To set a recording for a program, use the arrow buttons to choose the “Scheduled” option and press “OK.” Select the series you want to record and press “OK” again.
Part 5: Conclusion
In conclusion, recording your favorite shows on Spectrum can be easily managed with the right tools. While DVR offers basic recording options, it has limitations such as storage issues and restricted features. We suggest using Screenify— a 4K screen recorder for Windows and Mac with no watermarks and no time limits. It offers an intuitive interface and exceptional recording quality. Thanks to this beneficial and straightforward tool, you can record in 4K on Mac and Windows.
Free Download * 100% Clean & Safe
How to Manage Video Easily
Toplists
- All the Details about Screen Record on iPhone 13 [2025 Updated]
- Best Ways to Record Anything on YouTube TV
- Top 7 Screen Recorders for 1080p Resolution
- Top 9 Audio Recording Software Tools for Mac and Windows
- [Reviews] 7 Best Screen Recorders for Mac
- Top 9 Screen Recorder with Facecam and Audio
- What App Do YouTubers Use to Record Audio
- Best Screen Recorder for Chromebook
- 2025 Best Screen Recorder for Low End PC Review
- 11 Best Screen Recorders for PC with Audio
- Screen Recorder No Watermark: Top 10 Picks [2025 Updated]
- 7 Best Screen Recorders for Windows
- Ways to Fix Screen Recording No Sound on Top Platforms
- All Things to Know About What is Screen Recording
How-to Guide
- How to Play MOV Files on Windows PC
- How to Record Discord Audio on PC or Phone
- How to Record Google Meet on Computer or Phone [Solved]
- Full Guide on How to Record YouTube Videos [PC & Phone]
- How to Record Zoom Meeting without Permisson [Windows/Mac/Phone]
- How to Screenshot Video on PC/iPhone/Android
- How to Stop Screen Record on Mac
- 5 Ways to Record Audio on Mac
- How to Record FaceTime Call with Audio on Mac/iPhone/Android
- How to Record Screen on Mac with Internal Audio
- 4 Ways to Record on Snapchat without Holding the Button
- How to Record Streaming Video on PC
- How to Screen Record on Chromebook
- 10 Ways to Screen Record on HP Laptop
- 3 Easy Ways to Screen Record on Windows with Audio
- How to Screenshot on Samsung Laptop Easily
- How to Stream Netflix on Discord
- How to Record Screen Using VLC
Product-related questions? Contact Our Support Team to Get Quick Solution >

