How to Fix Google Photos Not Showing All Photos
If you’re stuck in google photos not showing all photos problem, luckily, you can get 9 ways to solve this issue. Moreover, you can get an extra tip to recover those photos disappeared from Google Photos.
Common Android Issues
Android Screen Issues
Android Connect Issues
Android App Issues
It’s without a doubt that Google Photos is one of the best cloud storage facilities for storing photos on the net. This platform acts as an alternative for your Android gallery. Google Photos provides enough space to export your desired images for future reference. It’s a simple platform, reliable and trustworthy. Thus, users don’t have to worry about security issues.
Getting your photos on Google Photos is pretty straightforward. However, recently, there have been reports of Google Photos not showing all images. Does that sound familiar? If so, and you need a solution, we are here to help you.
Here, we will share a troubleshooting guide with official solutions to fix Google Photos not showing all photo issues. Without delay, let’s get started!
Part 1. Why Google Photos Not Showing All Photos
Google Photos won’t show all photos for several reasons, however, here are the prominent ones:
- Large Cache: For every time you download a photo from Google Photos, a small sized cache memory is created. With time, the cache memory gets bigger and that might cause Google Photos to misbehave. It causes the cloud storage service to display Google Photos not showing photos issues.
- Disabled Automatic Syncing: As one of the requirements, the auto sync feature must be enabled for Google Photos to function properly. Should you disable this feature, you may experience Google Photos not showing all photos problems.
- Poor Data Connection: Here is another common reason why Google Photos won’t show your entire photos. Google Photos depends solely on data connection for it to fetch image data files stored on its system. A poor internet connection slows down the speed which affects Google Photos.
Part 2. How to Fix Google Photos App Not Showing All Photos?
With the 9 official solutions provided below, you can fix Google Photos app not showing all photos issues effortlessly:
1. Keep a Stable Internet Connection
As we all know, the internet is crucial for Google Photos to function properly. Connecting your mobile or computer system to a stable data network would help Google Photos fetch all the photo data stored on its server. We recommend that you use a stable WiFi connection or mobile data.
2. Clear Cache
Since the cache is one of the problems causing Google Photos to misbehave, clearing it often would help resolve the issues.
To clear the cache on Google Photos, apply the instructions below:
- Launch Settings and select Apps on the screen that pops up.
- Next, click on Manage Apps.
- Now tap on Google Photos to open it.
- Once done, a new interface labeled App info will appear on your screen.
- Select Storage and click on Clear data to wipe caches.
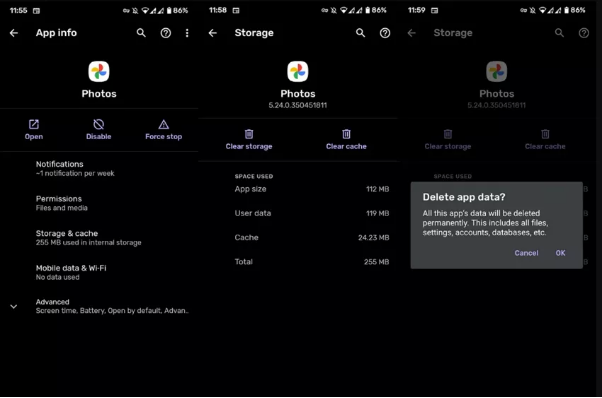
Clear Google Photos Cache
3. Enable Backup and Sync Option
If you have the backup and sync options disabled for Google Photos, you cannot access the whole photos on the server. A simple technique to resolve this is- enabling backup and sync options. Once done, you can view all the photos on Google Photos without stress.
Enable backup and sync options by following the steps below:
- Open Google Photos and click on the Profile icon at the top right corner of your screen.
- A couple of buttons will come up. Choose Google Photos Settings.
- Now tap on Backup & sync.
- Drag the slider next to Backup & sync right to enable the feature.
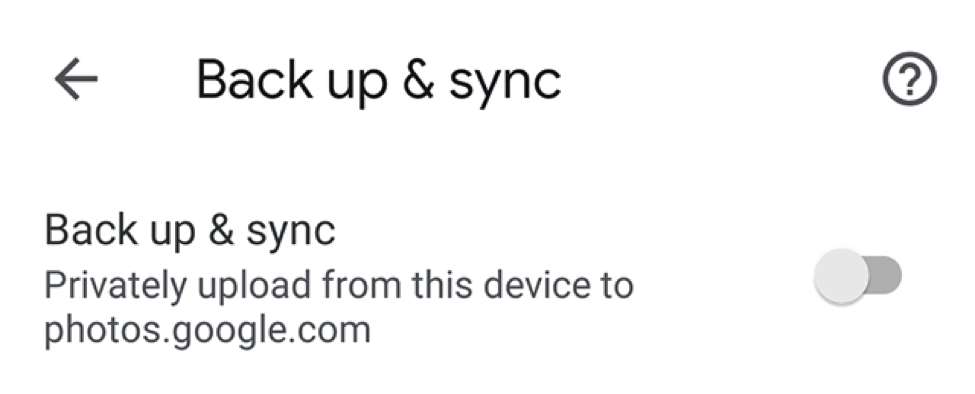
Turn on the Sync Option in Google Photos
4. Make Sure that You Have Enabled the Folders to Upload
Here is a simple guide to doing that:
- Launch Google Photos on your mobile device.
- Click on your profile icon at the top right corner of your screen, and the response page below will appear:
- Select Google Photos Settings, and select Backup and sync on the next screen that pops up.
- Head to where you have Backup Device Folders and click on it to proceed.
- Locate the folder holding all of your photos and toggle the icon next to it right to enable it.
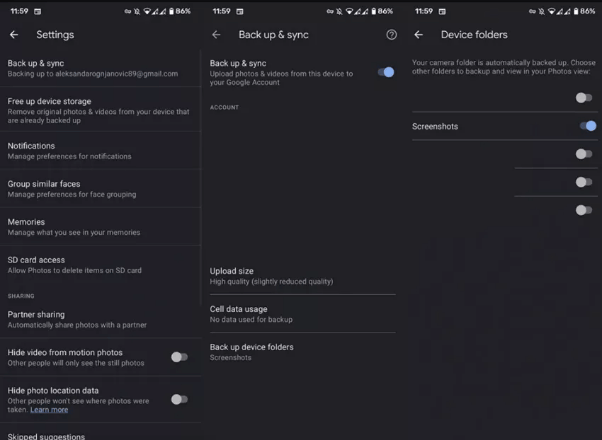
Make Sure that You Have Enabled the Folders to Upload
5. Check the Archive and Trash Folder of Google Photos App
Sometimes Google Photos images are accidentally moved to archive and trash folders. A quick check on these folders can fix the Google Photos not showing all photos issues you are currently experiencing.
Here is the simple procedure to check the archive folder on Google Photos:
- Locate and click on the Google Photos app on your device.
- Next, select Library at the bottom right corner of your screen, and the interface below will show:
- Now click on Archive to check your image files.
If after checking the archive the issue persists, follow the stepwise guide below to check the trash folder:
- Open Google Photos and click on the Library
- On the next screen, tap on Bin and source for the unseen photos.
6. Enable SD Card Access
Have you granted Google Photos access to your SD Card? If not, there is a possibility you won’t find your entire photos on the cloud storage facility. A simple way to fix such an issue is granting Google Photos permission to access the SD Card.
The procedure involved is quite simple. Follow the instructions below:
- On the Google Photos page, click on your Profile name and the interface below will show:
- Select Google Photos Settings from the options that appear and click on SD Card
- Once done, follow the on-screen instructions to grant Google Photos permission to access your SD Card.
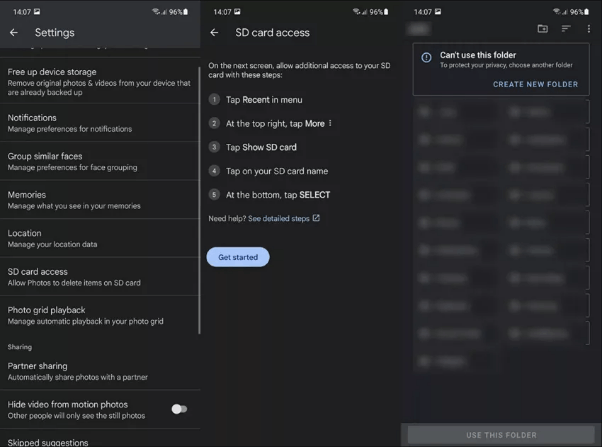
Enable SD Card Access
7. Manually Upload Photos to Google Photos
Uploading photos manually to Google Photos is another helpful solution you can use to fix Google Photos not showing all images. Here is a simple guide you could apply to resolve the issue on your mobile device:
- Head to the official website for Google Photos, and sign in your account.
- Once Google Photos opens, locate the Upload (an upward arrow with horizontal bracket) icon at the top right corner of your screen and click on it.
- Next, select where you want to upload photos from. Kindly choose Phone to proceed.
- Choose the upload size and select the image quality. Once done, follow the corresponding instructions to add the images manually on Google Photos.
8. Reinstall or Update Google Photos App
Google updates it’s apps, including Google Photos, frequently to clear the software bugs and temporal glitches that are affecting the previous version. So you must update related apps on your device.
To update the Google Photos app, launch the Google Play Store or App Store on your device, and enter Google Photos in the search field. Hit the Enter button to proceed. Once done, a new screen with the Google Photos app will come up. Click on the corresponding icon to download and install it.
9. Try Web Version
This is the last solution to fix Google Photos not showing all photo issues on our list. The solution recommends that you access Google Photos via the website instead of using the app.
Part 3. How to Find Missing Photos on Android Phone
If you still cannot find the photos that are not displayed by the above methods, then they are probably missing. In this case, you may be wondering how to get those disappeared photos back.
DroidKit is exactly what you are looking for in 2022. With DroidKit, you can easily find, preview, and recover deleted photos from your Android phone. Not only the photos in Google Photos, but also any deleted or lost photos on your Android phone can be retrieved through DroidKit.
- Recover up to 13 types of data from Android phones including photos, messages, contacts, phone numbers, apps, WhatsApp messages, etc.
- Quick Recovery mode – quickly scan and find the deleted photos from the Android phone without root.
- Deep Recovery mode – recover lost photos from your Android gallery with the highest-ever success rate.
- Preview and select the lost data you want to recover as you need.
Now, install the latest version of DroidKit and check its main features on Android data recovery.
Free Download* 100% Clean & Safe
Step 1. Launch DroidKit on your computer and connect with your Android Phone. Choose Quick Recovery from Device.
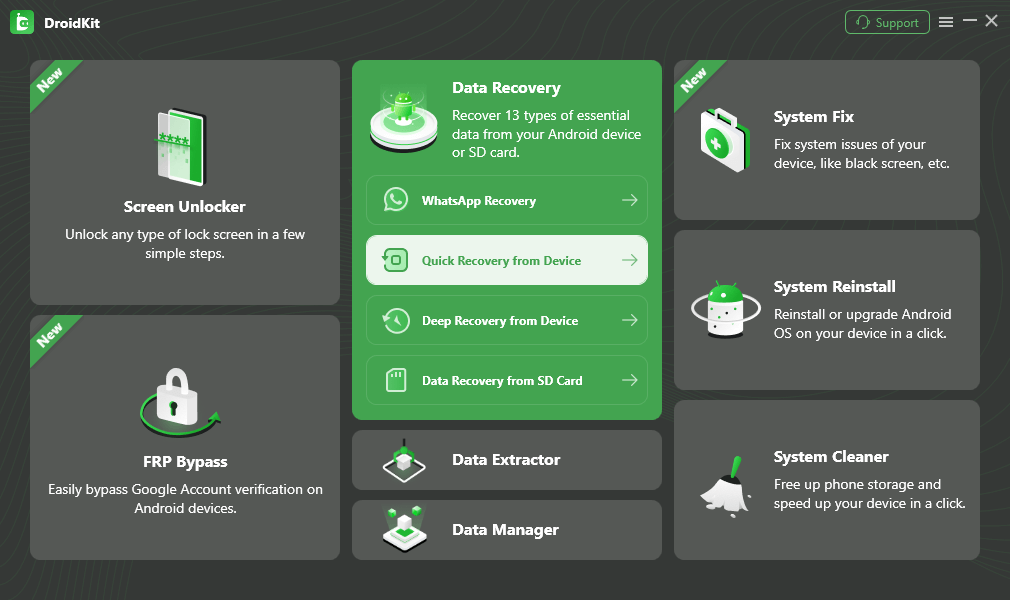
Choose Quick Recovery from Device
Step 2. Select Data to scan deeply from your Android phone, here you can choose Photos only or all types of data.
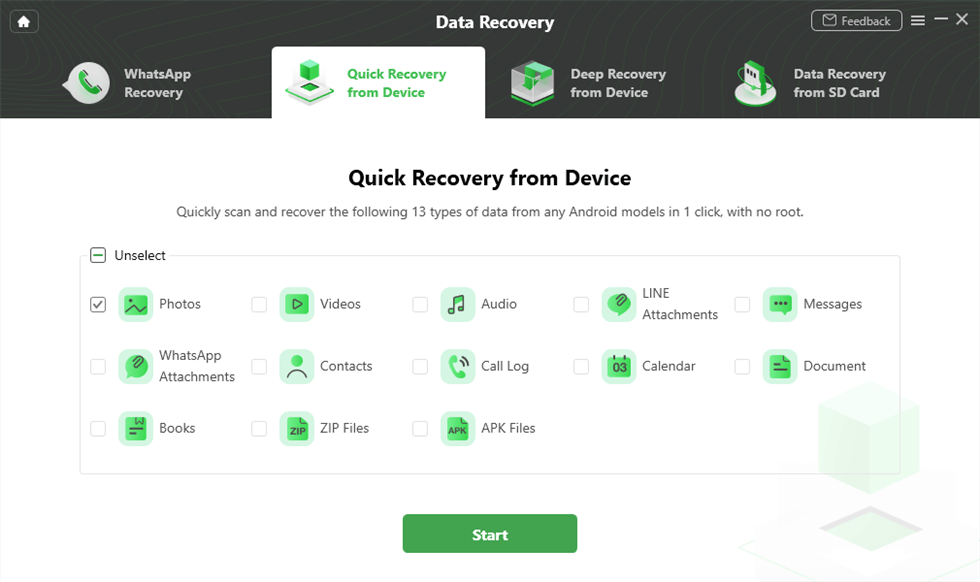
Select and Scan Photos
Step 3. Make sure you’ve connected your Android phone, and click Start afterward. Then DroidKit will start to scan the deleted photos on your Android device. When the scanning completes, you will see the deleted photos on your Android phone. You can either select photos to recover To Device or To PC.
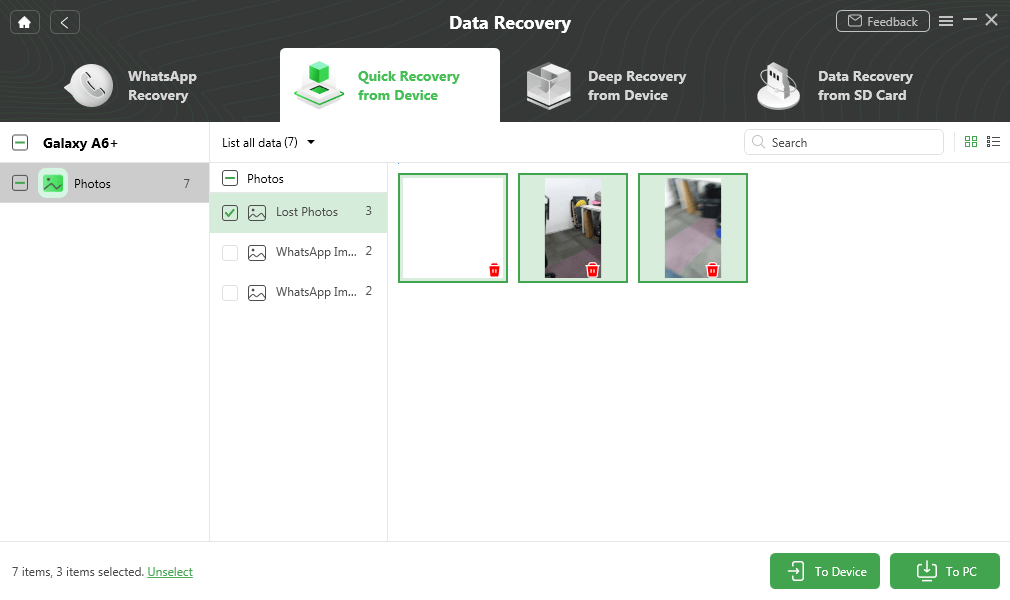
Select Deleted Photos to Recover
Conclusion
Now that you have our troubleshooting guide to fix Google Photos not showing all photos, kindly select one and apply. You can apply all if one isn’t yielding results. All solutions provided are cost-free and simple to implement. You don’t have to visit an Engineer to help you fix Google Photos not showing all image issues. You can always fix it yourself. Try the solutions out now!
More Related Articles

Senior writer of the iMobie team as well as an Apple fan, love to help more users solve various types of iOS & Android-related issues.
Product-related questions? Contact Our Support Team to Get Quick Solution >
