How to Fix “iPhone is disabled. Connect to iTunes” Issue?
What to do if your iPhone is locked and asked to connect to iTunes? In this post, we will explain what does connect to iTunes mean and accordingly offer 5 proven ways to unlock your iPhone no matter you can connect to iTunes or not.
iPhone Hardware Issues
Common Hardware Issues
When your iPhone is locked or disabled and says connect to iTunes, you should take some special measures to unlock your iOS device instead of continuing to enter the wrong passcode. Or there are times that your iPhone does not enable you to do anything except an emergency call. It is such a normal problem for iPhone users that don’t feel upset when you are stuck in the dilemma.
You have come to the right place if you encountered the same issue. In this post, we will explain why your iPhone is locked or disabled and say connect to iTunes. Accordingly, we will demonstrate several solutions to help you unlock your iPhone, no matter you connect or not connect to iTunes.
iPhone is Locked/Disabled
What Does Connect to iTunes Mean?
Before you learn how to fix the “iPhone locked connect to iTunes” error, it’s good to know what it exactly means.
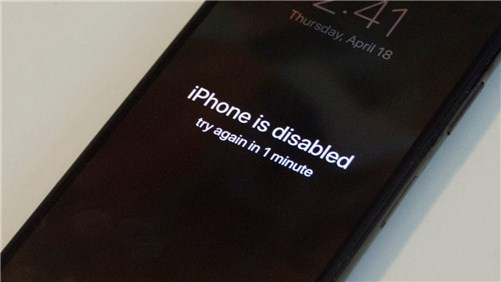
First of all, the “iPhone is locked/disabled. Connect to iTunes” error isn’t like other errors you face on your iPhone. It occurs due to several unsuccessful attempts to unlock the device.
Secondly, “iPhone is disabled connect to iTunes” is a serious error as it can result in data loss. It means that you’ve entered the wrong passcode at least 6 times in a row already. Unless you enter the right passcode on the next try, you’ll be locked out of your device and the device disabled for 5 minutes. So, as you can see that the iPhone doesn’t get locked on the first or second unsuccessful attempt. Here’s a quick summary of how many times you can enter the wrong passcode before your device is locked or disabled:
- 1-5 wrong passcode attempts – no issue.
- 6 wrong attempts – iPhone disabled for 1 minute.
- 7 wrong attempts – iPhone disabled for 5 minutes.
- 8 wrong attempts – iPhone disabled for 15 minutes.
- 9 wrong attempts – iPhone disabled for 60 minutes.
- 10 wrong attempts – iPhone is disabled/locked and you should connect to iTunes.
Connect to iTunes means iPhone will be completely erased if “Erase Data” is enabled. And you may want to know what to do when iPhone is locked and says connect to iTunes? The good news is that there are several solutions available to help you fix iPhone Locked and Connect to iTunes problem. In order to access the device again, you need to erase the iOS device and then, restore it. So, let’s take a look at the all possible methods you can try.
How to Unlock Your iPhone When It Says Connect to iTunes?
Those who don’t want to use any third-party software to fix a locked iPhone problem can use the traditional method, instead. You can erase your iPhone using iTunes and then, simply restore the device either from an iTunes backup or iCloud backup.
Firstly, if you’ve synced your iPhone using iTunes in the past, then iTunes is recommended for you. Make sure that you’ve installed the latest version of iTunes on your computer before you move further. Then here’s how to fix the iPhone locked problem using iTunes.
Step 1. Connect your iPhone to the computer with the help of a USB cable. Then, run iTunes if it doesn’t open automatically.
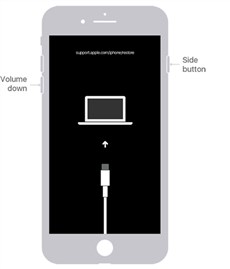
Step 2. Put your iPhone into recovery mode. Depending on the iPhone model, the steps to enter the recovery mode will be different. Please refer to the following steps to set your device to recovery mode according to your iPhone model.
On iPhone 8 or above
- Press and release the Volume Up button quickly and follow the same with the Volume Down button.
- Press and hold down the Top button until the device restarts.
- Keep holding the Top button until the device enters the recovery mode.
On iPhone 7/7 Plus
- Press and hold down the Top/Side button and Volume Down button at the same time.
- Continue holding them until the device enters the recovery mode.
iPhone 7 and iPhone 7 Plus
On iPhone 6s or earlier
- Press and hold down the Top/Side button and Home button at the same time.
- Continue holding them until the device enters the recovery mode.
Step 3. Click on your device icon located at the top-left side of your screen to open the device’s information.
Step 4. Navigate to the “Summary” tab and then, click on the “Restore iPhone”.
Step 5. Follow the on-screen instructions to completely wipe out your device data and that’s why make sure that you have a recent backup, either in iCloud or iTunes.
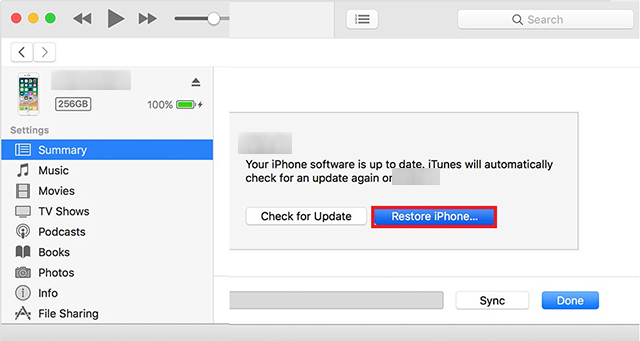
Restore iPhone Through iTunes
Once the device has been restored, your device will start up like new. Follow the instructions to set up your device. When you reach the restore screen, use the most recent backup available.
How to Unlock a Disabled iPhone That Won’t Connect to iTunes?
Sometimes, unlocking a disabled iPhone can not be achieved by simply connecting to iTunes. If you are the one whose iPhone is disabled and won’t connect to iTunes, you should take the following measures to unlock your iPhone.
Way 1. Unlock Disabled iPhone in Simple Clicks
AnyUnlock is a powerful iPhone password unlocker, which allows you to easily unlock your locked or disabled iPhone. You can use AnyUnlock’s iPhone Screen Unlocker feature to fix the “iPhone locked connect to iTunes” or “iPhone is disabled connect to iTunes” issue with simple clicks. Also, as a multifunctional iPhone password unlocker, AnyUnlock can help you remove Apple ID, recover iTunes backup password, and bypass MDM restrictions. Now, install the latest version of AnyUnlock and take the following steps to unlock your iPhone. Before that, you are encouraged to check whether you have backed up your iPhone, or you may need to back up your disabled iPhone to avoid data loss.
Free Download * 100% Clean & Safe
Step 1. Launch the app when it is fully installed on your computer. On the main screen, click on the option that says Unlock Screen Passcode.
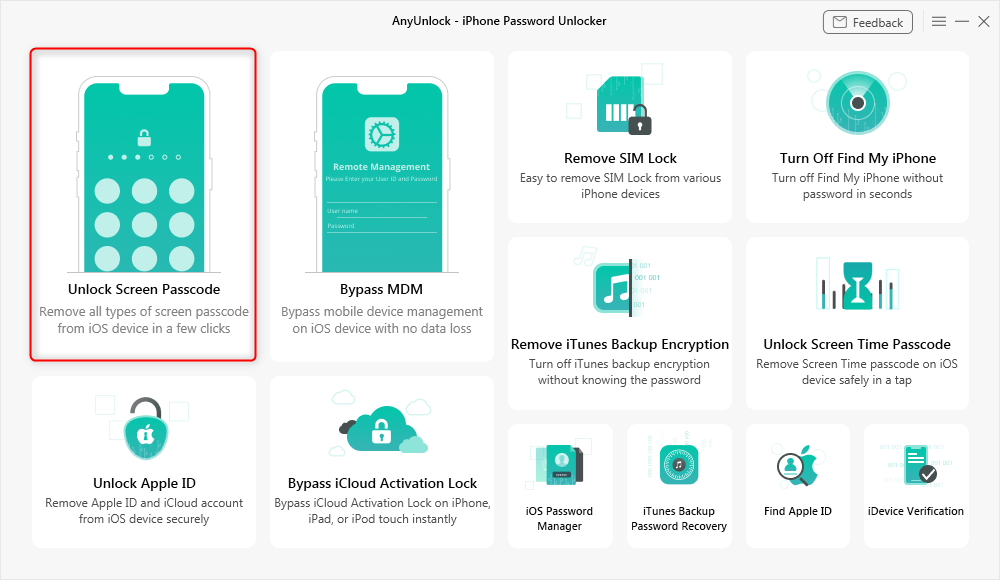
Choose Unlock Screen Passcode
Step 2. Click Start Now and hit the Download button to download the firmware for your iPhone model.
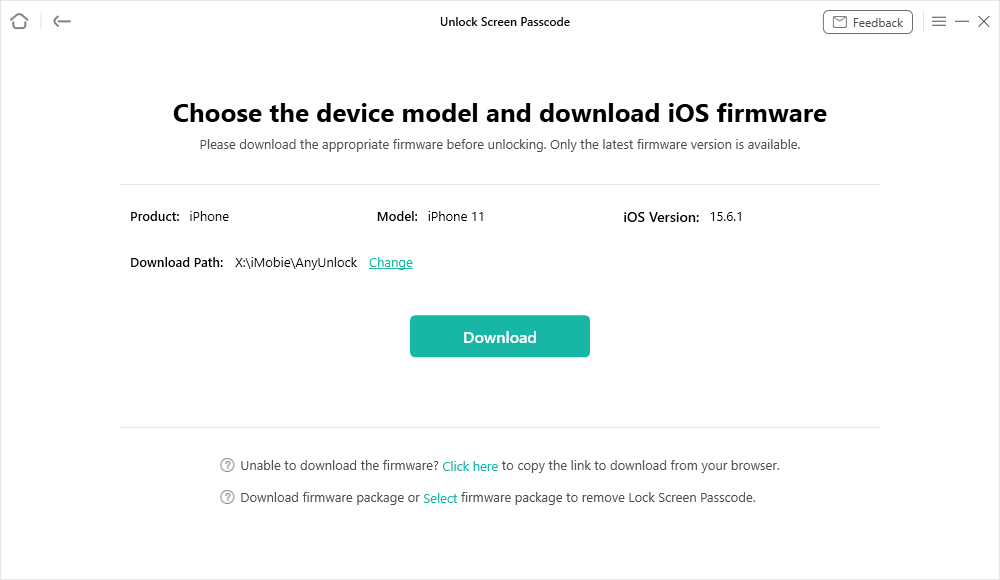
Get a Matching Firmware
Step 3. When the firmware is downloaded, click on the Unlock Now button to start unlocking your iPhone. You should be able to see the live progress on your screen.
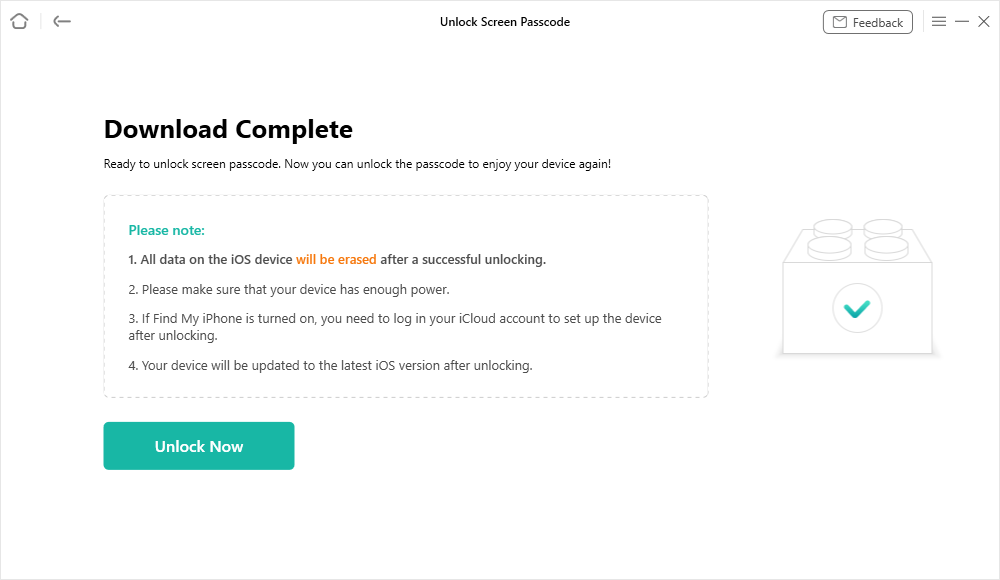
Tap on Unlock Now
Step 4. The following message will appear when the passcode is removed successfully from your iPhone.
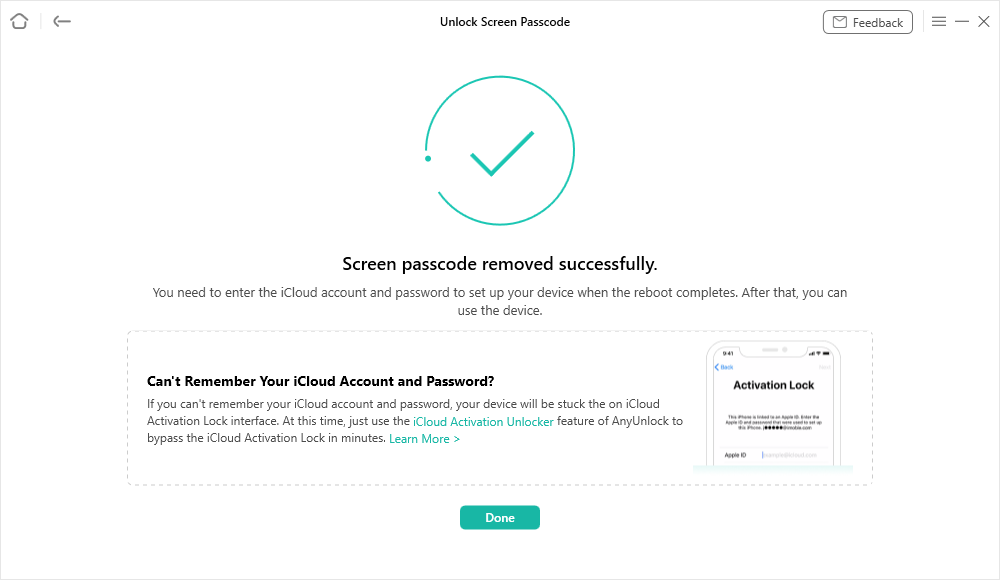
Screen Passcode Removed Successfully
Way 2. Unlock Disabled iPhone with iCloud
You should use iCloud only if you’re logged into your iCloud account and have the “Find My iPhone” feature turned on. Otherwise, this method is not workable for you. Therefore, if you meet the requirements of using the iCloud method, follow the below steps to gain access to the locked iPhone.
- Open a browser on your computer, and then, visit iCloud.com.
- Enter your Apple ID and passcode to sign in to your iCloud account.
- Choose the “All Devices” option at the top.
- Click on your device that is locked currently.
- Click on the “Erase” option and confirm the erase.
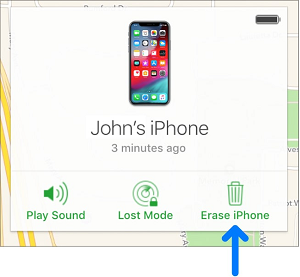
Click Erase iPhone in iCloud
You may have to enter your Apple ID again to authenticate. Once the device has been erased, your device will start as a new one. Follow the setup process and use the most recent backup to restore your device.
Way 3. Unlock Disabled iPhone via Recovery Mode
Take advantage of PhoneRescue for iOS which can help you get into your locked iPhone. With the help of this software, you can fix the iPhone locked problem in a few clicks and most importantly, without using iTunes. Whether you’ve set 4-digit passcode, 6-digital passcode, Face ID, or Touch ID, PhoneRescue will help you bring your locked device back to life in a hassle-free manner.
Free Download * 100% Clean & Safe
Are you ready to use PhoneRescue for iOS? If so, get it on your computer and follow the below steps to resolve your locked iPhone problem.
Step 1. Once download PhoneRescue for iOS, run it and choose the “Device Rescuer“>”Remove Lock Screen Passcode” option from the main interface.
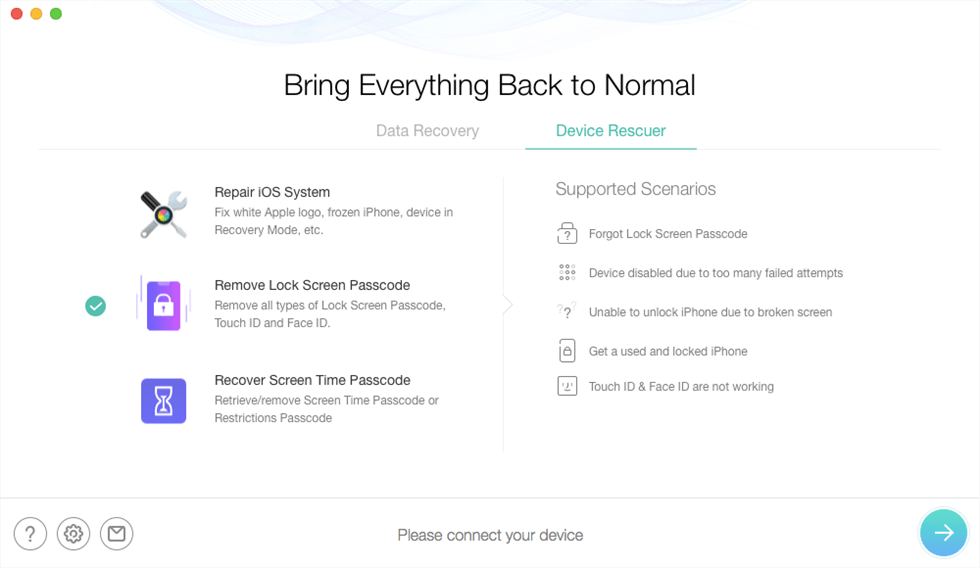
Choose the Remove Lock Screen Passcode Option
Step 2. After that, you need to connect your device to the computer with the help of a digital cable and follow the on-screen instructions to put the device into recovery mode.
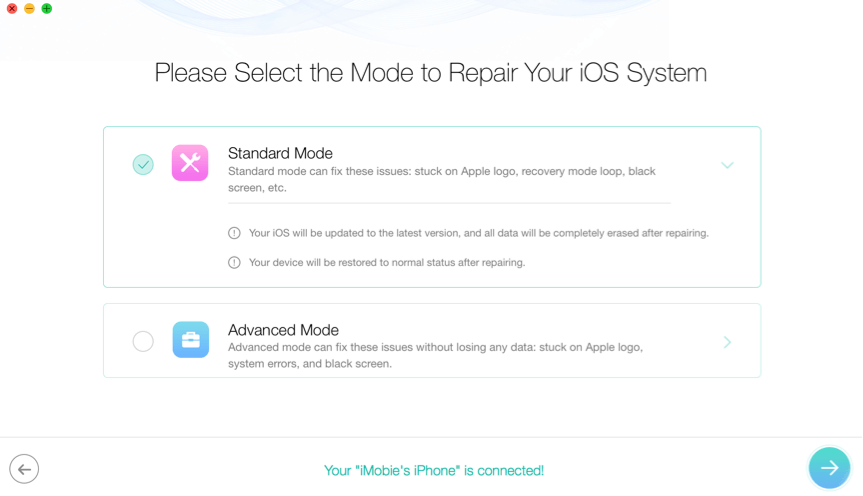
Select the Standard Mode to Repair iOS System
Step 3. Now, specify your device information and click on the “Download” button to start downloading the suitable firmware needed to resolve the problem.
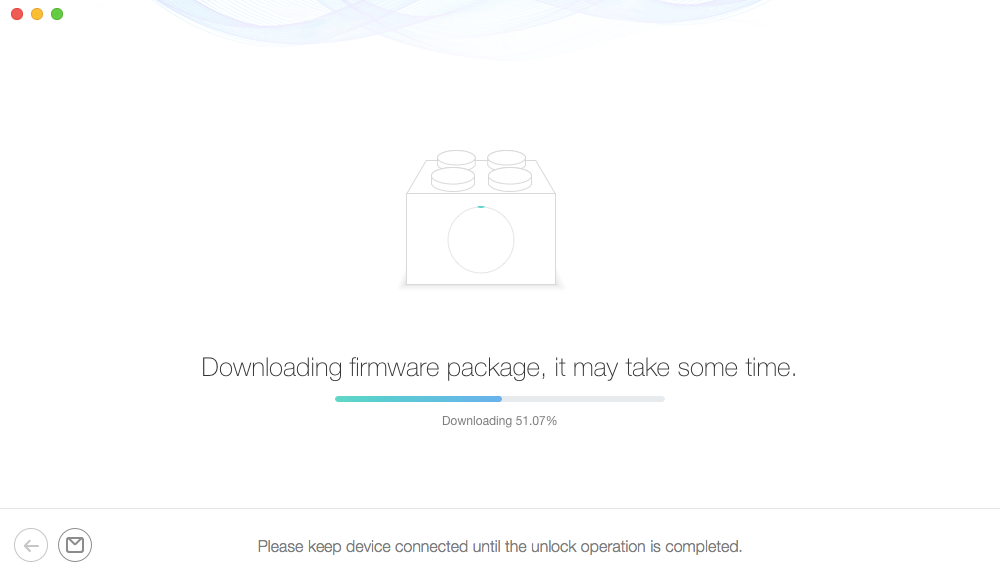
Downloading iPhone Firmware
Step 4. Once the download firmware package process completes, the software will start removing the lock screen passcode.
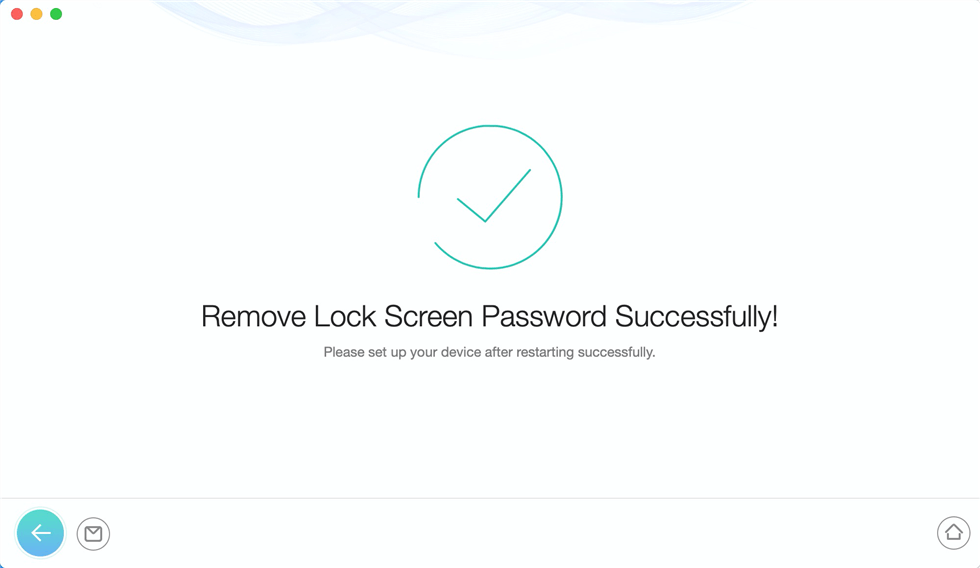
Remove the Lock Screen Passcode Successfully
When the lock screen passcode recovery process completes, restart your iPhone to access it and use it again as usual. One thing you need to note that the software will wipe out your device data in order to remove the lock screen passcode and update your device to the latest version. Nevertheless, there is no better solution to fix a locked iPhone problem easily and quickly than PhoneRescue for iOS.
The Bottom Line
That’s all about what you can do to fix iPhone Locked and Connect to iTunes error. This guide has covered every possible way to help you come out of this annoying problem. Among all, AnyUnlock is the complete way that can help you fix the iPhone password issue in the most secure and easiest way. If you still got a problem with this issue, please leave a message in the comment part.
Free Download * 100% Clean & Safe
More Related Articles

Senior writer of the iMobie team as well as an Apple fan, love to help more users solve various types of iOS & Android-related issues.
Product-related questions? Contact Our Support Team to Get Quick Solution >
