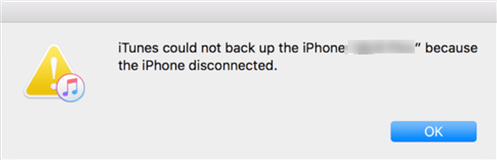
Fix: iTunes Could Not Backup the iPhone Because the iPhone Disconnected Issue
When you try to back up your iOS content via iTunes, you might receive a warning notice saying that iTunes could not back up the iPhone because the iPhone disconnected. Generally, you have no clue about this situation. Don’t worry, this article will show you the solutions to fix this problem.
Common iTunes Issues
iTunes Sync issue
iTunes Connect Problem
iTunes Backup and Restore
iTunes Music issue
Backing up and restoring iDevices from an iTunes backup should be easy, however, sometimes the backup and restore process stops or fails due to unexpected errors. Recently, many iOS users keep emailing us complaining that while backing up iDevices before an iOS update, a message pops out saying “iTunes could not back up the iPhone because the iPhone disconnected”.
iTunes Could Not Back Up the iPhone That Is Disconnected
Actually, many iOS users might also encounter problems like “iTunes could not restore the iPhone because the iPhone disconnected”,” iTunes invalid response“. If you are also stuck on such iTunes backup or restore problems, here are some quick fixes.
Part 1. iTunes Could Not Backup the iPhone Because the iPhone Disconnected
Before getting started to fix iTunes could not back up the iPhone because the iPhone disconnected problem, please make sure:
- You have connected your iPhone to your computer.
- You are using the original Apple USB cable.
- You did not jailbreak your iPhone.
Solution 1. Trying Another USB Cable
For the majority of issues about “iTunes could not back up the iPhone because the iPhone disconnected”, the USB cable is the first to be blamed. Try another USB cable and maybe you can then backup iDevices freely.
Solution 2. Resetting Network
Go to Settings > General > Reset > Reset Network Settings. All network settings might be erased. Be free to reset network settings for it does no harm to your existing data on iDevice. Many people have fixed iTunes could not back up the iPhone because the iPhone disconnected issues by resetting the network.
Solution 3. Booting Mac Computer
If you are using a Mac computer, this solution may work to solve iPhone disconnected error during backup.
Restart Mac and then press and hold the Shift key immediately, then a white Apple logo will appear, release the shift key when you see the login window.
Solution 4. Using an iTunes Alternative
If you tried the common methods above but none of them are working, it is high time to choose one 100% safe iTunes alternative tool like AnyTrans to backup and restore iOS device data. Below are its features:
- Easier & Quicker than iTunes. According to the test, it takes only a few minutes to backup piles of photos and songs.
- Selective Backup. Selectively backup iPhone data to a computer/iTunes/another iPhone via Wi-Fi.
- Full Backup. Besides the files that an iTunes backup includes, it supports backing up 10 more types of files on the iPhone.
- Incremental Backup. Back up only the new added data based on the previous backup, which saves both the backup time and storage space.
- Air Backup. Back up your iPhone/iPad/iPod automatically, wirelessly at a scheduled time (daily, weekly, monthly, etc.).
Now, Free Download AnyTrans on your computer firstly, and then follow the steps below to back up your iPhone with ease.
Free Download * 100% Clean & Safe
Step 1. Choose the Backup Manager mode.
Open AnyTrans > Plug in your iPhone, once the computer has detected your mobile phone > Click on “Backup Manager” on the left side to continue.
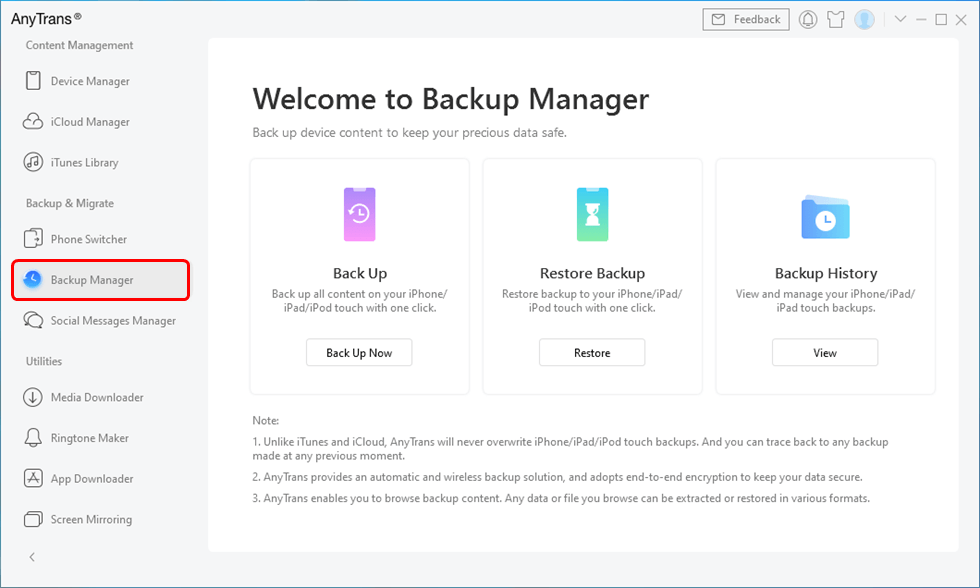
Enable Backup with AnyTrans
Step 2. Make a full backup of your iPhone.
Change the Backup Path and Click Back Up Now. And you can make a full backup for your iPhone. And before that, you can enable backup encryption or air backup and the schedule according to your needs.
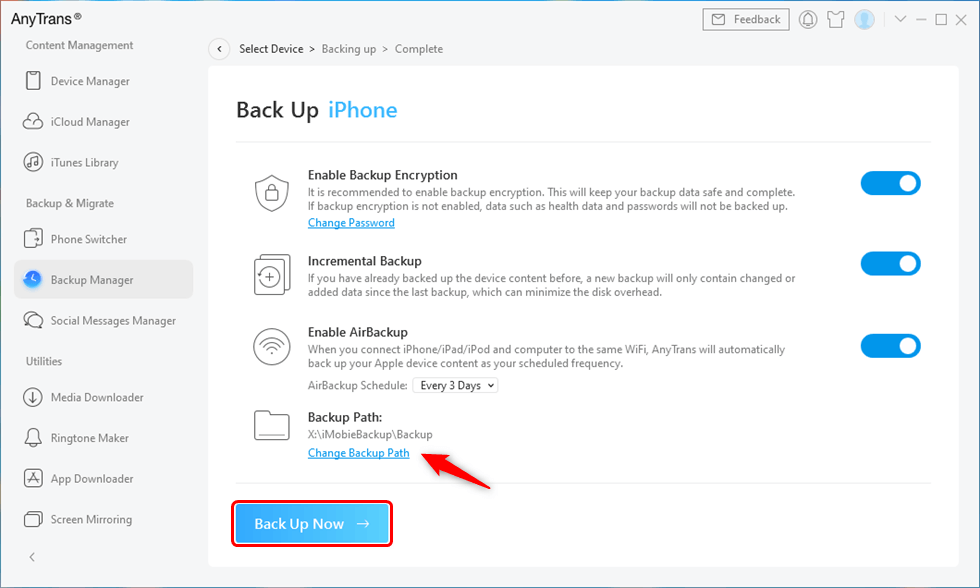
Enable Backup Options According to your Needs
Step 3. Encrypt the backup.
If you do not want to encrypt the backup, just ignore it and click Back Up Now button directly. To encrypt the backup, just toggle blue the “Enable Backup Encryption” option and set the password.
Making a backup regularly could be a time-consuming process. Actually, you can try the Air Backup mode of AnyTrans to back up your iPhone automatically, wirelessly as scheduled – daily, weekly, monthly… The Air Backup mode helps you easily backup your device within Wi-Fi or when you connect the device to the computer. You don’t need to do anything.
How to Selectively Backup iOS Data to Computer with AnyTrans
Creating a new backup with AnyTrans is a nice solution to iTunes could not back up the iPhone. However, while making backups, you can’t selectively backup data. It allows you to selectively back up data from iPhone to computer as a printable and viewable format, that is to say, if you use AnyTrans to backup iPhone data, you can have access to the data backed up on computer whenever you need.
Step 1. Free download AnyTrans on your computer and then launch it on your computer, plug in your iPhone.
Step 2. The managing content by category panel is on the right side of the main interface, select the data type you want to backup. (Take Photos as an example)
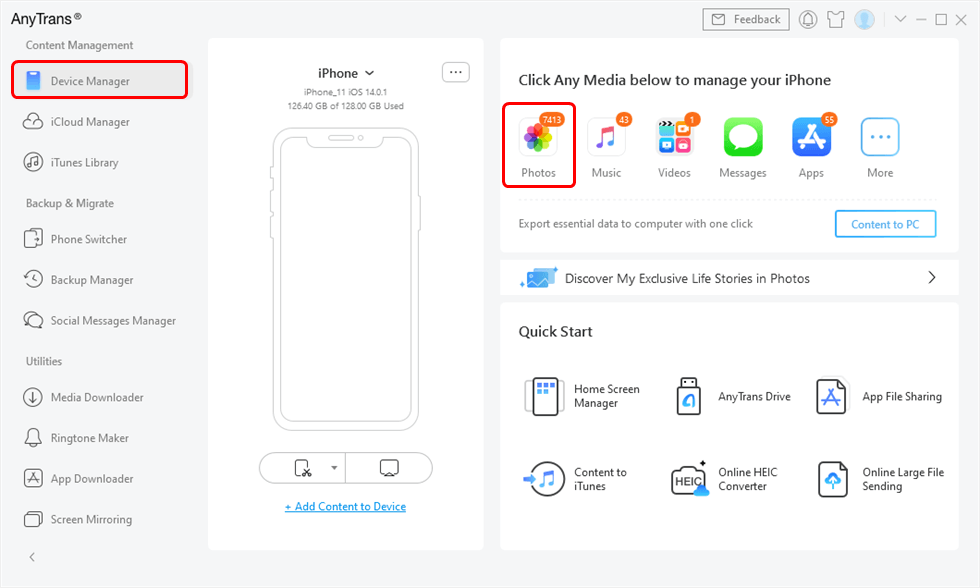
Choose Photos Category
Step 3. AnyTrans would display all photos on iDevice. Select the photos you want to backup, click the To Computer button and selected photos will soon be transferred to your computer.

Select the Photos and Send to Computer
Solution 5. Fix the iPhone Disconnected Issue with A Professional Tool
No matter what problems you have experienced while backing up iPhone to iTunes, you can solve them through an efficient troubleshooter to fix them. The typical problem will be solved via the AnyFix’s iTunes Repair with several clicks. Also, AnyFix supports solving over 200 iTunes issues and over 130 system issues without any data loss at all. Here the steps will lead a way to get out of the iPhone disconnected to iTunes while backing up data on the iPhone.
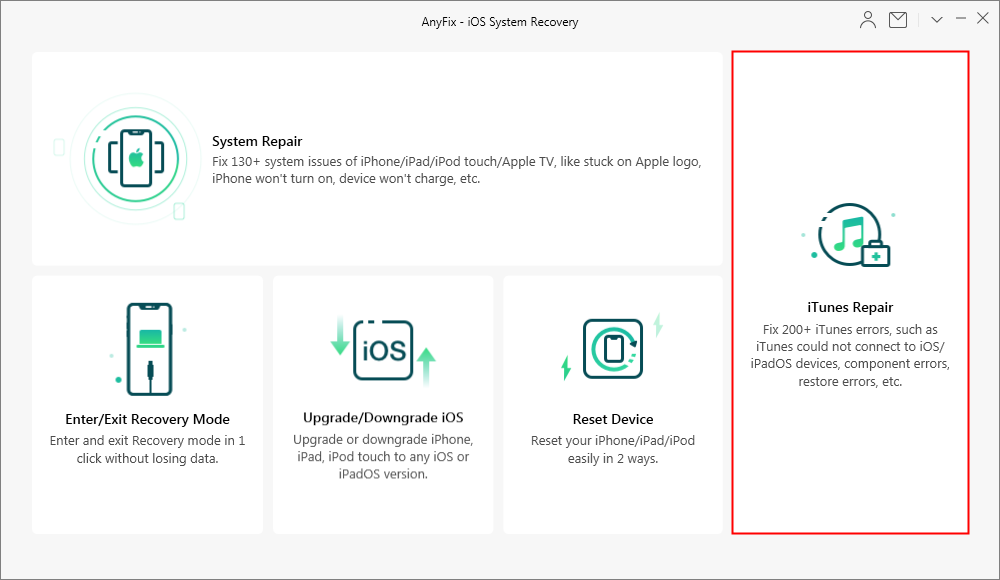
Step 1. Get the latest version of AnyFix and then launch it on your computer > choose the iTunes Repair on the right.
Free Download * 100% Clean & Safe
How to Fix iTunes Errors with AnyFix in 1 Click
Step 2. Click on the iTunes Connection/Backup/Restore Error > tap on the Fix Now to go on.
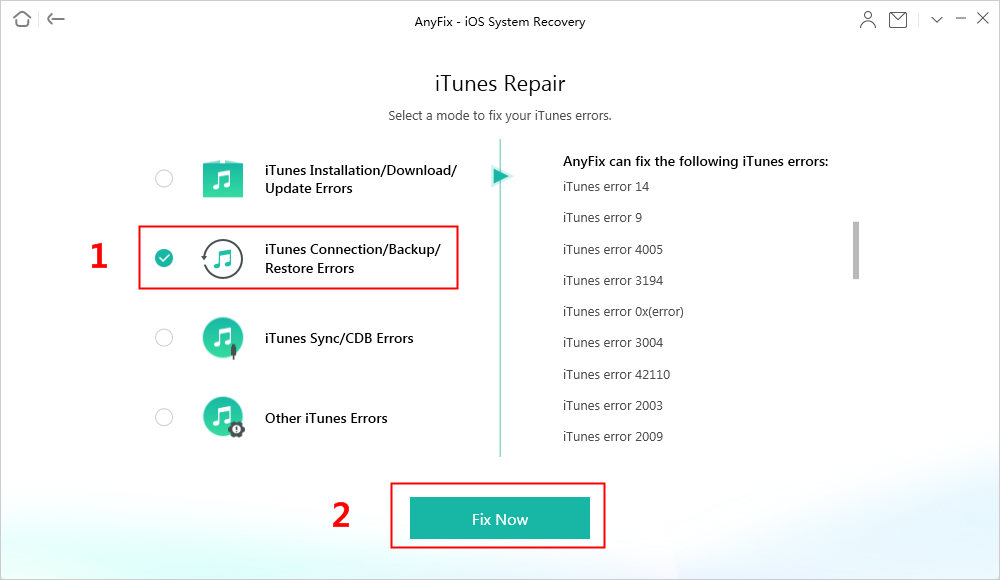
Fix iTunes Error with Anyfix Easily
Step 3. It will take minutes to analyze the component of iTunes. After analyzing, you can click on the Fix Now to fix the issue. Now you need to authorize the AnyFix an administrator right to fix the iTunes problem. Click on yes and OK button to start the journey.
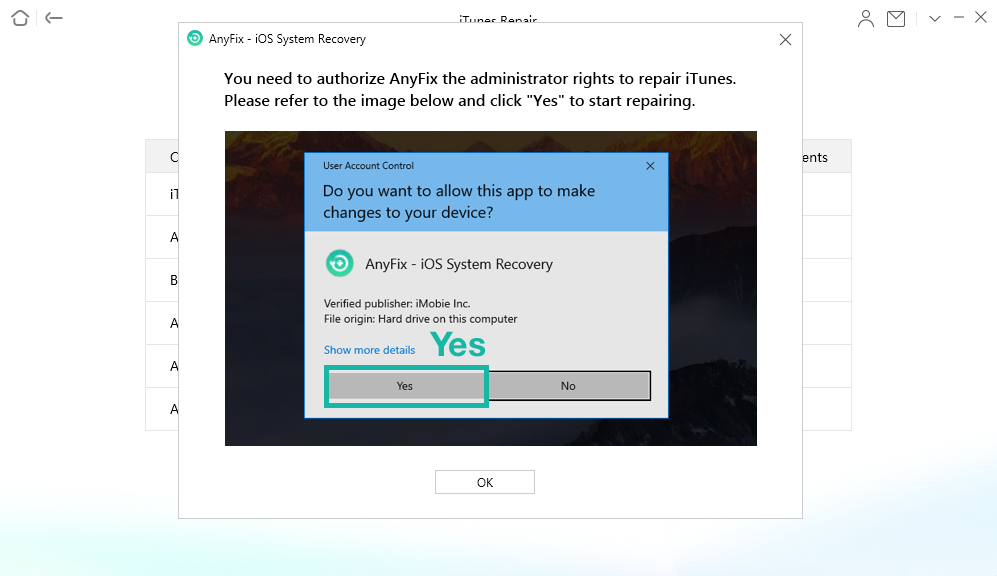
Authorize AnyFix the Permission to Repair iTunes Issues
Step 4. Minutes later, you’ll see the successfully repaired page on your screen.
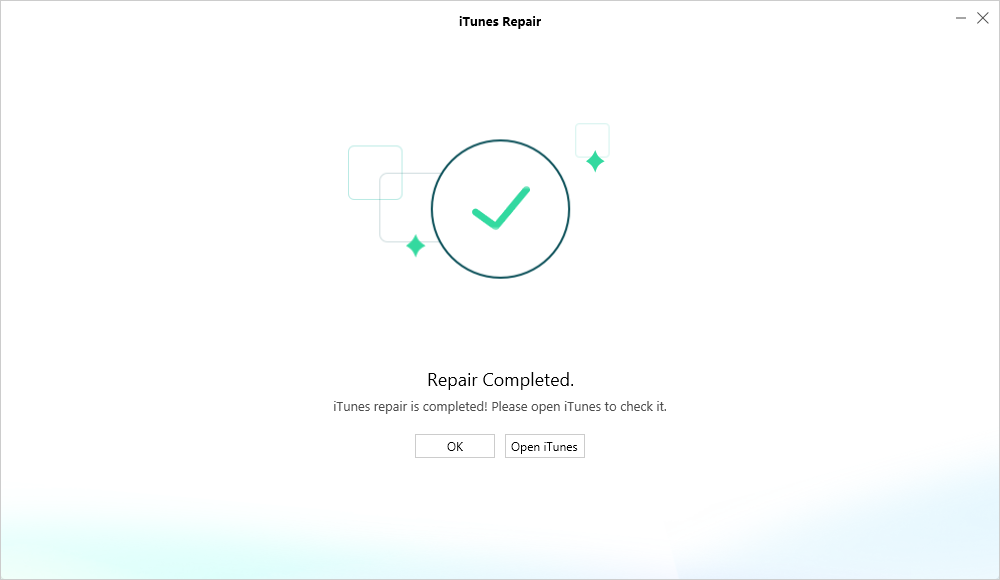
Complete iTunes Issues Repair
Solution 6. Deleting the Lockdown Folder
The lockdown folder is a protected folder on your computer containing temp data. When it goes corrupt, you need to delete the lockdown folder from your computer to be able to backup devices again. We have talked about deleting the lockdown folder from the computer before, please refer to How to Delete Lockdown Folder to know more.
Solution 7. Deleting iTunes Backup
Go to iTunes > Preferences > Devices, all iTunes backups will be displayed. Delete backups would eliminate errors caused by reading or trying to update it. Give this solution a try and see if you can fix the iPhone disconnects problems.
Solution 8. Renaming the Old Backup Folder
Matching your device identifier with the backup folder name could be helpful to solve issues of iTunes could not back up the iPhone because the iPhone is disconnected. For more detailed steps to rename the old backup folder, please refer to How to Rename the Old Backup Folder >
Solution 9. Changing the iDevice Setting
While backing up iDevice with iTunes, it is recommended to turn on Airplane mode and Low Power Mode, then turn off Background App Refresh. This could avoid disconnect errors caused by the iPhone itself.
Part 2. iTunes Could Not Restore the iPhone Because the iPhone Disconnected
When you are getting the message of “iTunes could not restore the iPhone because the iPhone disconnected”, it is necessary to find a solution that will keep the data you’re trying to restore intact. There are three solutions below can be helpful.
Solution 1. Changing USB Cables
Just like fixing iTunes could not back up the iPhone, maybe it is the USB cable that should be blamed. Change the USB cable or switch to another USB port and try again, the problem should be fixed.
Solution 2. Booting iDevice and Computer
This is a solution that many iOS users forget to try. This is certainly the easiest thing you could do to fix the iPhone disconnects errors during restore. Restart both your iPhone/iPad and your computer, then try to restore the iTunes backup again.
Solution 3. Using PhoneRescue for iOS
If you tried all methods mentioned above but failed, there is still one last solution you can try to fix the problem of iTunes could not restore the iPhone because the iPhone disconnected – using a third-party restoring tool – PhoneRescue for iOS.
PhoneResue for iOS is developed to serve iOS users to recover data. It can be used to restore the iPhone with the previous backup even if iPhone disconnects error occurs. What’s more exciting, you can selectively restore data from iTunes backup to iPhone, that is to say, if you just want to get back some missing data, you don’t have to suffer from the risks of losing existing data.
Here is how to restore iPhone with previous iTunes backup with PhoneRescue for iOS.
Step 1. Free download PhoneRescue for iOS to your computer and then launch it. Please make sure there are previous iTunes backups on the computer.
Free Download * 100% Clean & Safe
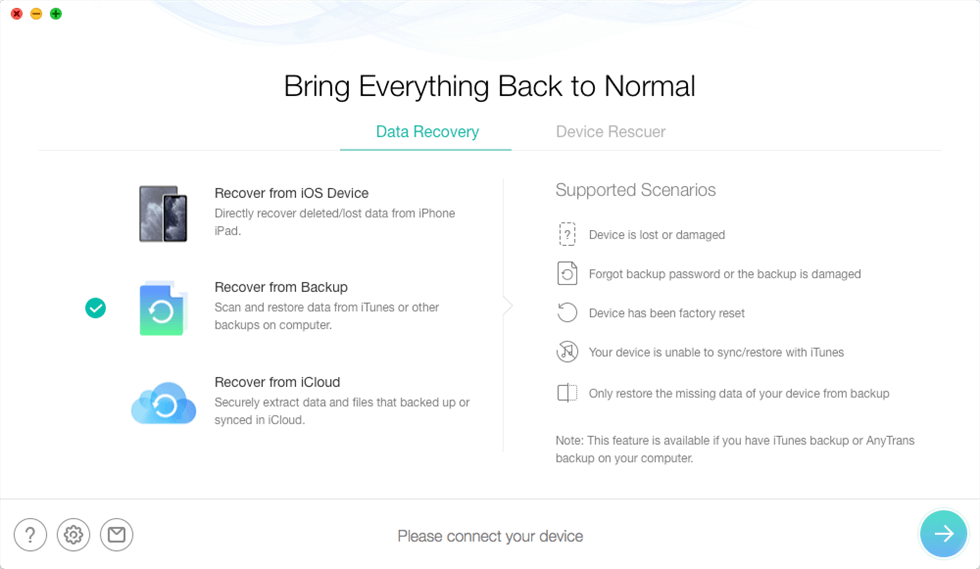
Step 2. Connect your iPhone to your computer via a USB cable. Select Recover from Backup, then click the Right Arrow button to continue.
Recover Data on iPhone with iTunes Backup
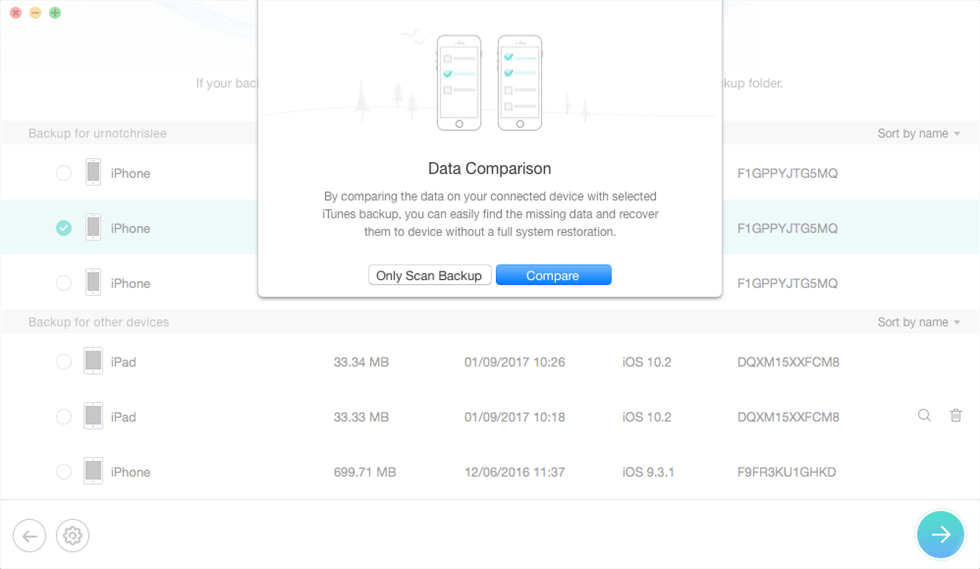
Step 3. PhoneRescue for iOS data recovery would display you all previous iTunes backups. Select one backup and click the Right Arrow button again. Then click Only Scan Backup if you want to view the data in iTunes Backup, click Compare if you want to find out the differences between the data in iTunes backup and iPhone.
Choose iTunes Backup on iPhone
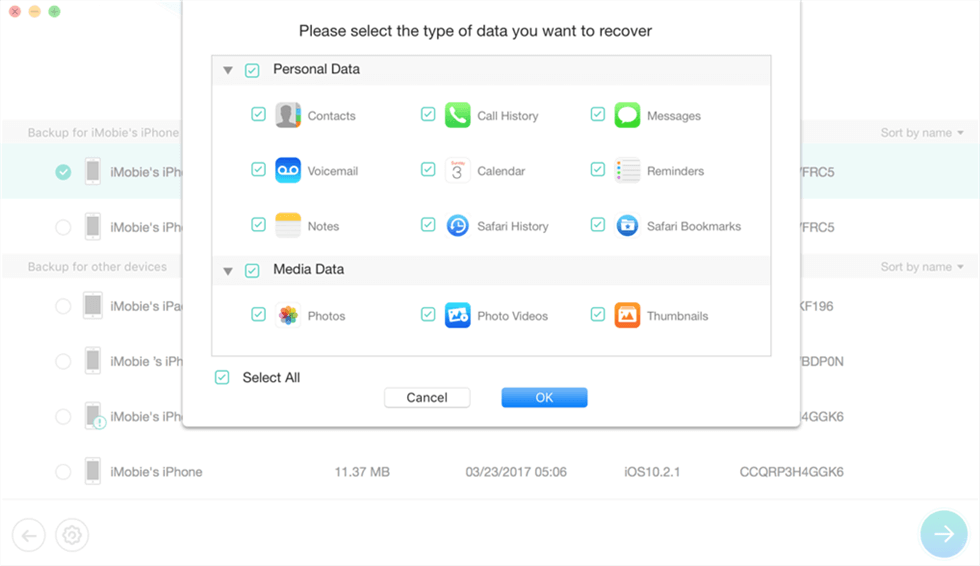
Step 4. Select the data type you want to restore to iPhone from iTunes backup, don’t forget to click OK.
Select the Data Type
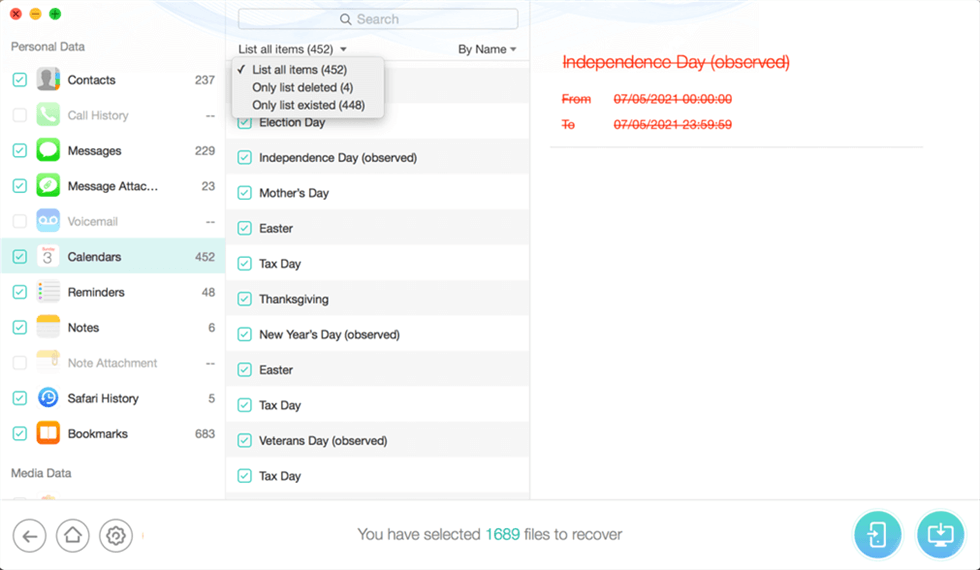
Step 5. It would display all data in iTunes backup. Select the data you want to restore to your iPhone, click the To Device tab. You can also save these data on the computer as a printable and viewable format.
Recover to Device or Computer
The Bottom Line
That’s all for solutions for iTunes could not backup/restore iPhone because the iPhone disconnected. If you are having any problems, please do leave comments below. By the way, AnyTrans offers all users a 3-day free trial and you can transfer 30 items a day. Besides, it is always free to use PhoneRescue for iOS to scan and view the contents in iTunes backup, why not download them and have a try?
More Related Articles

Senior writer of the iMobie team as well as an Apple fan, love to help more users solve various types of iOS & Android-related issues.
Product-related questions? Contact Our Support Team to Get Quick Solution >
