How to Recover Data from Disabled/Locked iPhone without Backup
Searching for a way to recover data from locked/disabled iPhone without backup? In this tutorial, we are going to share you a reliable and efficient method to help you recover data from locked/disabled iPhone without backup in minutes.
iPhone Recovery Tips & Issues
iPhone Data Recovery Tools
Recover Data from Broken iPhone
iPhone Recovery Problems
PhoneRescue for iOS – Recover Data from Disabled iPhone without Backup
How to recover data from locked iPhone, especially when you don’t have a backup? Luckily, PhoneRescue for iOS helps you to recover data from disabled/locked iPhone without backup, easily & quickly. All data types can be recovered, like photos, videos, messages, etc.

To prevent any access from others and protect our privacy information at the same time, almost all iPhone users would like to set a password on their devices. Some of you may even change the password regularly to ensure security. But if you forget your password accidentally or enter the wrong passcode several times, your iPhone will be locked or get a message saying that iPhone is disabled connect to iTunes or that iPhone unavailable. That is to say, you will not be able to use your iPhone, let alone access any of the data on it.
So, if you’re looking for methods to recover data from locked iPhone, especially when you haven’t backed up iPhone, this page is coming to help. Since nobody wants to suffer from data loss, here in this guide, we’ll share with you efficient methods how to recover data from disabled iPhone without backup.
Can You Retrieve Data from a Disabled iPhone?
Certainly Yes!! You can retrieve data from a disabled iPhone. Once you have installed iTunes on your computer and connected your iPhone with a USB cable, your iPhone would have backed up all your iPhone data on the computer. What’s more, every time you connect your iPhone to the computer, iTunes would auto-backup your iPhone data. And you can use this iTunes backup to complete iPhone unavailable data recovery.
Moreover, iPhone has an Automatic sync function once your iCloud backup is enabled. It indicates that when your iPhone was in charge, connected WiFi, and locked, your data would be auto-synced to iCloud. Therefore, you can restore a disabled iPhone without trusting a computer via iCloud service.
However, if you haven’t backed up your iPhone data to iTunes or iCloud, how to recover data from disabled iPhone without backup? Fortunately, there are still ways for you to do that. So just read on to see the methods in detail.
How to Recover Data from Disabled iPhone?
As we mentioned above, you can recover data from disabled/locked iPhone through backups after you re-enable your device. You can follow Apple’s way to enable and recover data from locked/disabled iPhone.
- Enable and recover data from disabled iPhone via iTunes.
- Enable and recover data from disabled iPhone via Recovery Mode.
- Enable and recover data from disabled iPhone via using Find My iPhone on another iOS device.
If you find out your iPhone had backed up, you can erase your iPhone to re-enable your iPhone and restore your data from your backups. However, Apple’s way doesn’t allow you to preview and restore the data selectively. As a professional data recovery tool, PhoneRescue for iOS would be a better choice to view iPhone backup files and recover data from disabled iPhone without backup.
How to Recover Data from Disabled iPhone without Backup?
If you fail to unlock your disabled iPhone or you didn’t back up your iPhone via iCloud or iTunes, you are highly recommended to use another professional iPhone data recovery tool to recover data from disabled/locked iPhone without backup. Among the most effective iPhone data recovery software, PhoneRescue for iOS is worth your trying! As a professional iOS data recovery tool, PhoneRescue for iOS supports you to recover data from a disabled or broken iPhone, data mistaken deletion, factory reset, failed Android software update, and other situations. No matter you’ve backed up your Android device or not, you can all free install PhoneRescue for iOS to recover data from disabled/locked iPhone without backup or with iCloud or iTunes backup. In the following sections, we’ll have a closer look at how to use PhoneRescue for iOS to recover data from disabled/locked iPhone without backup.
Free Download* 100% Clean & Safe
Method 1. How to Retrieve Data from Locked/Disabled iPhone without Backup
With PhoneRescue for iOS, you can get all data off a disabled iPhone in simple clicks and minutes, like photos, contacts, videos, messages, etc. And you can also freely view and choose what you really need to recover. Most importantly, no data loss or overwriting. So now free download PhoneRescue for iOS on your computer. Here, we will take photos as an example, and just follow the detailed tutorial below to see how to recover photos from disabled iPhone without backup in just 3 simple steps.
Step 1. Run PhoneRescue for iOS
Launch PhoneRescue for iOS on your Mac/PC computer and connect your locked/disabled iPhone/iPad to the computer via its USB cable > Choose Recover from iOS Device option and click Scan button on the bottom right corner.
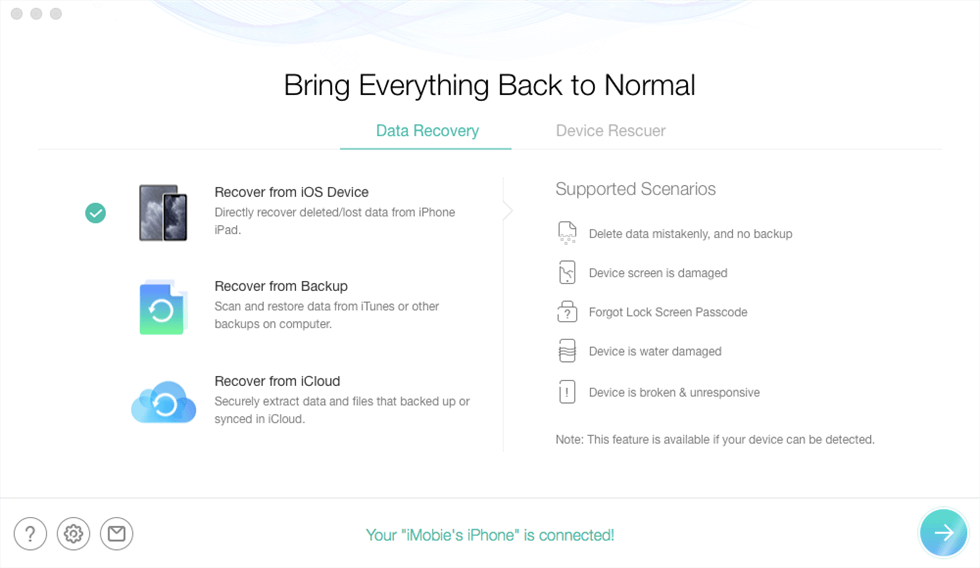
Choose the Recovery from iOS Device Mode
Step 2. Choose the Files and Scan the iPhone
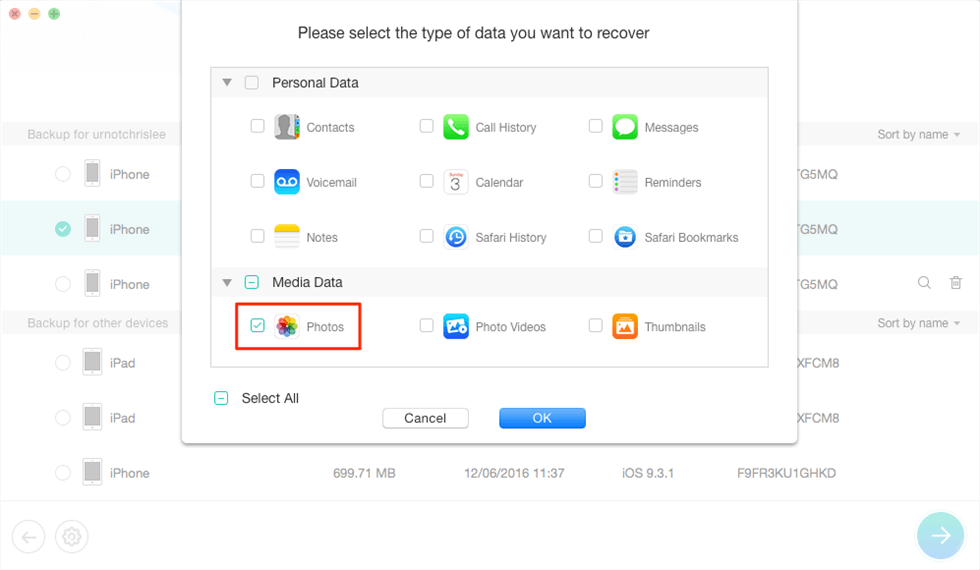
Check the categories you want to recover > Click the OK button to proceed.
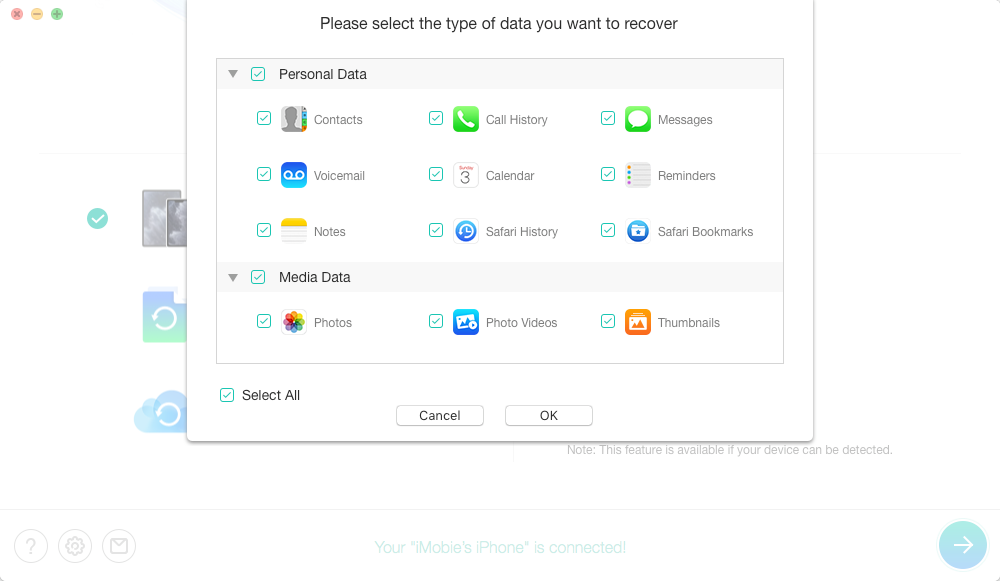
Click the Categories You Want to Recover
Step 3. Preview and Recover the Files to iPhone/Computer
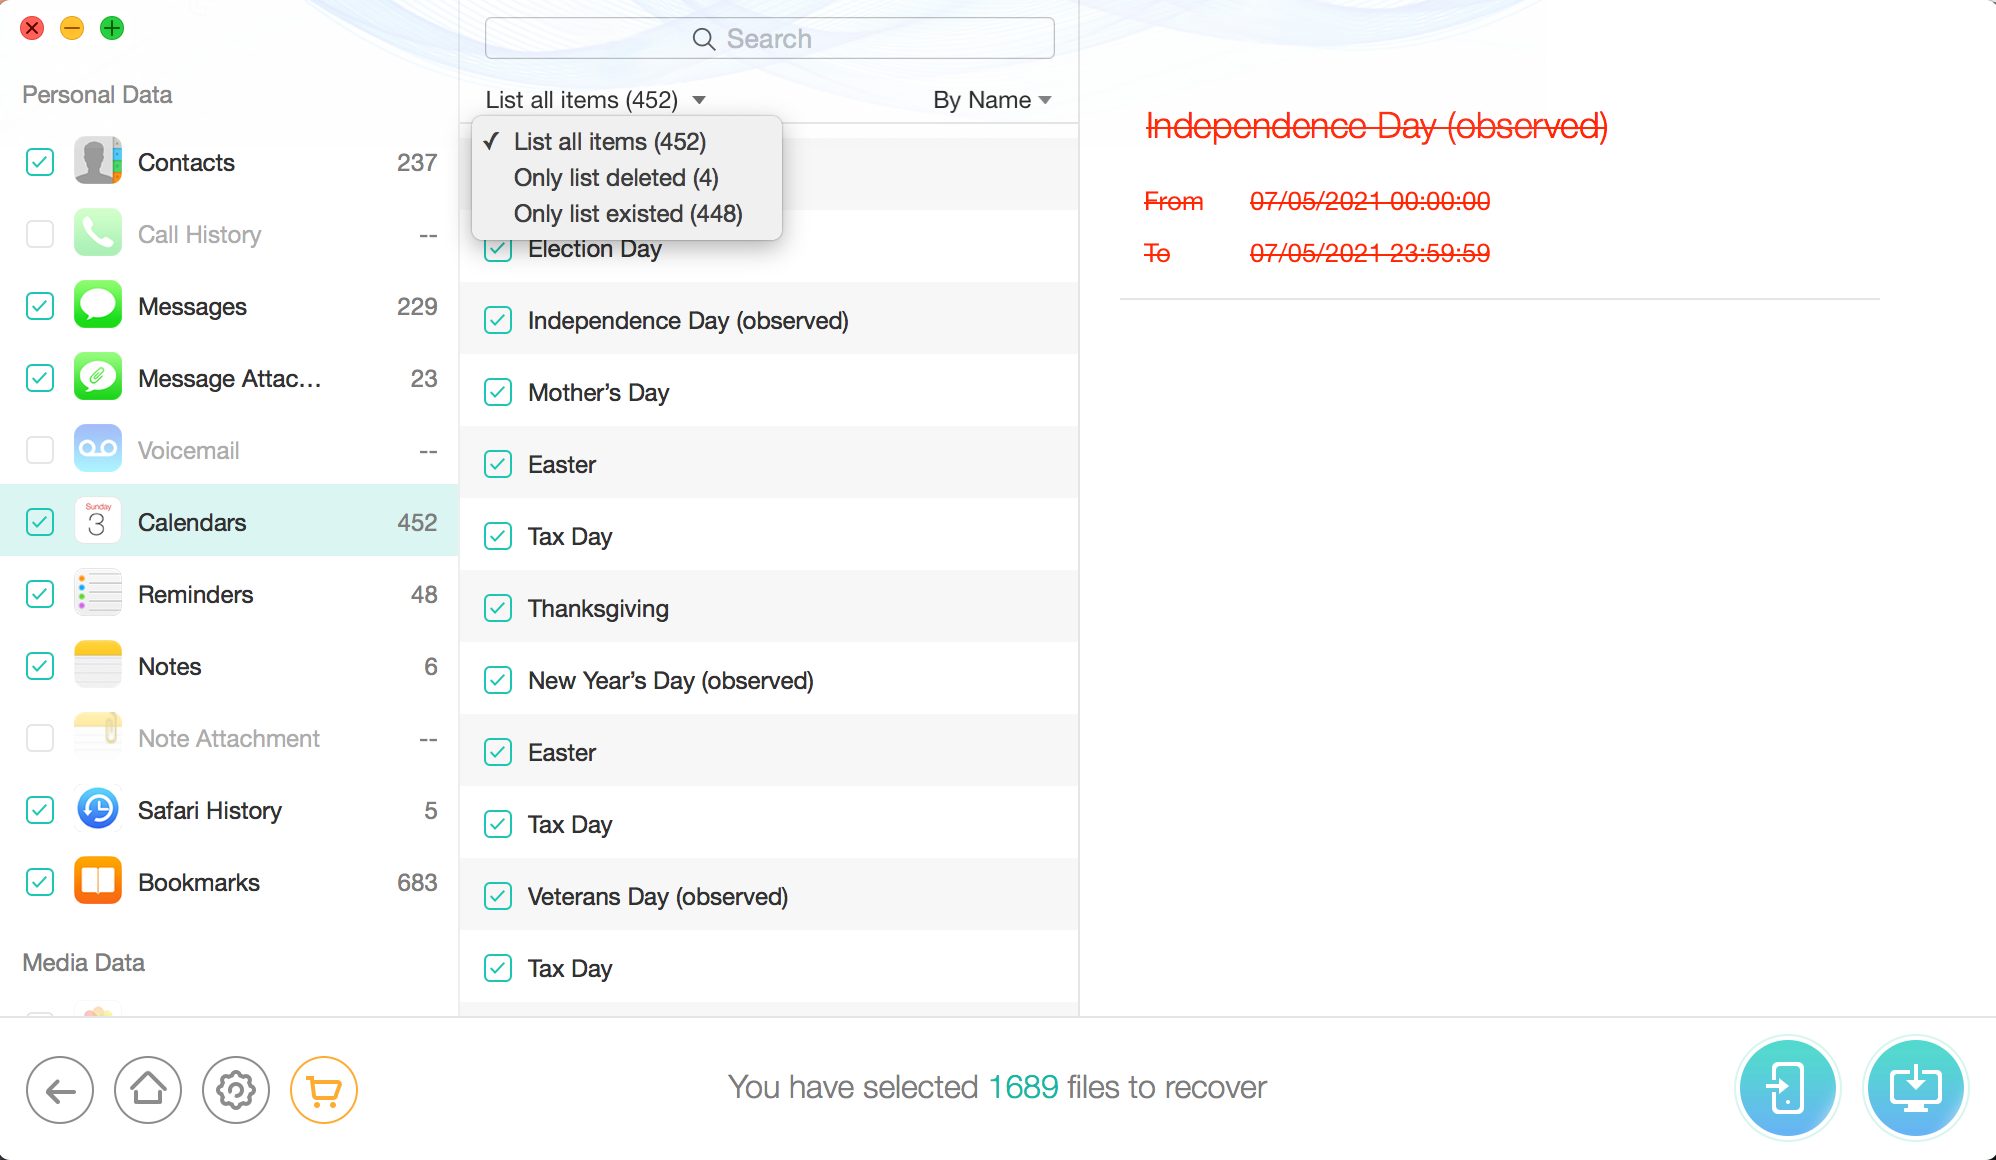
Preview and select the data you want to recover after the scanning process completes > Click To Device button to recover them to iPhone’s correspond app directly, or you can choose to store them on your computer by clicking To Computer button.
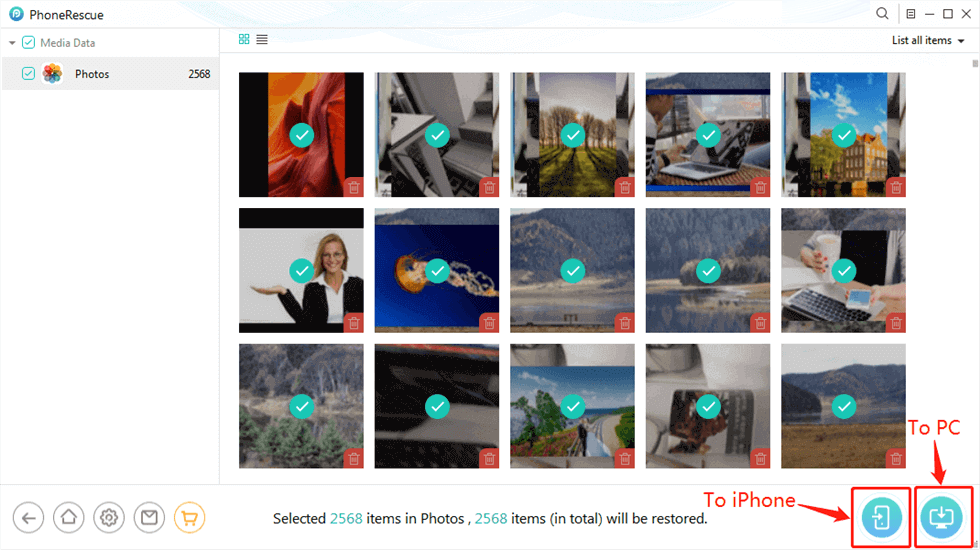
Recover Data to iPhone/Computer Directly
Method 2. Retrieve Data from Locked/Disabled iPhone Using Backup
Also, you can recover the locked iPhone data from your backup if you have one. If not, don’t worry, you can also make it with ease. All you need to do is 3 steps.
- Make a full backup of your locked/disabled iPhone with iTunes.
- Erase your iPhone.
- Restore the backup data to your iPhone.
1. Make a full backup of your locked/disabled iPhone with iTunes.
If you have backed up your iPhone in iTunes before and haven’t restart your iPhone after you connected it to iTunes in the last time, then iTunes won’t ask you to enter your password to back up the device again. So, you’re lucky enough to back up your locked iPhone with iTunes as usual.
2. Erase your iPhone.
After making a full backup of the locked/disable iPhone data, now you can erase your iPhone without worries. To erase a locked iPhone or a disable iPhone, you can use iTunes or iCloud to easily make it. If you’re not very clear about how to do, you can follow this step-by-step tutorial.
3. Restore the backup data to your iPhone.
Now, your iPhone is unlocked, but there is no data on it. To get back your data to the iPhone, you can restore the backup you’ve made before by using iTunes. Certainly, you can also use the iTunes alternative – PhoneRescue for iOS to selectively and quickly restore accurate data from the backup to your iPhone. Here is how to do it.
Free Download * 100% Clean & Safe
Step 1. Run PhoneRescue for iOS on Computer
Free download and install PhoneRescue for iOS on your Mac or PC computer > Launch it and select Recover from iTunes Backup. (If already install it, you can open it directly.) > Connect your iPhone to the computer and click the arrow button.
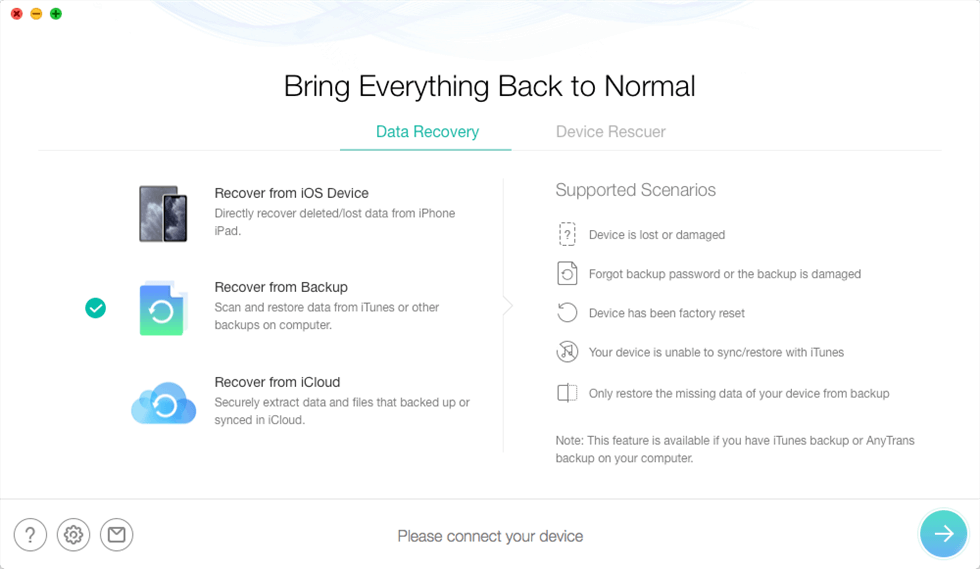
Select Recover from Backup
Step 2. Choose the Backup You Want to Recover
Select the backup you made in advance > Click Right Arrow > Check the file categories you prefer > Click OK button to scan the backup files.
Extract iPhone Photos from iTunes Backup
Step 3. Preview and Recover the Files to iPhone/Computer
Preview and select data you want to restore to your unlocked iPhone > Click To Device button at the bottom right corner.
Preview and Recover the Data to iPhone/Computer
- How to Unlock Disabled iPhone without Computer or iTunes or iCloud >
- How to Backup a Disabled iPhone >
- How to Disable Find My iPhone/iPad without Password >
- How to Fix “iPhone is disabled. Connect to iTunes” Issue >
Bonus Tip. How to Unlock a Disabled iPhone without Losing Data?
Now you know the ways to recover data from a locked iPhone. Then, is there a way to unlock a disabled iPhone without losing data? Unfortunately, Apple takes privacy very seriously, so you can’t unlock and fix iPhone unavailable without losing data.
So, how to unlock a disabled iPhone? Here’s a professional iPhone password unlocker – AnyUnlock for you. No matter whether your iPhone is disabled, iPhone is unavailable, your Face ID or Touch ID is not working or you’re stuck in iCloud Activation Lock, AnyUnlock will help you get out of the dilemma with simple clicks. And it supports unlocking all iOS screen locks, like numeric passcode, Face/Touch ID, pattern, PIN, etc.
Besides, AnyUnlock enables you to unlock iTunes backup password, remove the screen time, bypass iCloud Activation Lock, remove Apple ID, and more. If you are interested in AnyUnlock, free download AnyUnlock and follow the steps below to see how to unlock a disabled iPhone.
Before we start, there’s something you need to pay attention to:
- All the existing content and settings on your device will be erased once the removing process is completed, please make sure you’ve made backups of your device.
- After unlocking, your iOS system version will be updated to the latest version.
- If Find My iPhone on the device is turned on, you need to enter the iCloud account password to set the phone after unlocking.
Step 1. Run AnyUnlock on Computer
Launch AnyUnlock on your computer, and connect your iPhone to it. When AnyUnlock has detected your device, click “Unlock Screen Passcode”.
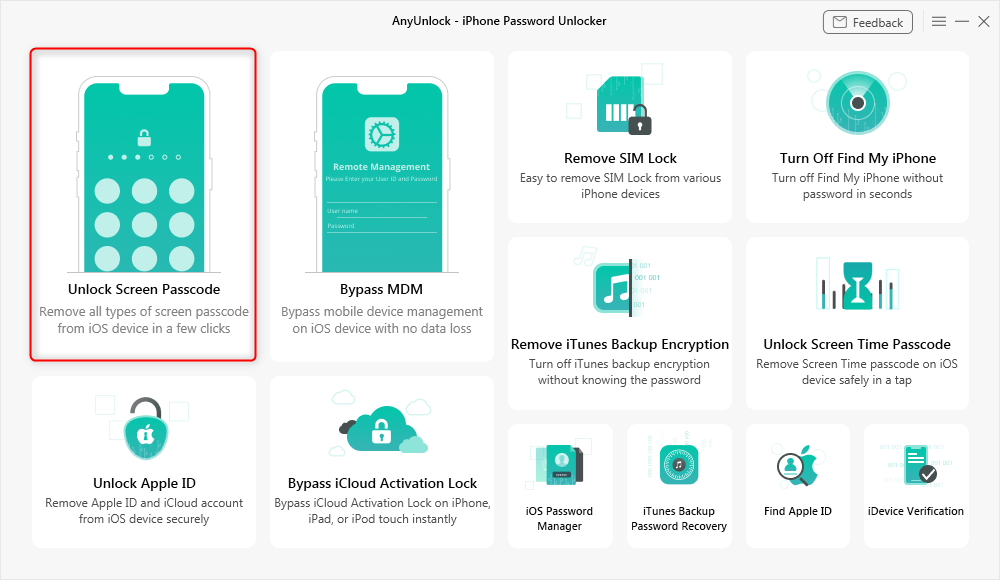
Choose Unlock Screen Passcode
Step 2. Download the iOS Firmware
Follow the on-screen instructions to get your iOS device into recovery mode > Download the iOS firmware, this is for unlocking the screen passcode. It might take a long time to download the package, so please just keep patient.
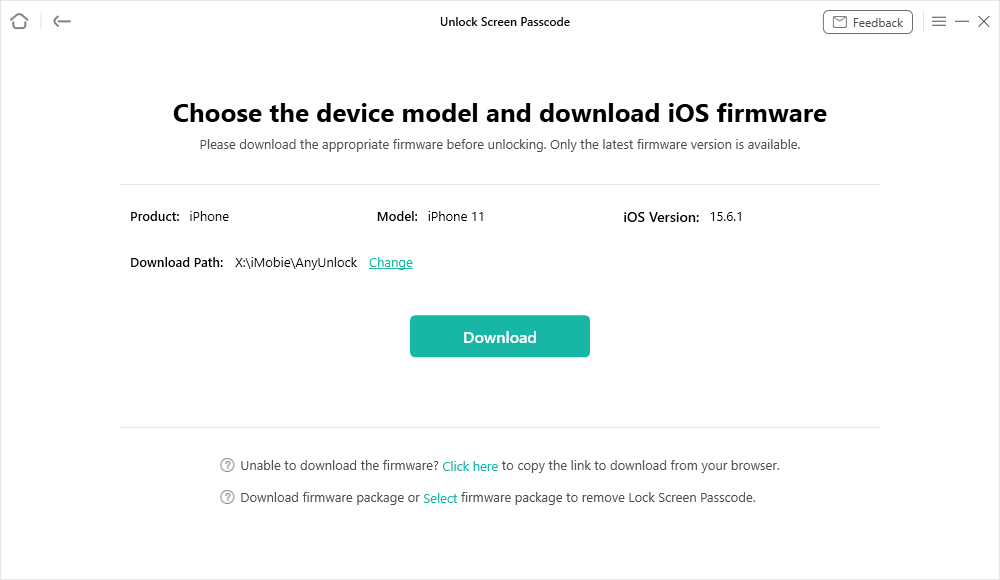
Get a Matching Firmware
Step 3. Start to Unlock the Passcode
When the firmware downloading is finished, click the “Unlock Now” option. Then AnyUnlock will unlock the screen passcode automatically. Please do not disconnect your device until it restarts.
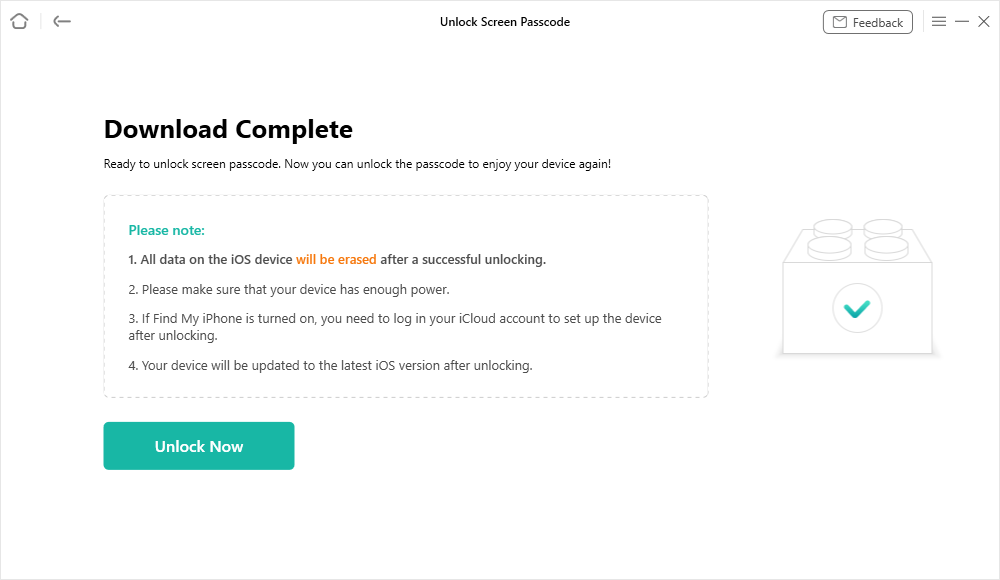
Tap on Unlock Now to Remove Screen Passcode
Step 4. Successfully Remove the Passcode
And when the recovery process is completed, you will see the “Screen passcode removed successfully” interface.
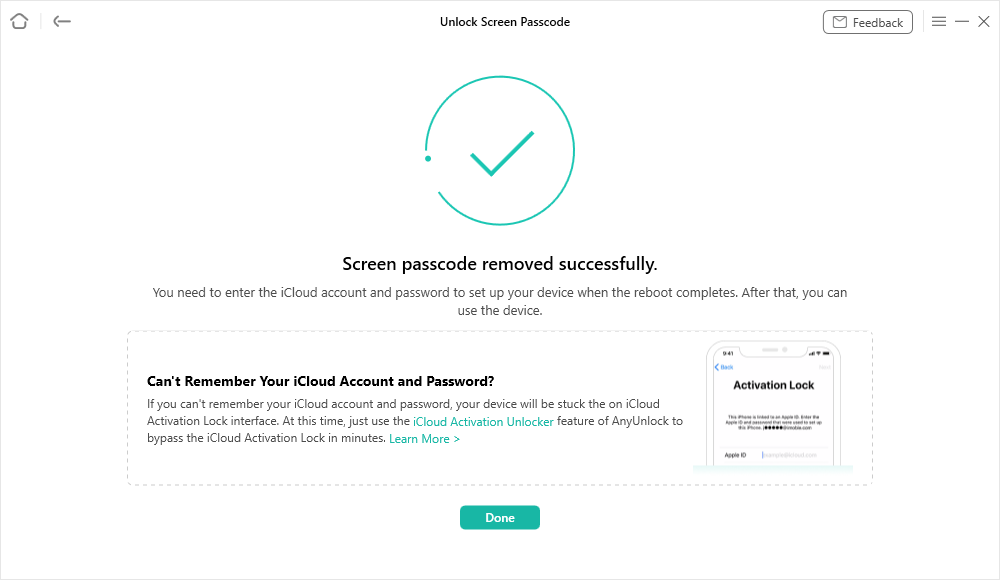
Screen Passcode Removed Successfully
The Bottom Line
As you can see from above, with PhoneRescue for iOS, it is easy enough to recover data from a locked/disabled iPhone with or without backup. These methods also apply to iPad. So, don’t hesitate to have a free try now. The sooner you act, the higher the success rate you will get. OK, as a mobile phone user, some risks you may have encountered. Therefore, usually backing up your device will ensure the memories/information that matters to you are always on your back.
Free Download * 100% Clean & Safe
More Related Articles

Joy Taylor is a seasoned technical writer with over a decade of experience in mobile technology. At iMobie, she specializes in producing in-depth content on iOS data recovery, iPhone unlocking solutions, and iOS troubleshooting.
Product-related questions? Contact Our Support Team to Get Quick Solution >
